
Click here if you want to skip the intro and get to the good stuff.
My Case Against 3D Printing
I’m becoming more aware of my stubbornness and resistance to new trends as I’ve gotten older. I don’t think it’s necessarily because I’m older, but maybe I’m wrong about that. Some might call me a Luddite, and there’s a grain of truth to that. But I don’t think it stems from a fear of new technology, or a resistance to change for the sake of resisting change. I think instead it’s born out of my past experience with hype cycles and the sheer number of them that I’ve witnessed come and go. How is this really different? Does this really benefit us, or is it just another scheme for extracting value from an already sucked dry industry? Is this really revolutionary or is it just a Reheated Idea™ from years ago that failed for all the same reasons this is doomed to fail?
3D printing was one of those things that I just wasn’t quite sold on when they first started appearing in the consumer market. At the time, I remember hearing the buzz around Repraps and early 3D printers and I ultimately concluded that they were novelties, not useful for much of anything beyond printing poorly made keychains and toys. And if you look at some of the most popular sites for sharing 3D printed object files, like Thingiverse, or Thangs, or the 3D printing Sub-Reddit, you’ll see that there are quite a lot of exactly the kind of tripe I wasn’t interested in wasting money on. I don’t care about Sonic the Hedgehog game controller stands, gear shaped fidget spinners, or flexible print-in-place dragons. I’m not saying these aren’t perfectly good uses for a 3D printer, it’s just not for me. Why buy a whole 3D printing setup just to print off some bad decorative items, especially when you could get better injection molded versions of the same thing off Amazon for arguably less than it would cost to print?
Another problem I had with the idea of 3D printing, more of a misconception than an actual problem, was the commonly held belief that 3D prints are easy to break. I’d gleaned from Reddit posts and other discussions with people about 3D printing that they were objectively inferior to other manufacturing techniques because the end products are weak, and not useful for anything but prototypes. Why would I want something like this? I’m not going to do rapid prototyping in my home. I’m not trying to invent something to bring to market, so why bother with a 3D printer?
On top of the perceived lack of utility, I’ve also become more concerned lately with the environmental impact of our wanton use of plastic in everything from all manner of packaging, to medical devices, to single use coffee pods. Most of it is nearly unavoidable today; our entire modern world is practically wrapped in plastic. So why then would I want to buy a thing that will likely further contribute to this growing pile of plastic waste? Don’t we have enough? I’m not going to bury the lede entirely here; part of my change in opinion around 3D printing centers on my anecdotal experience that it can (maybe) reduce waste. I wasn’t convinced there was a need, especially considering I hadn’t quite grasped the actual benefit of having a cheap plastic manufacturing plant in my own home.
What Changed My Mind
Despite all of my reservations, I still kind of wanted one, just to see what it was about. Not enough that I would actually buy one for myself, but if my wife was looking for a fun toy to give me for Christmas or my birthday or something, I wouldn’t complain. So I added a very reasonably priced one to my Amazon wishlist and forgot about it for a few years. I remember being a bit disappointed she didn’t pick it out for me that first year, but I wasn’t too worried about it. After all I knew I wouldn’t really use it that much once the novelty wore off, right?
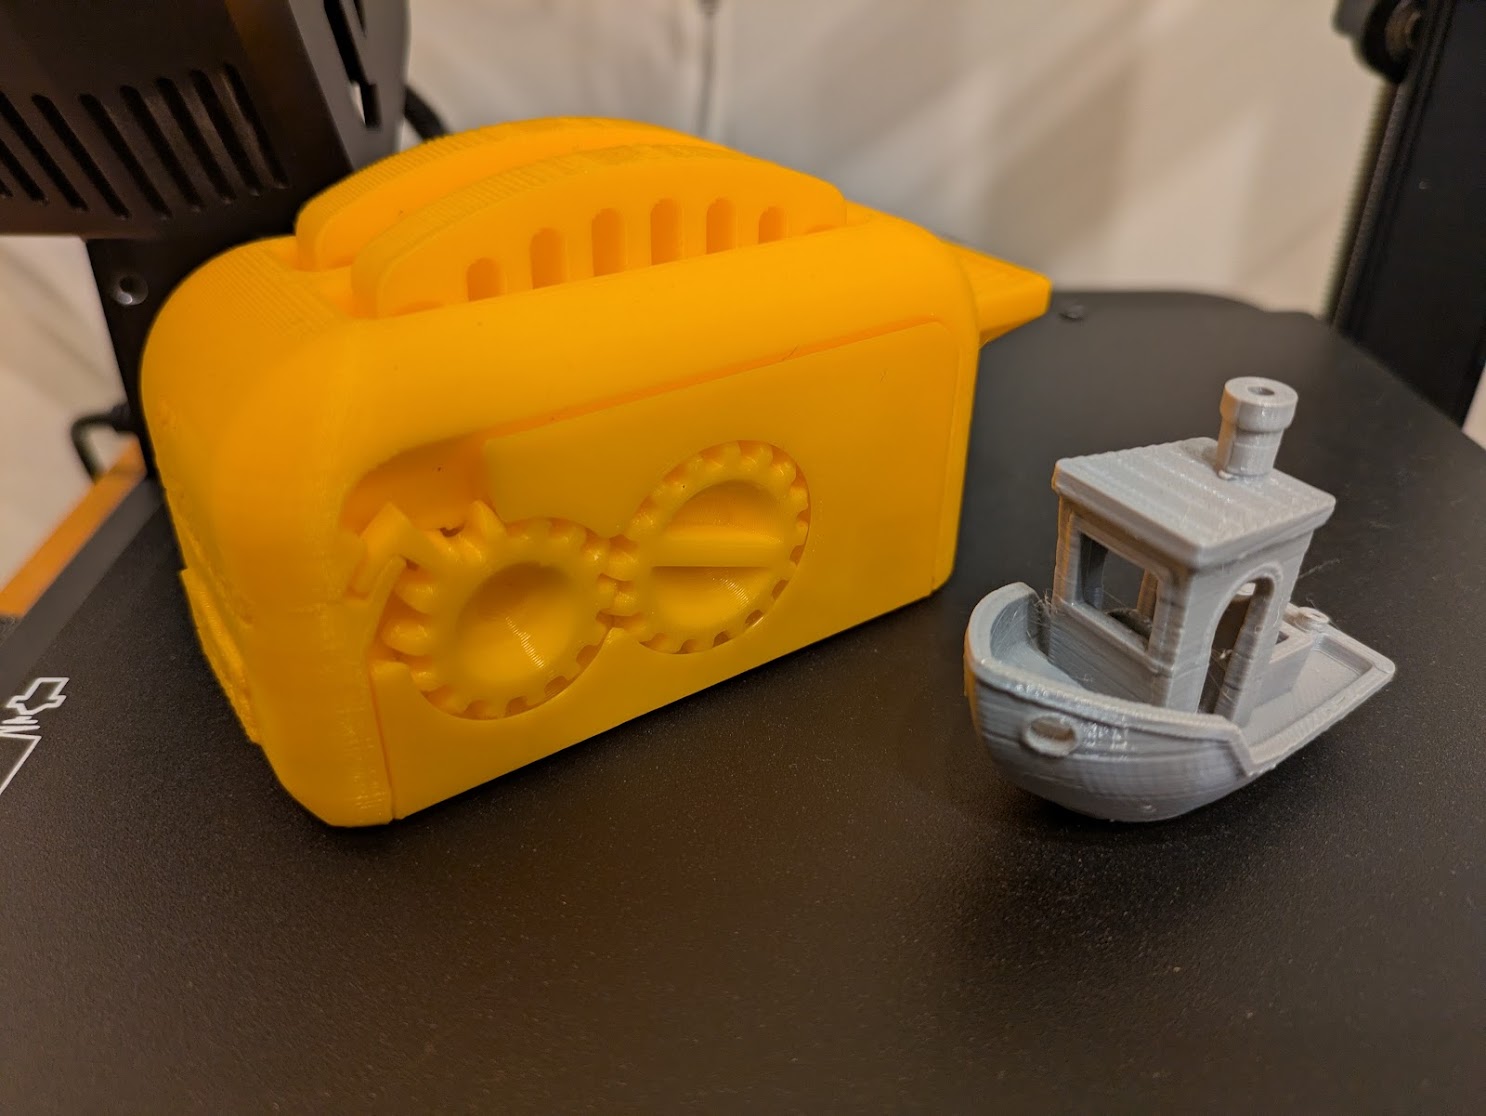
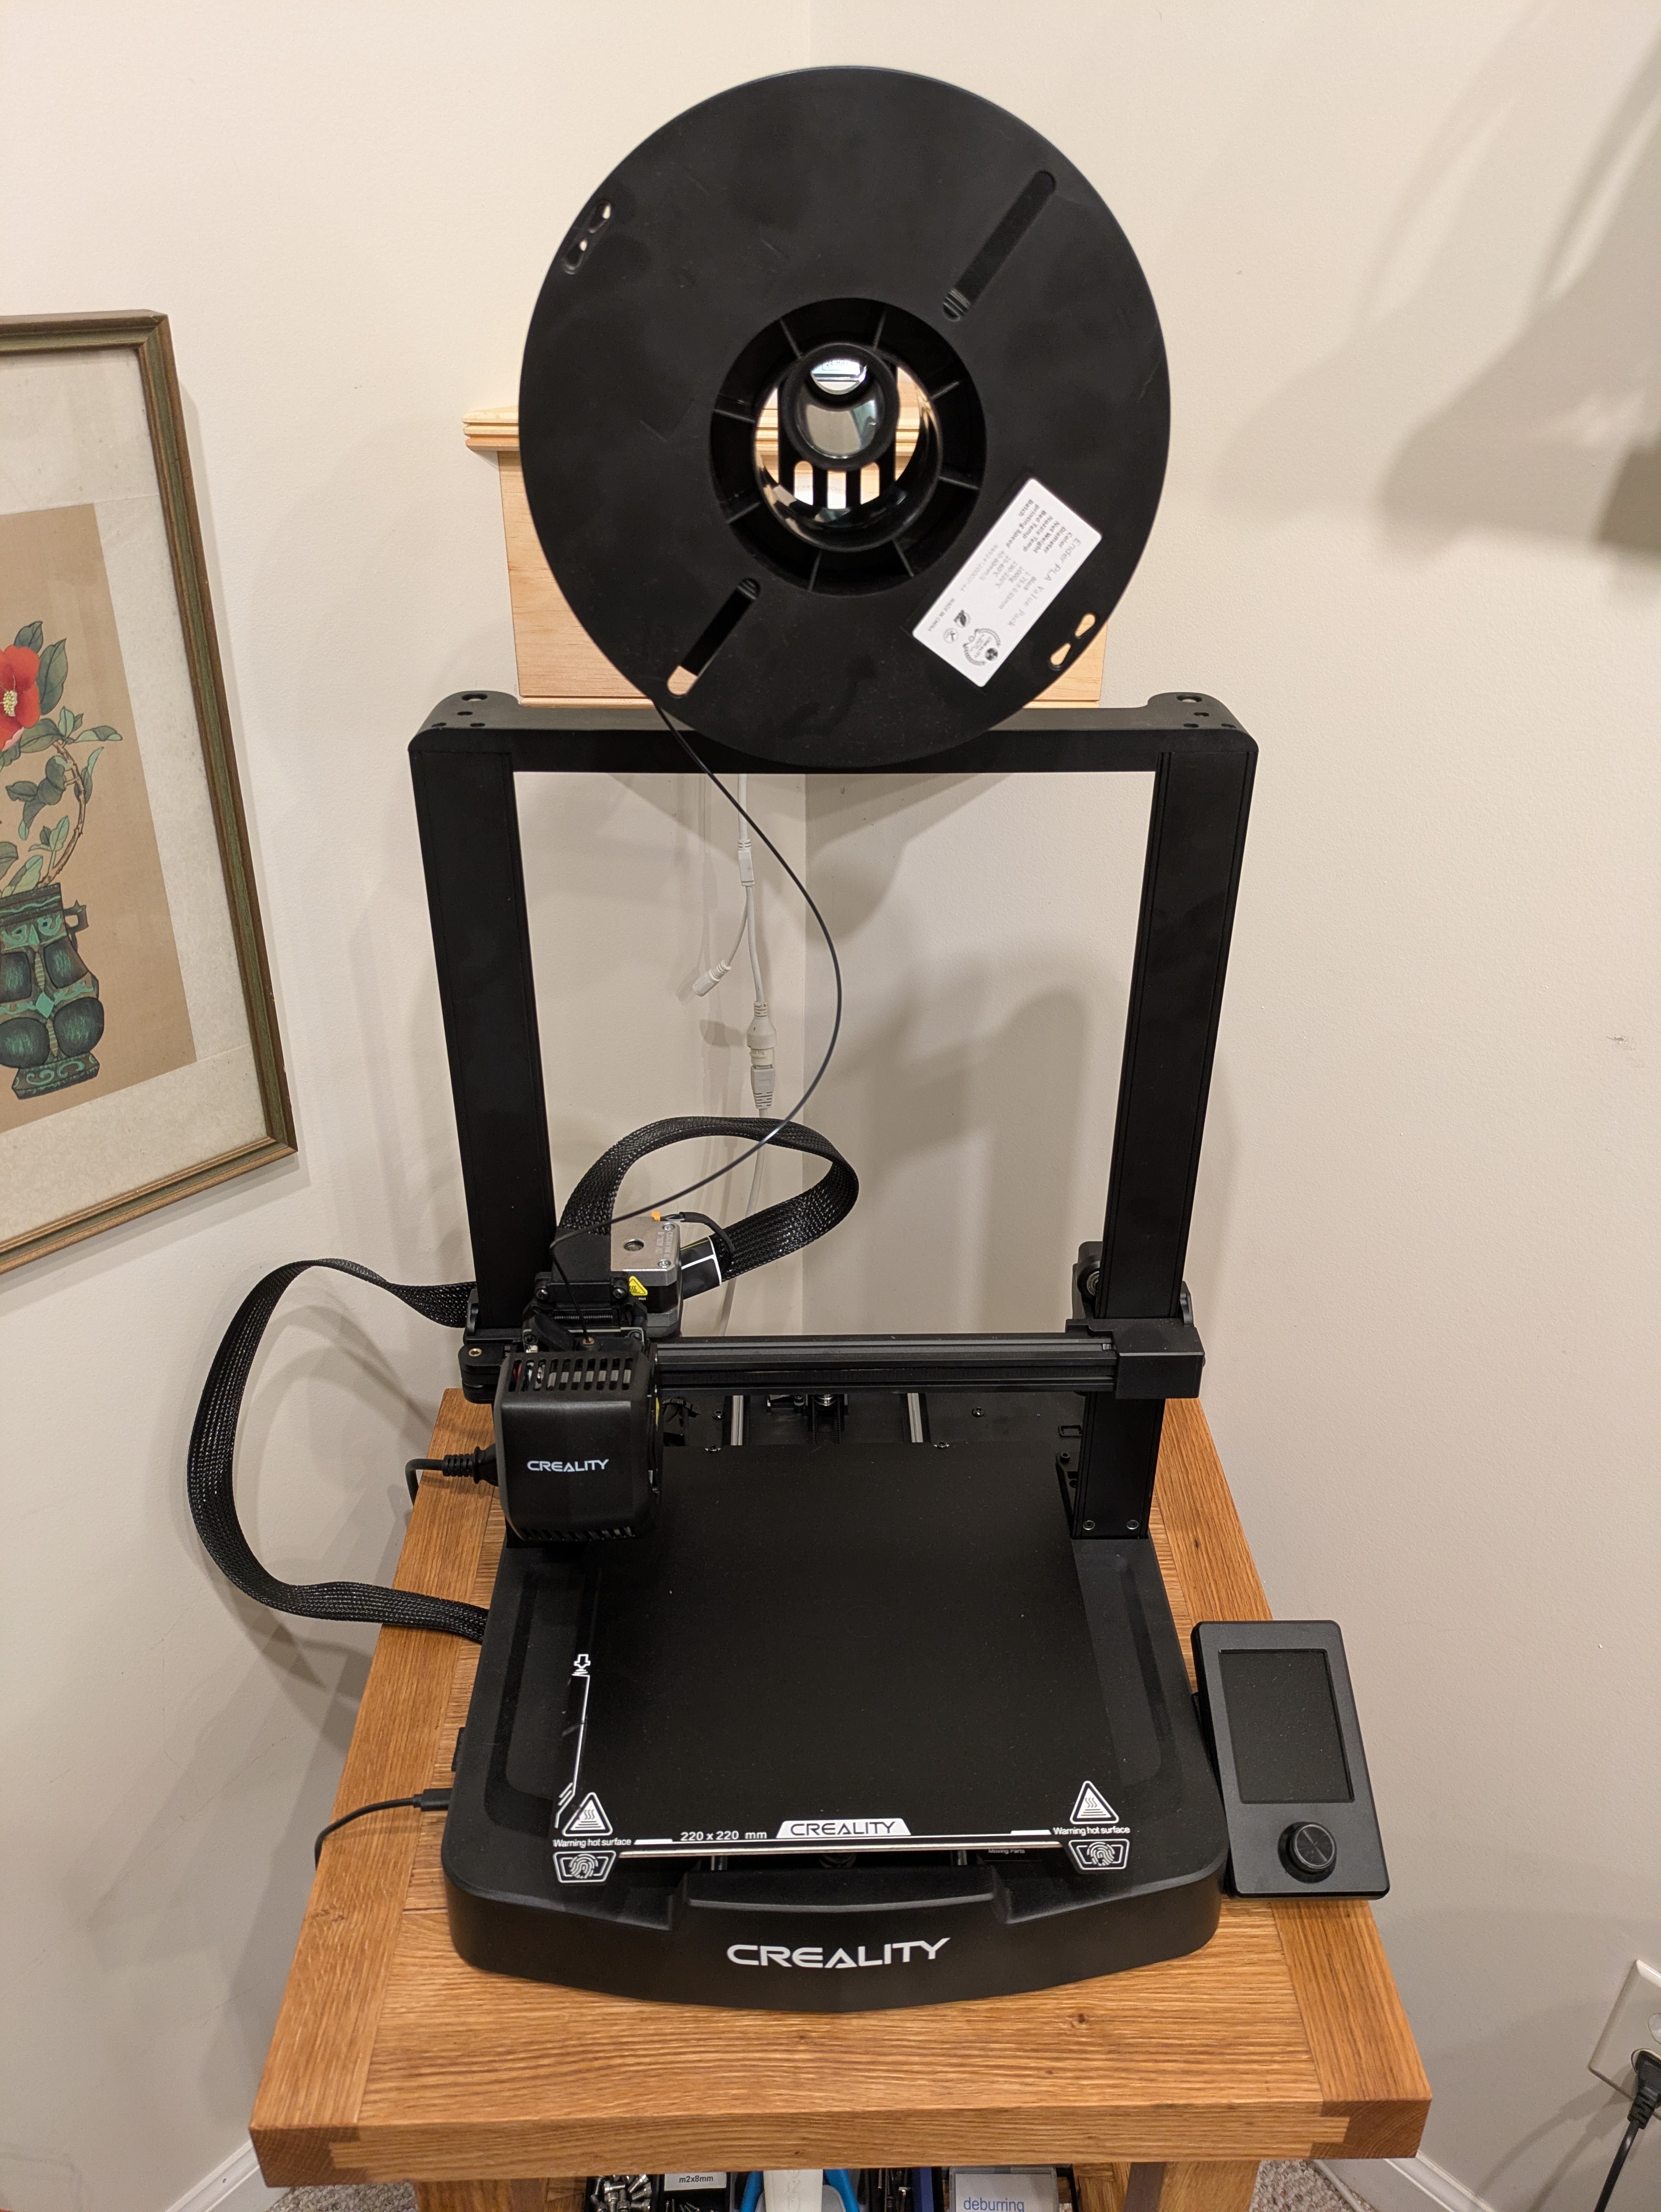
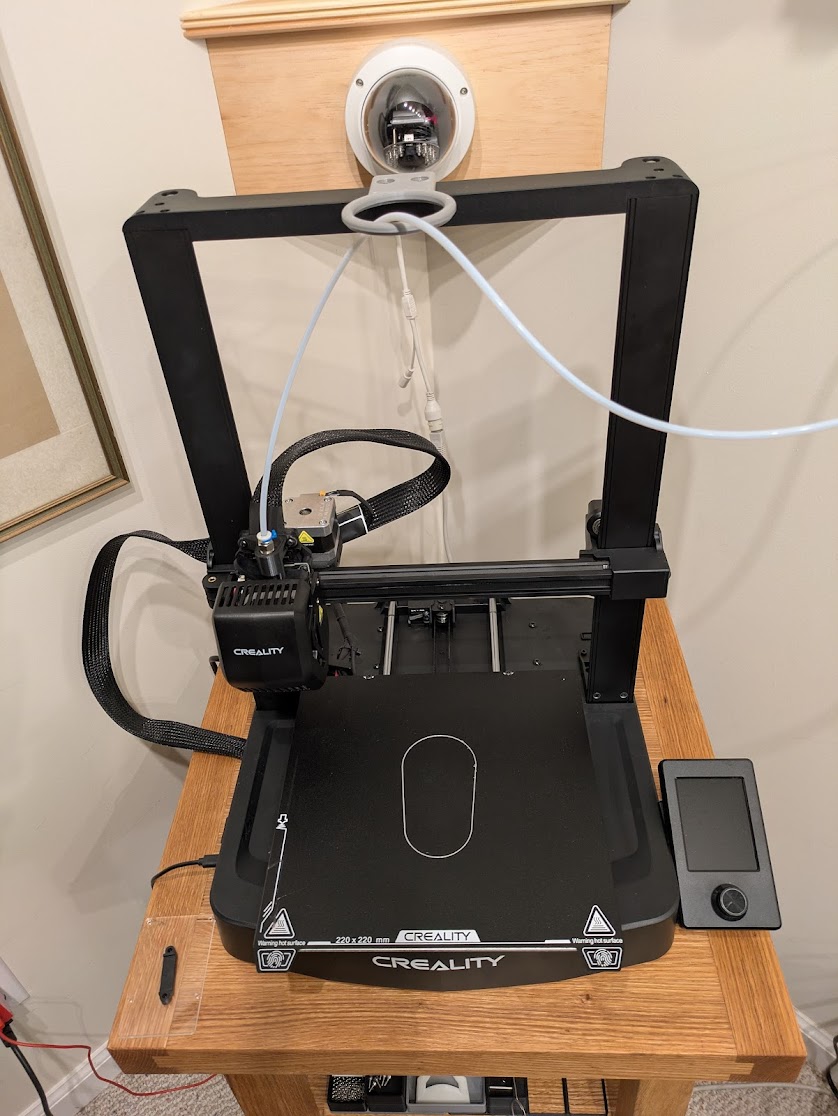
Then, for my 40th birthday, my wife finally decided to grab that one thing off my wishlist that had been there longer than anything else: a Creality Ender 3 v3 SE. My first post on this website after almost 10 years of not writing was about making a table for said 3D printer. This was probably the first sign that I was more than a little excited to see what I could make with it. I don’t think I could have predicted how ridiculously useful a tool it actually is, especially with a little know-how and some 3D modelling software. After the obligatory first test prints, and naturally a Benchy as well as a Torture Toaster, I ended up thinking about different ways that I could use it for projects around the house. I started small, but quickly began to realize that I had truly underestimated what was possible with a FDM printer.
For one thing, the prints are surprisingly strong… when you print them correctly. All the complaints I had heard over the years were likely from people who had experienced the striking difference in strength of 3D printed parts depending on the print orientation. 3D prints are weakest along their layer lines; if you print a vertical column, you can very easily snap it in the middle. The adhesion between these layers is much weaker than the continuously extruded filament that make them up. So if you flip the column on its side (maybe adding a flat spot on the bottom so it sticks to the print bed), you can orient the layer lines in a way that makes the end result significantly stronger. This property of 3D printed objects mirrors the same property in wood where strength varies greatly based on grain direction, so it wasn’t too hard to grasp, having had a background in woodworking. What this means is this: 3D printed objects are very strong in compression, but weak in tension when the force is applied perpendicular to the layer lines, and much stronger when force is applied parallel to the layer lines. Once you know this, and design your projects around this limitation, you can make incredibly strong parts for all manner of heavy duty applications.
And on the topic of plastic waste, there is certainly something to be said about how much waste can be produced when using a 3D printer. Failed prints were more common in the beginning, which resulted in rather large piles of waste plastic that ended up getting thrown away, and this problem will never fully go away. Sometimes you end up with a spaghetti print despite your best efforts. But once you know how they work and what causes spaghettification in the first place, you can greatly reduce the likelihood. These days I almost never have failed prints. More importantly though, 3D printing gives you the tools you need to repair and reuse things that you may otherwise not have been able to before. How many times have you broken something in your home that required this one weird plastic bit that you can’t buy and so you either have to come up with some janky repair or throw the whole thing away and get a new one? A 3D printer can solve this problem. Remember the slogan people used before we decided not to give a shit about the environment anymore? Reduce, Reuse, Recycle? I’d add Repair to that list.
This intro is already sounding like the beginning of an online recipe so let’s move on and look at all the cool shit I’ve made with my 3D printer since I got it less than a year ago. I’ve printed quite a few things I’ve found on the internet, but for the purposes of this article, I’m only including things I designed myself. There is value in being able to take advantage of other prints that people have designed already, but the biggest strength of a 3D printer is its ability to make custom, one-off parts. Plus, showcasing other people’s designs seems wrong. I’m including all the object files (if applicable) and FreeCAD design files so you can use them yourself if you want. So without further ado, enjoy the prints.
Woodworking
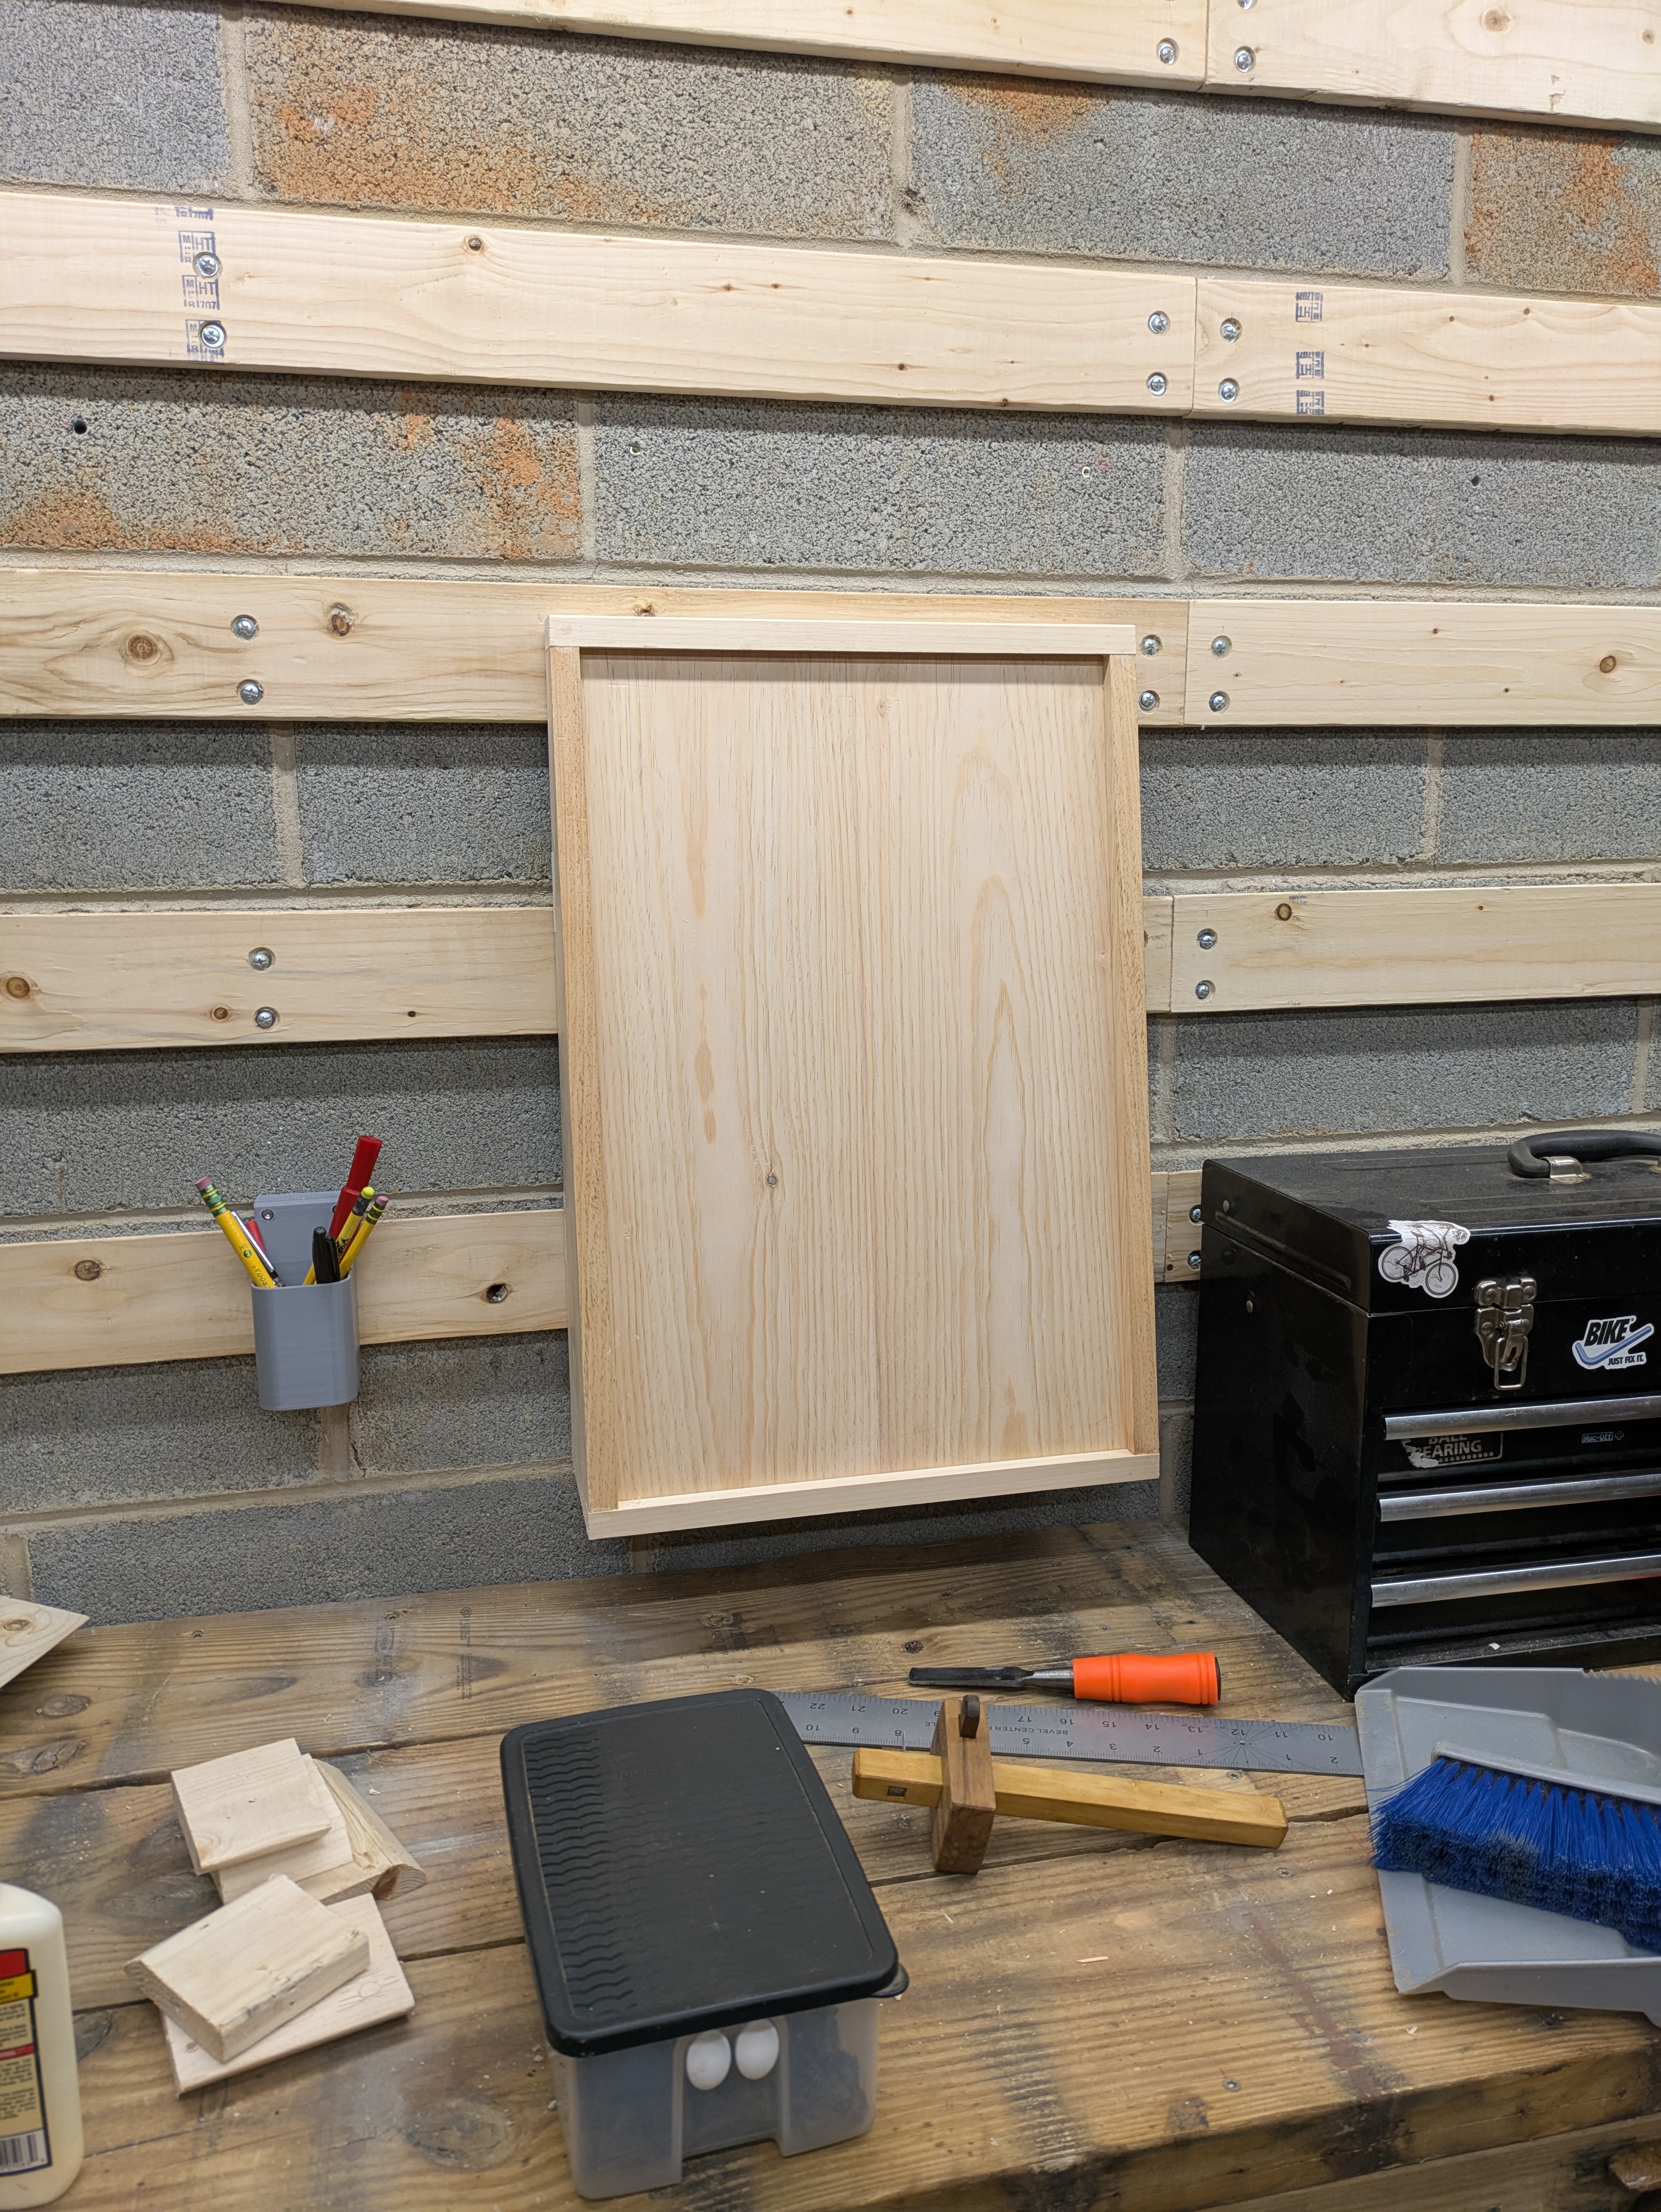
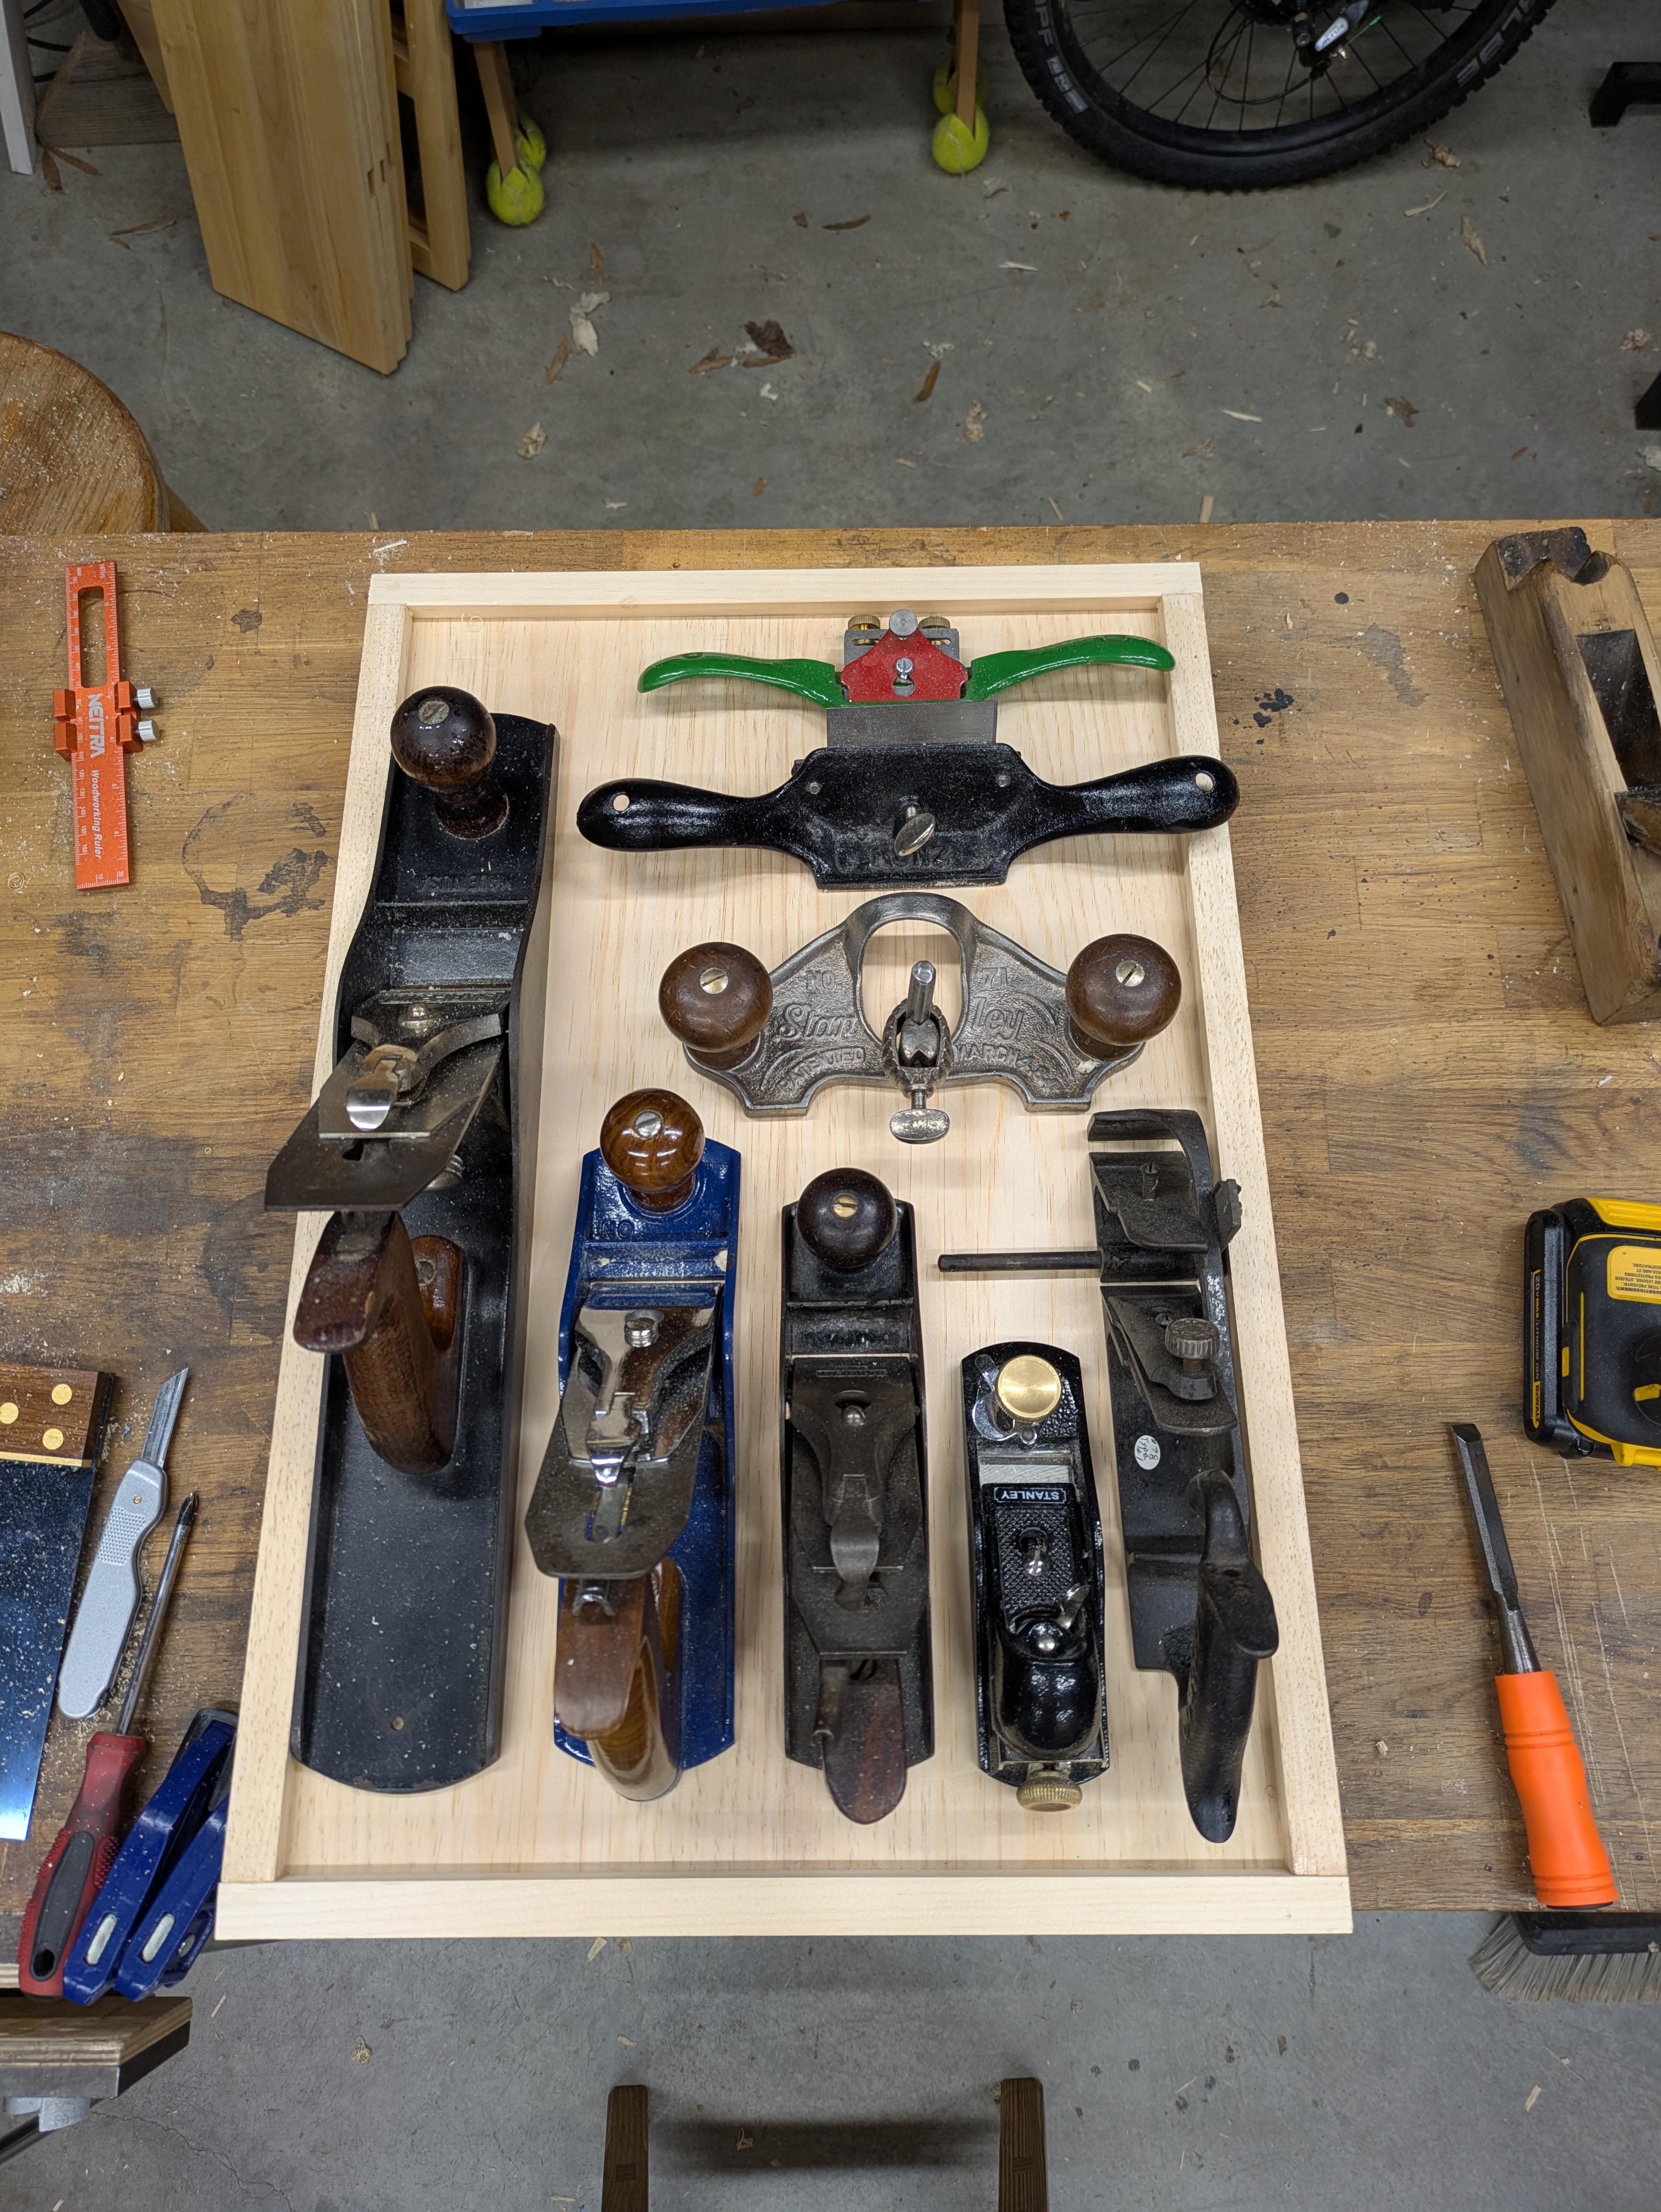
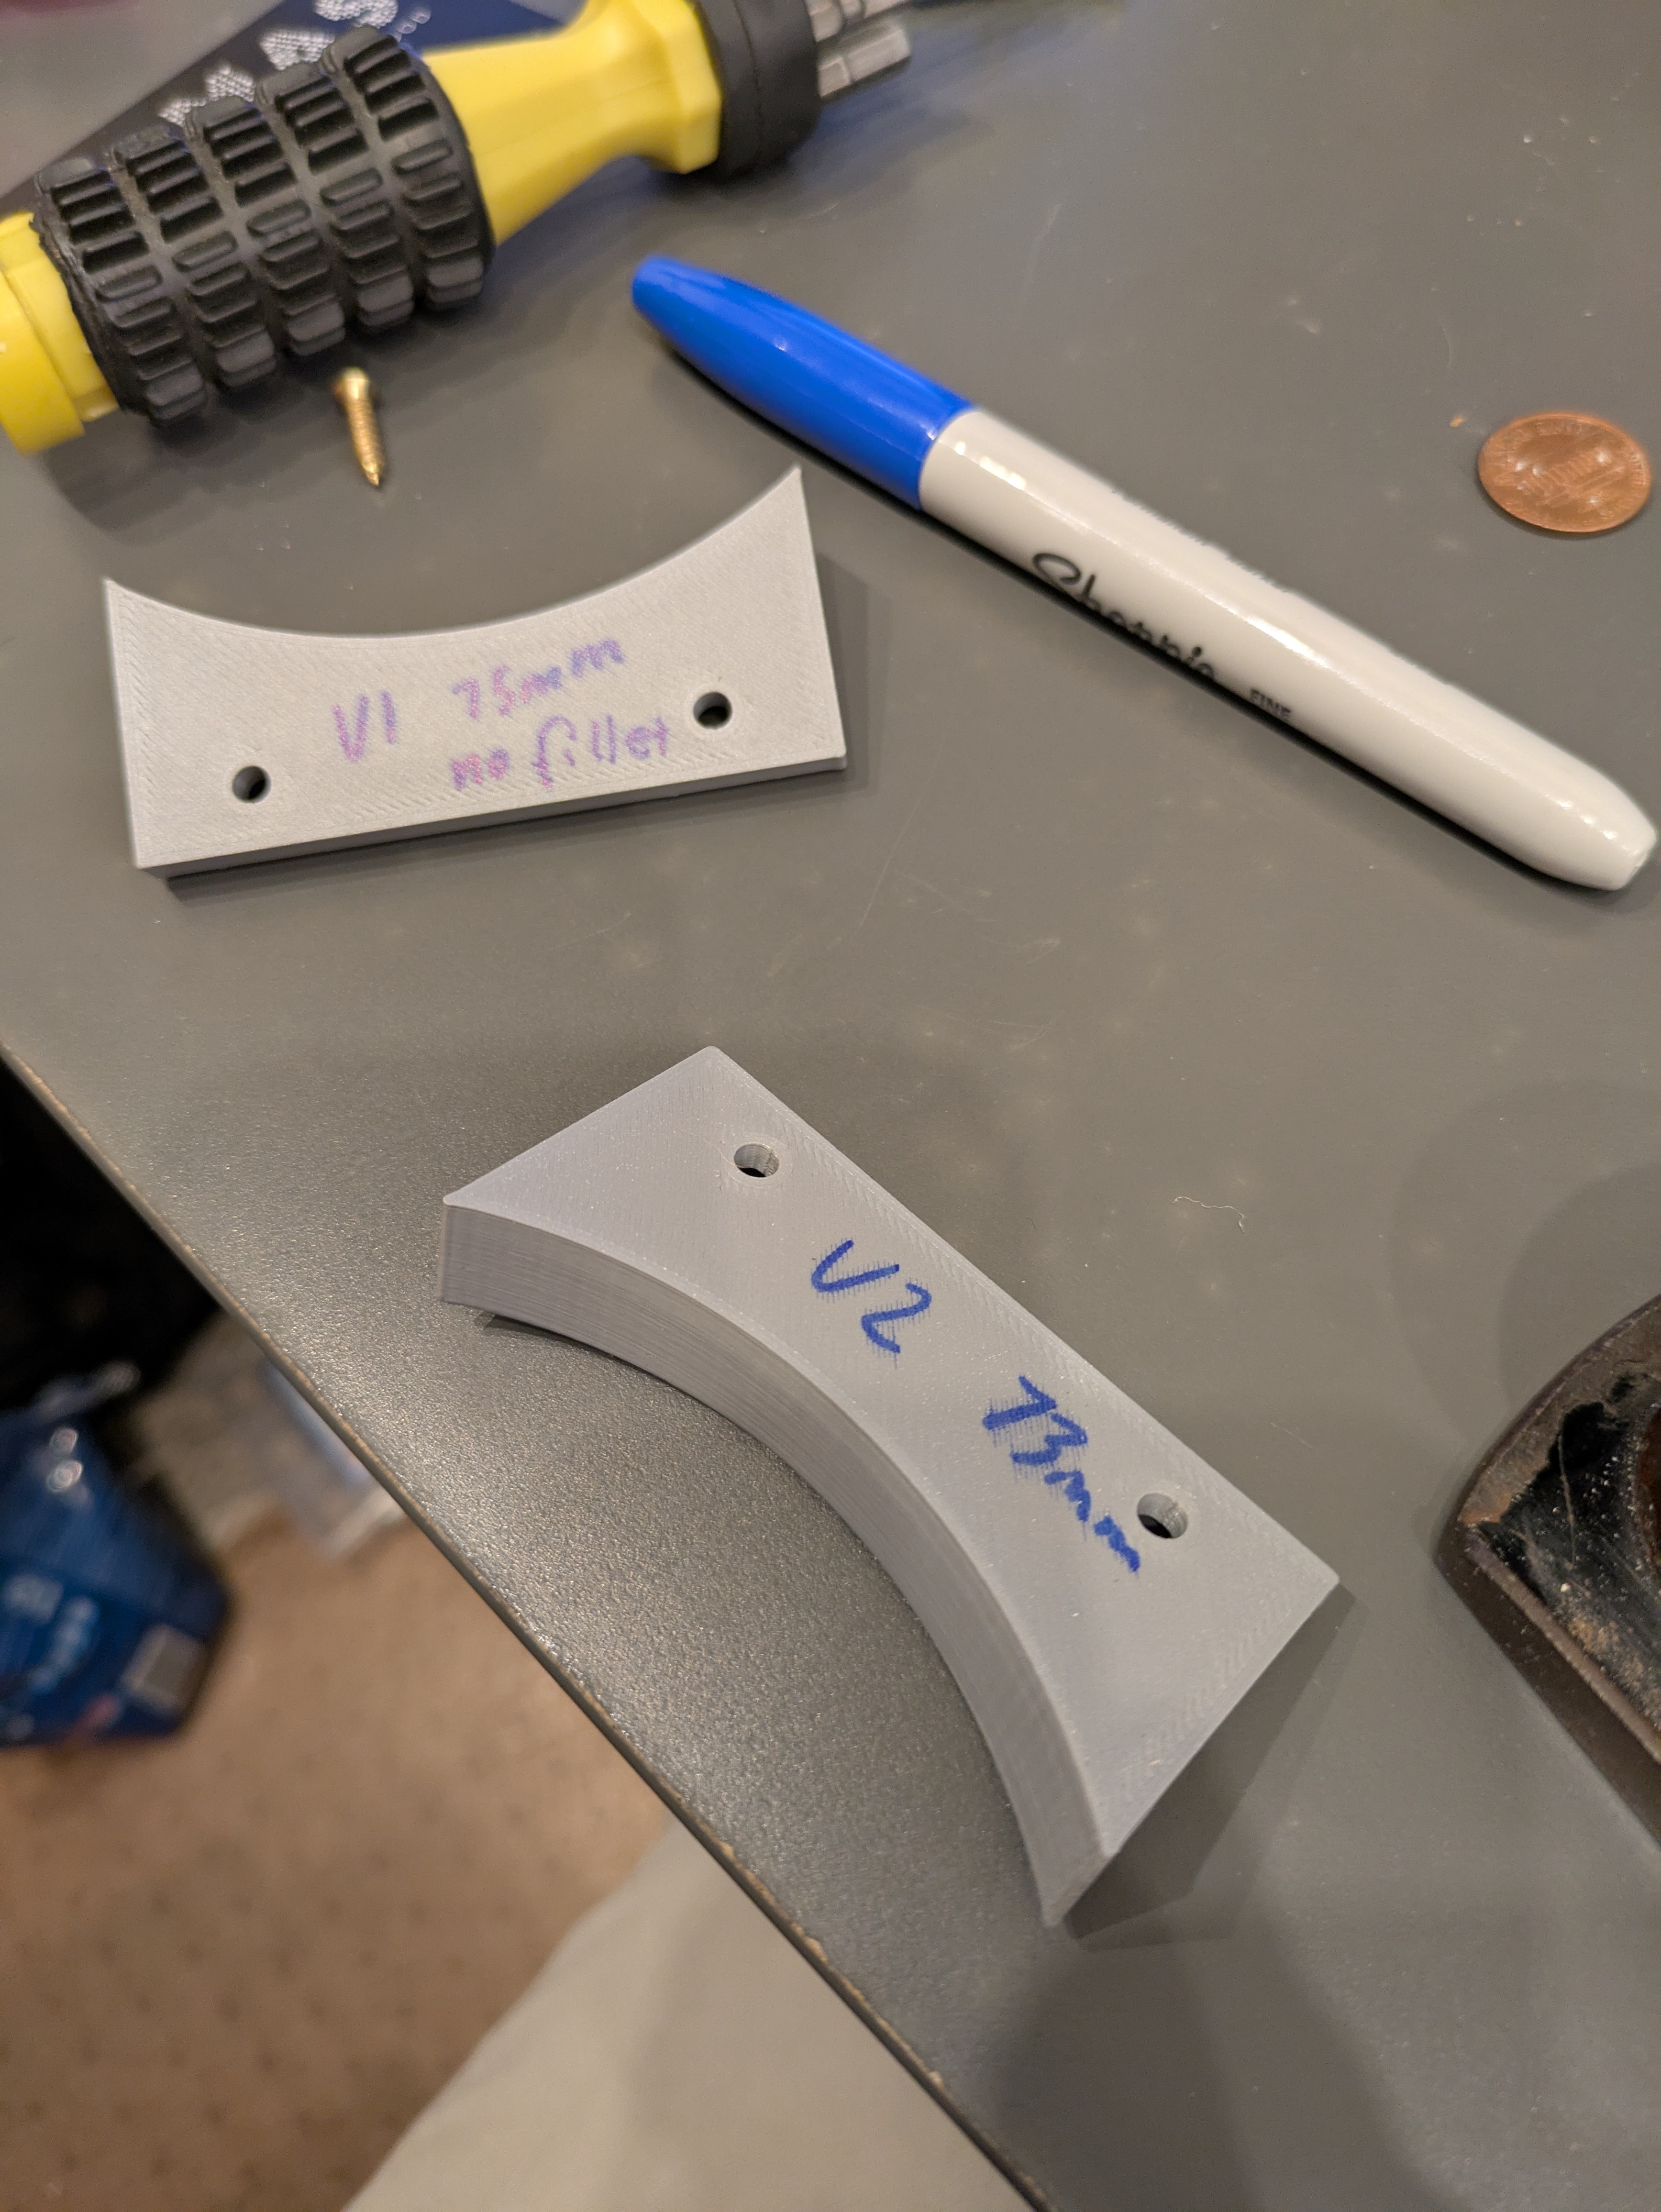
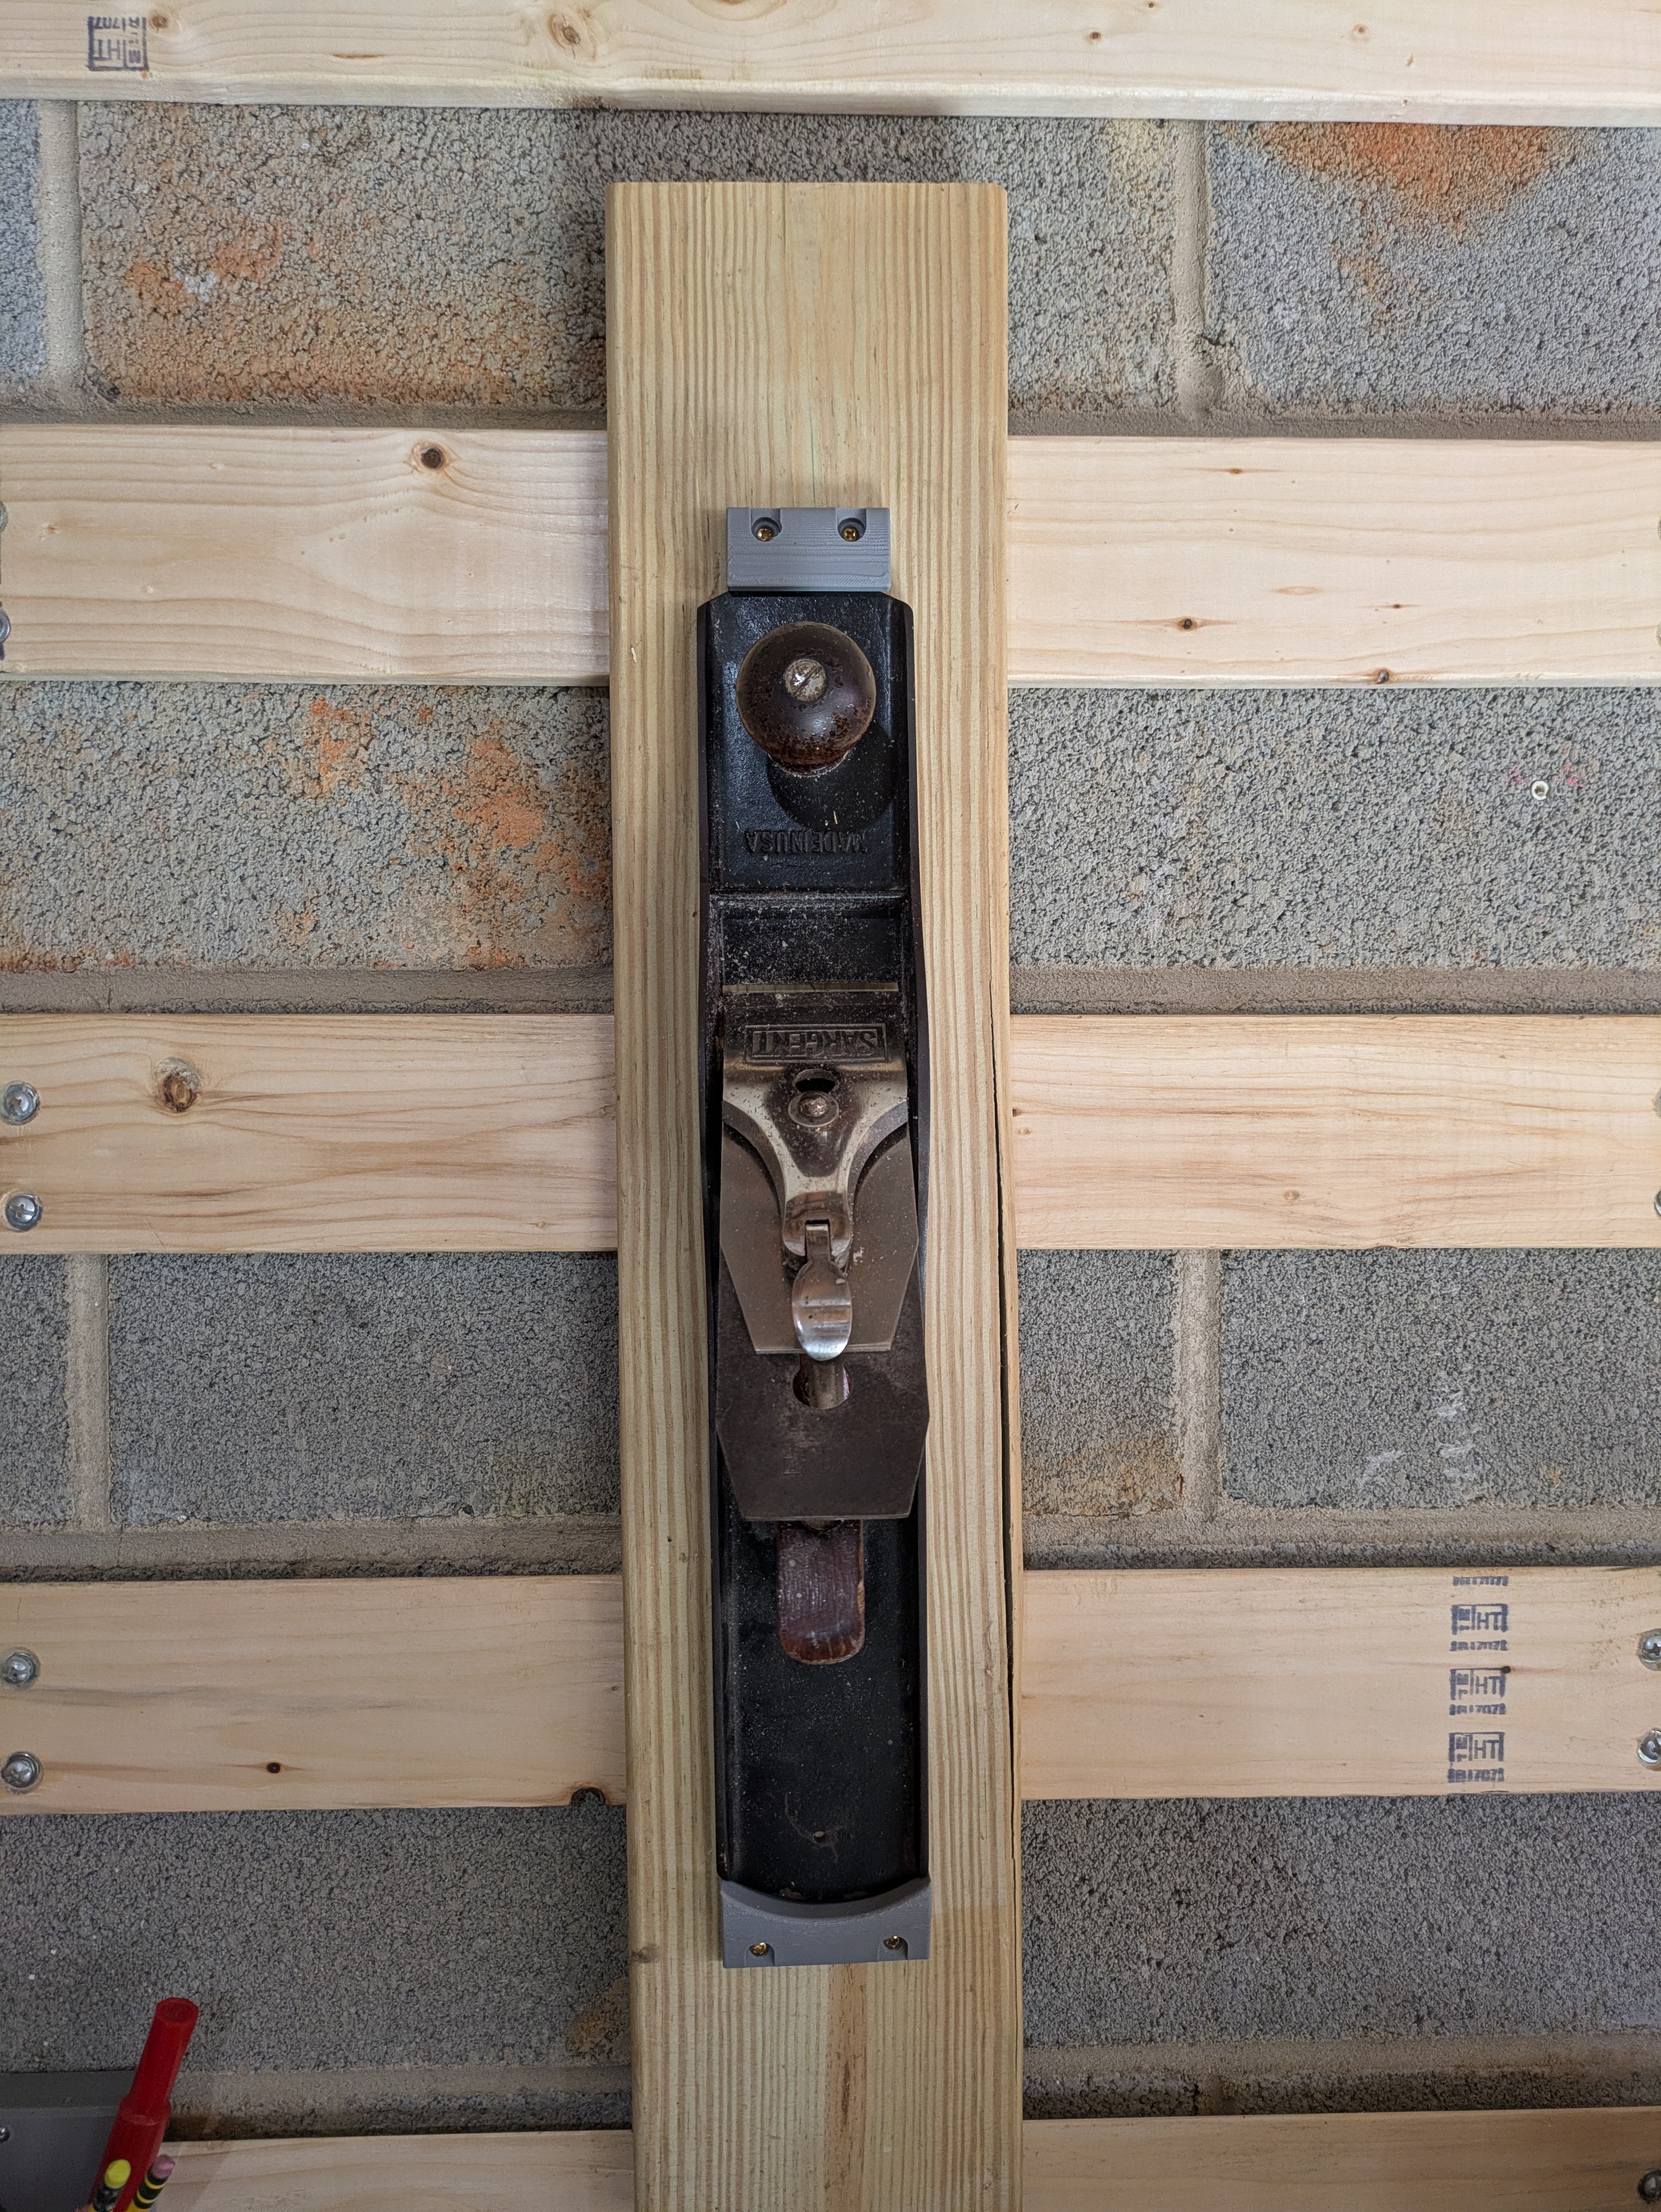
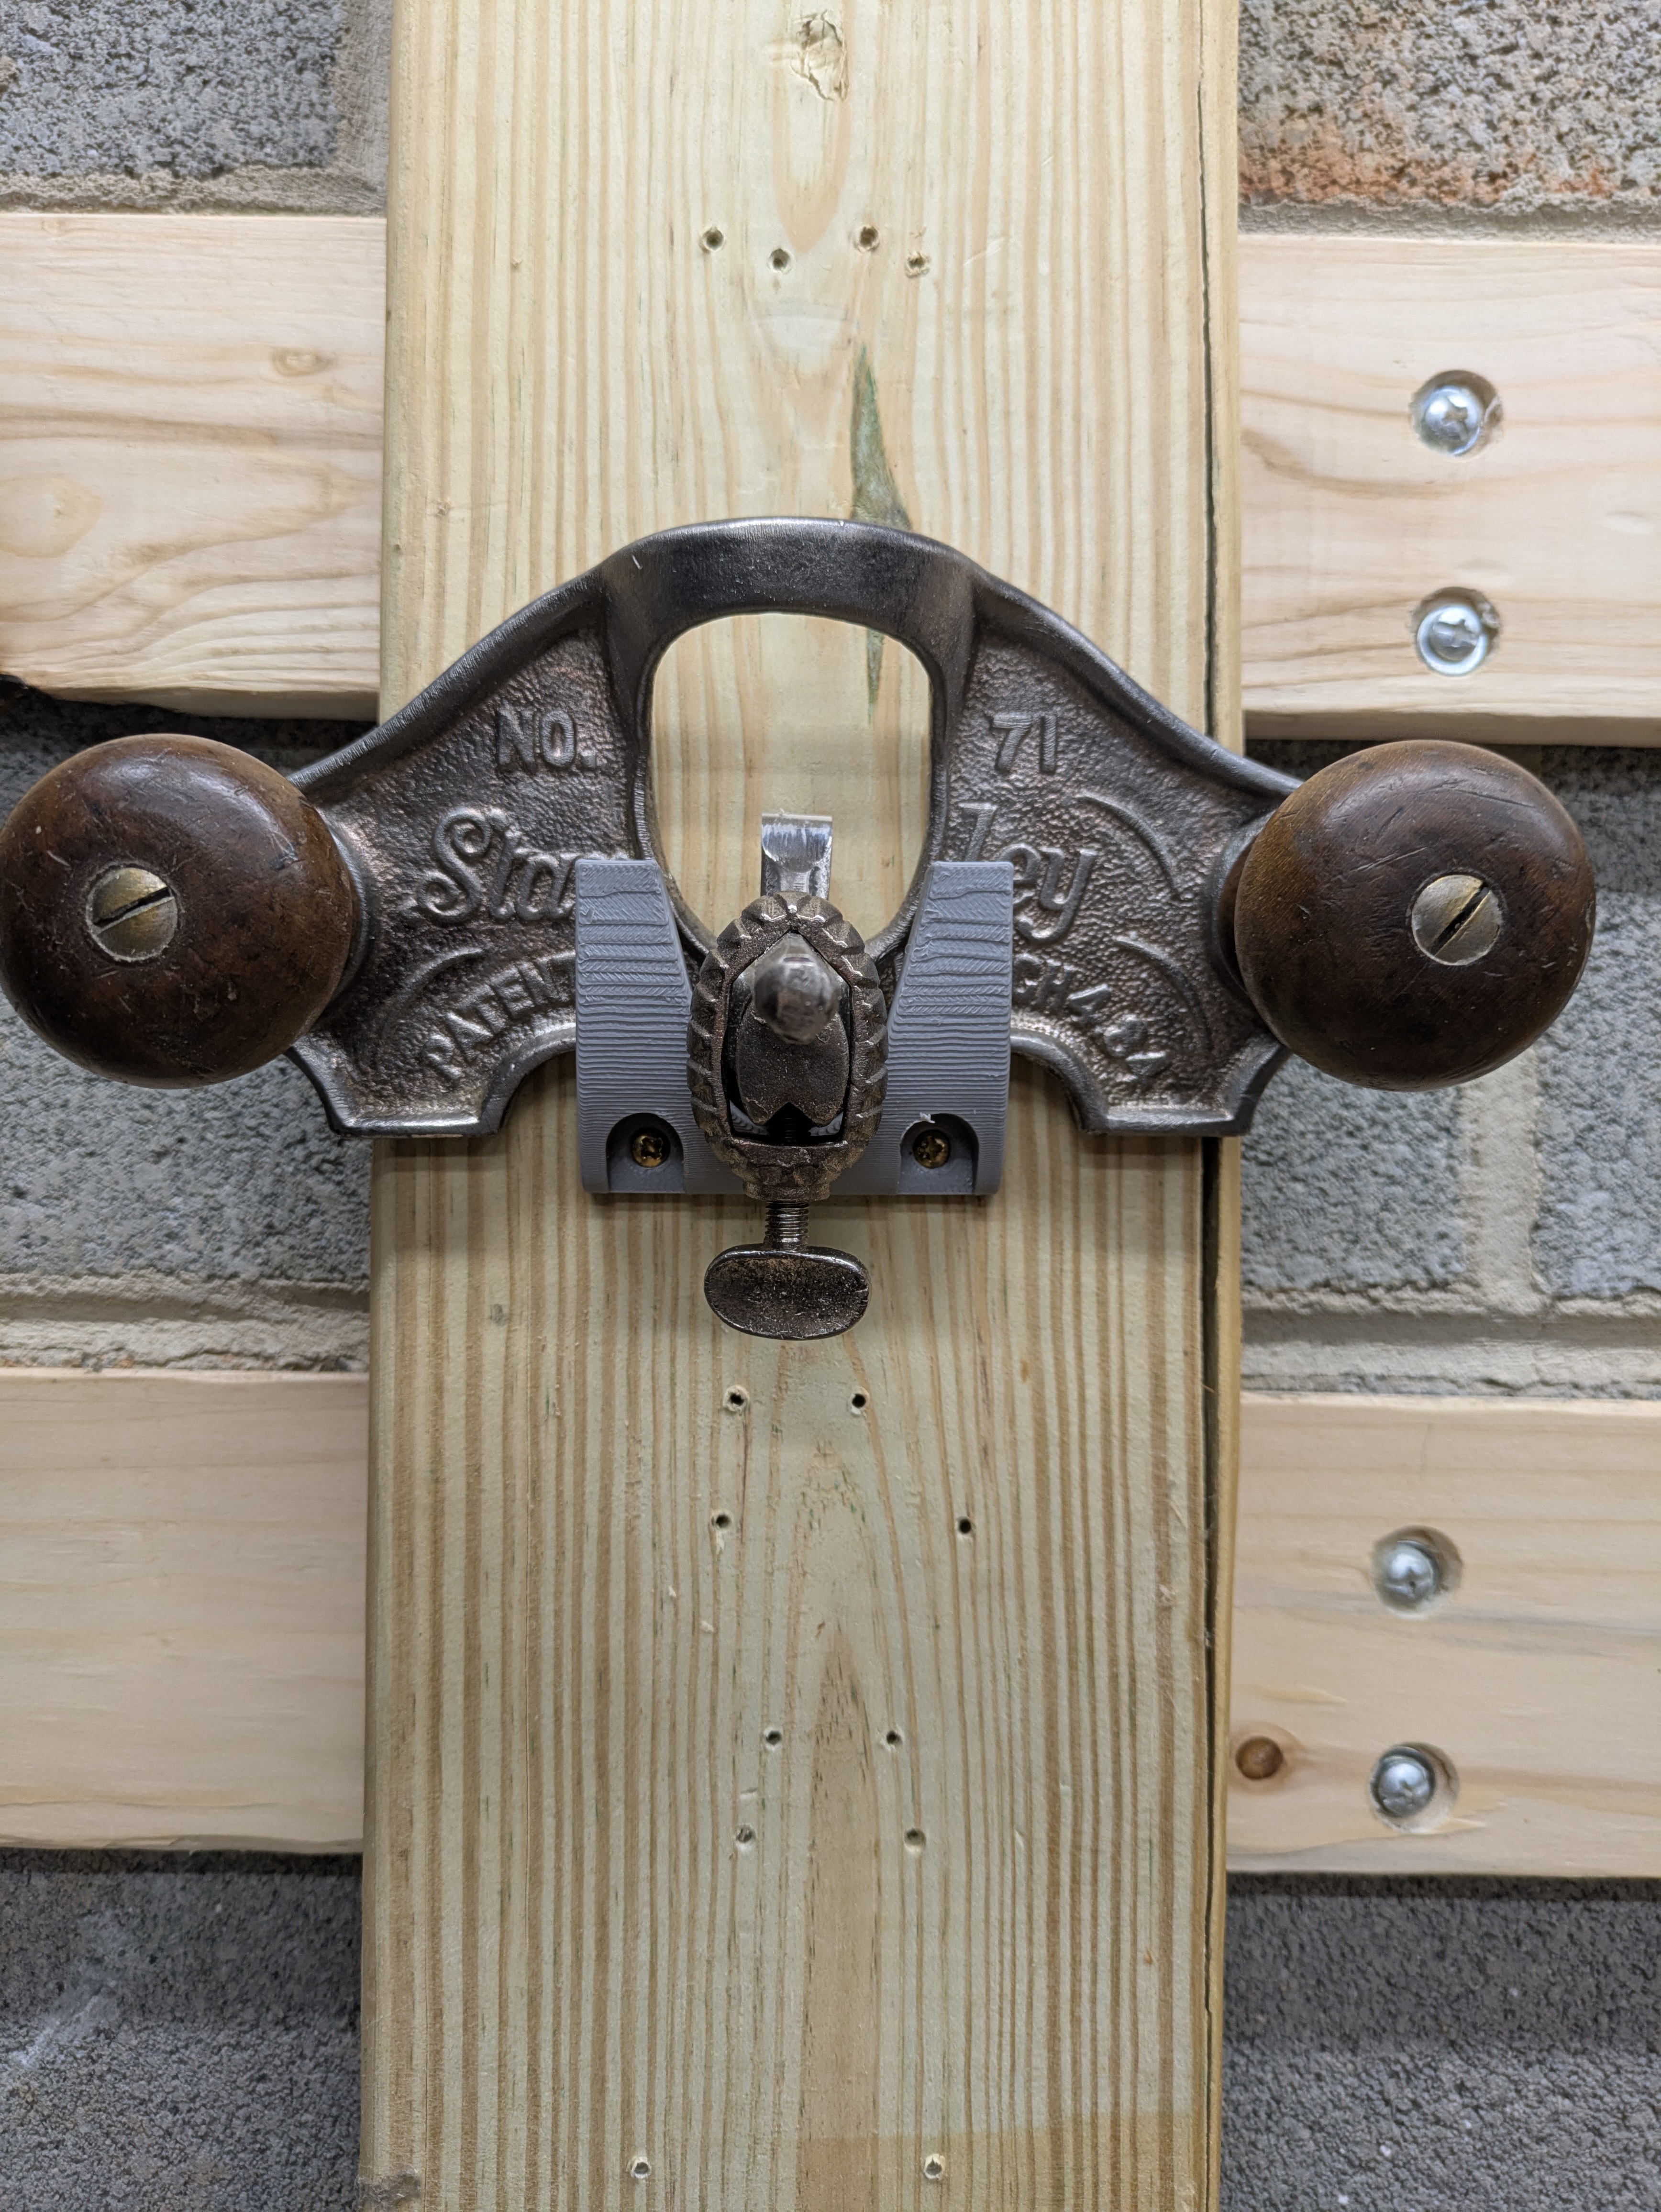
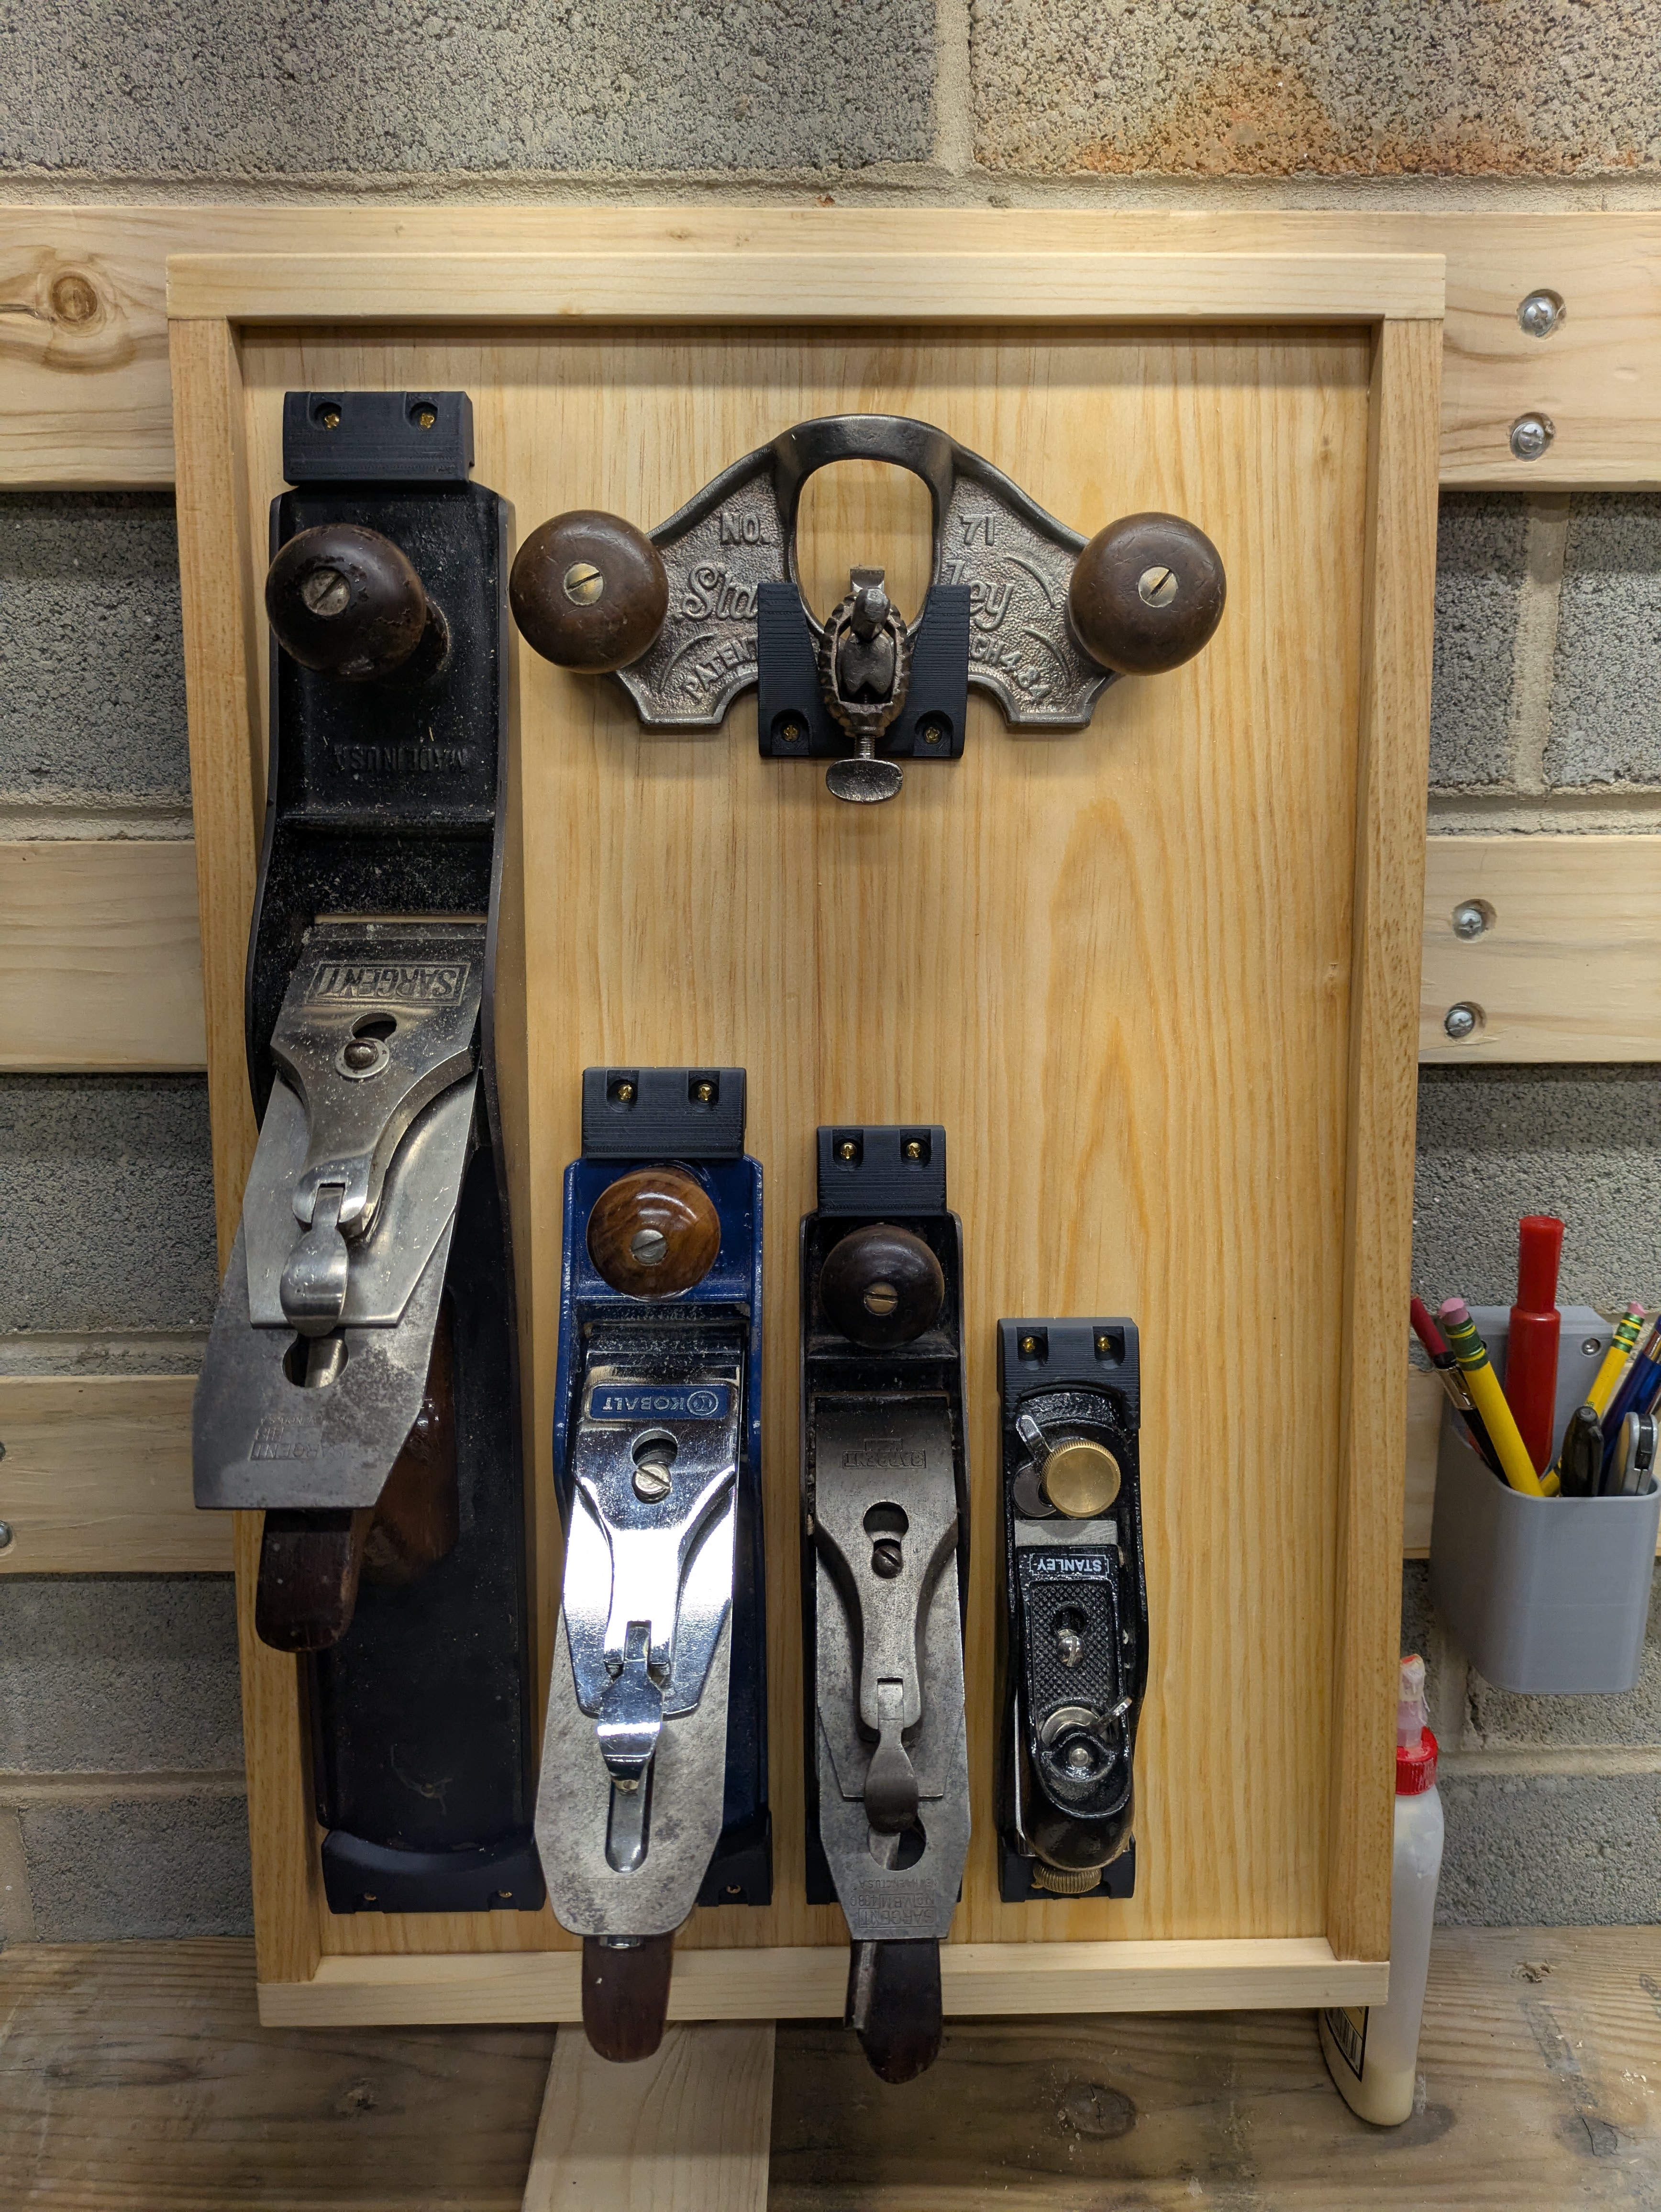
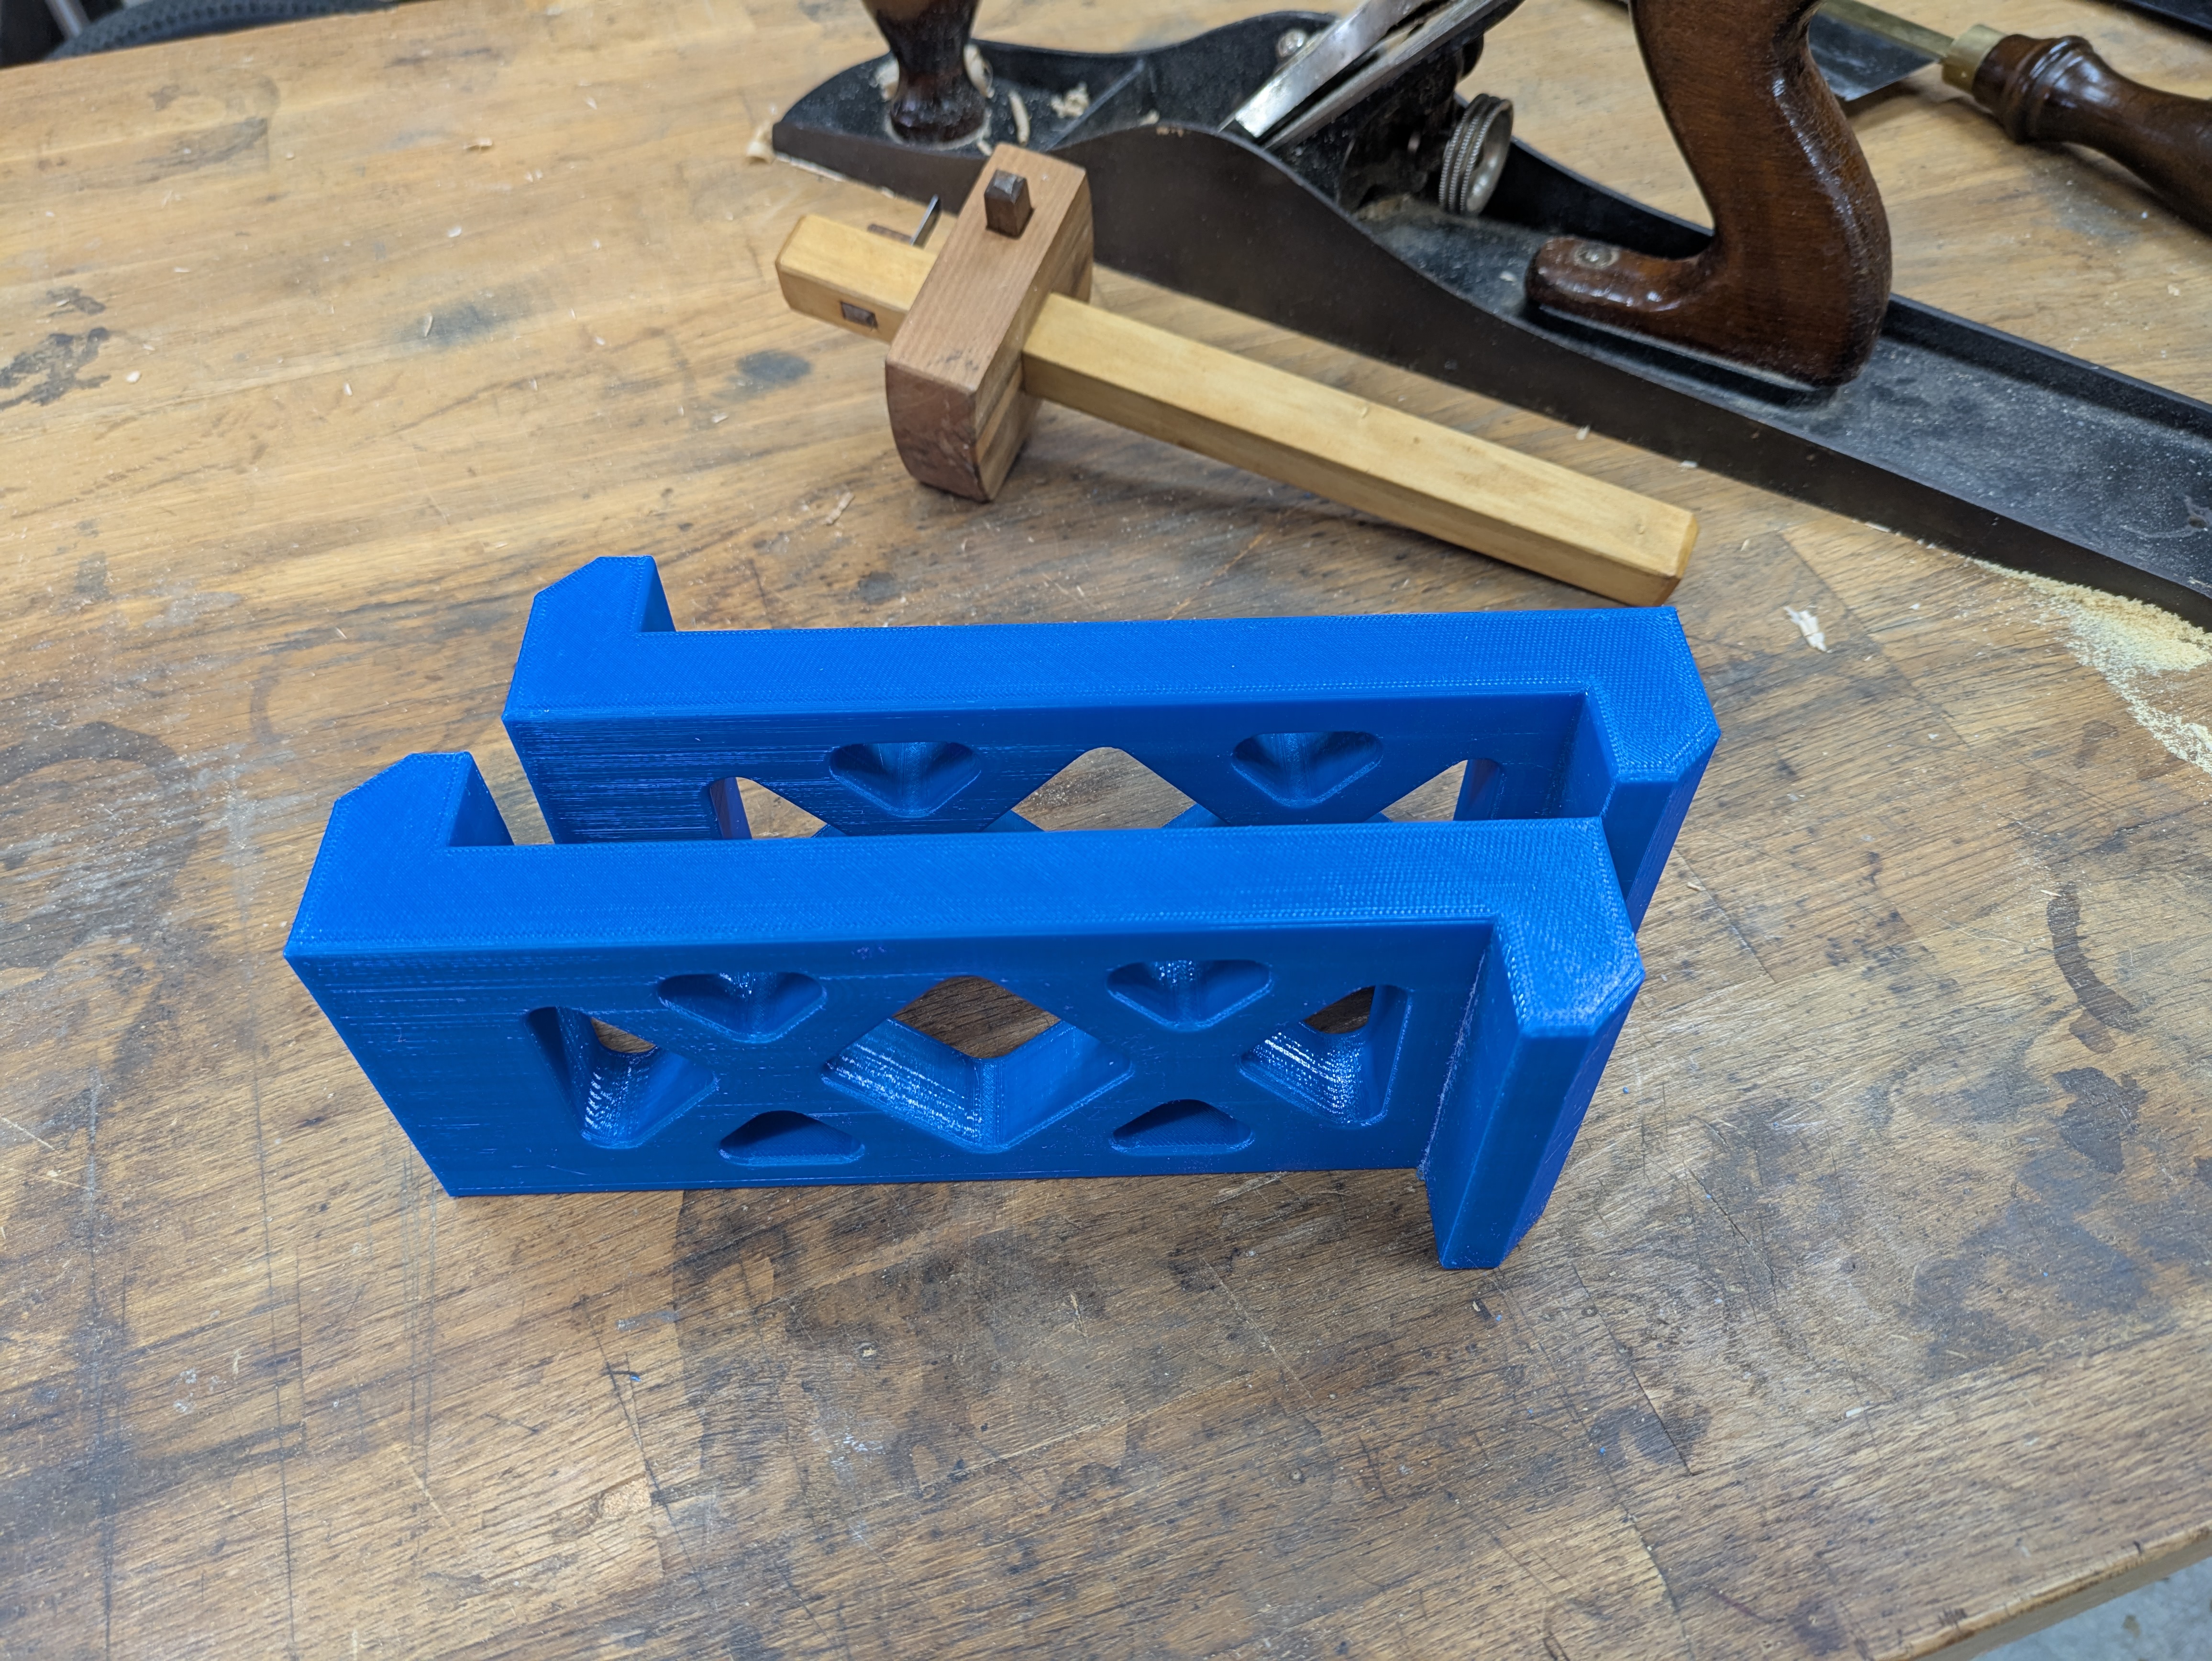
Plane Storage
I needed a place to store all my planes in the workshop. I had just been putting them down on my workbench, but they take up a ton of space. I had seen some designs for storing planes on an inclined board, but I hadn’t gotten around to implementing this design because I really didn’t want to put in all the work on the cleats. Making smaller parts like this can actually be more challenging than making the frame itself because it can be difficult to secure them in a vise in a way that allows you to work on them effectively. A 3D printer excels at making small, fiddly bits like this so I did the fun work of making a frame and offloaded the tedious cleat design to my 3D printer.
Download the 7z bundle containing FreeCAD design file.
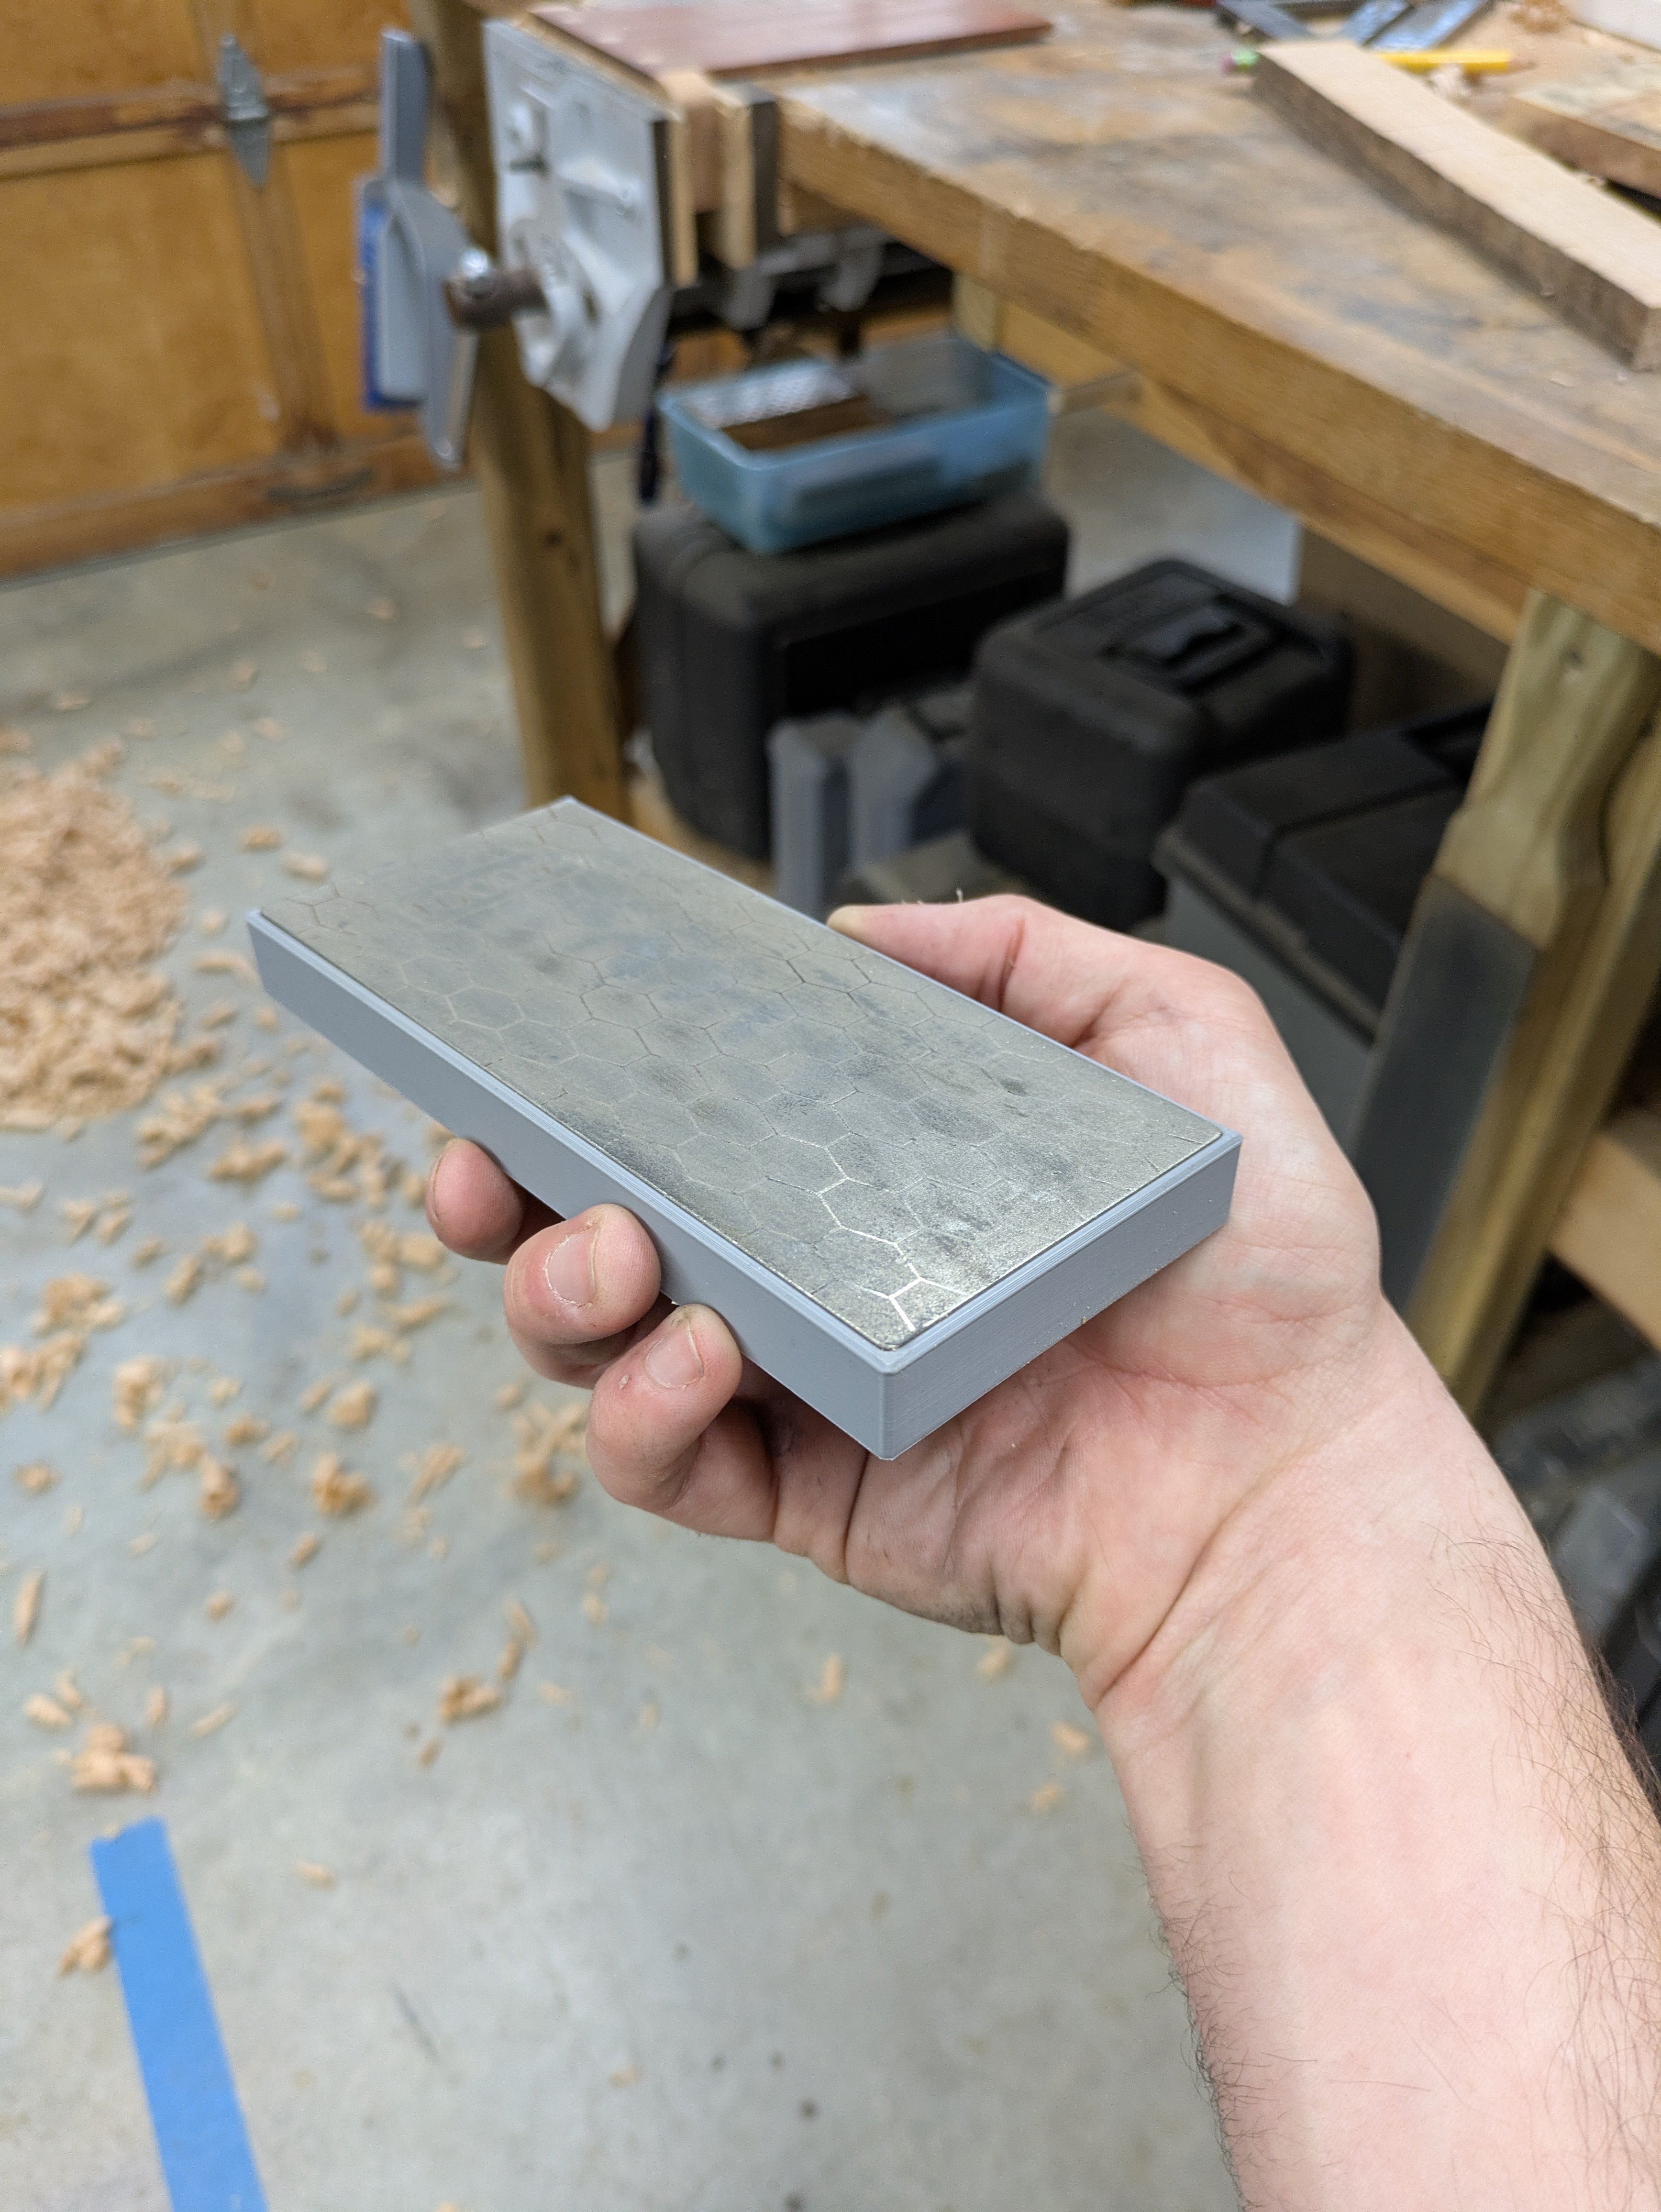
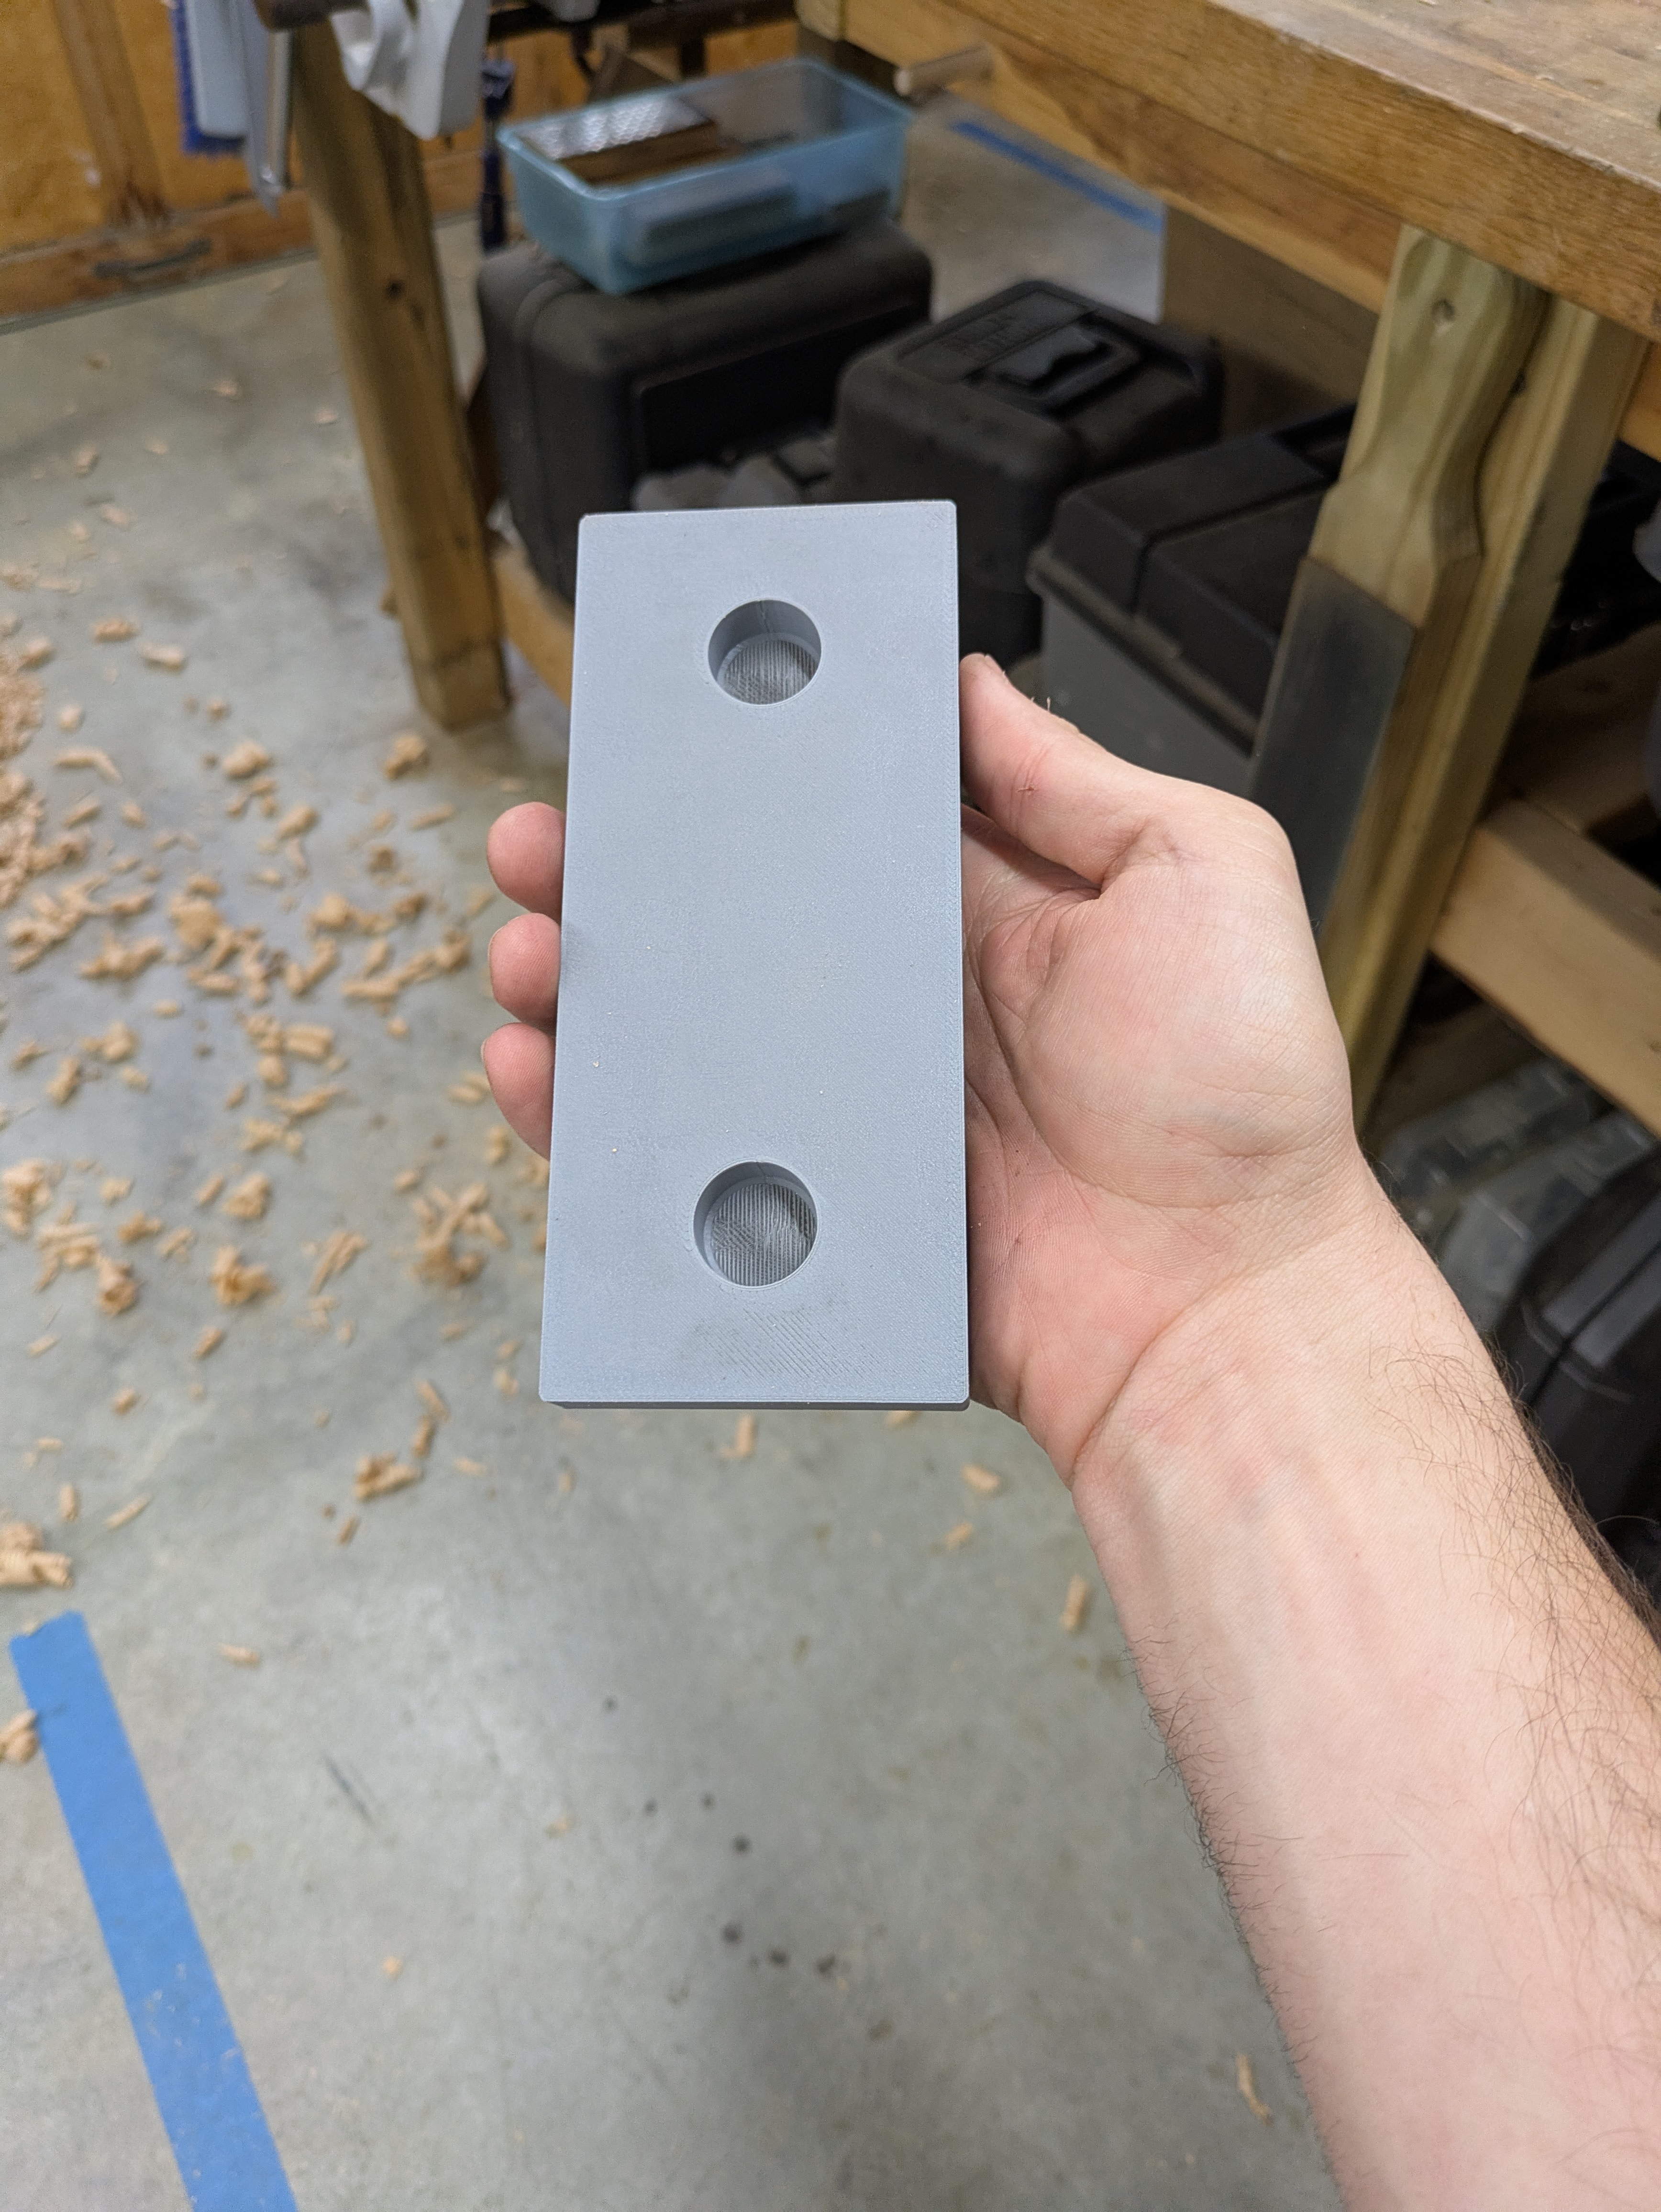
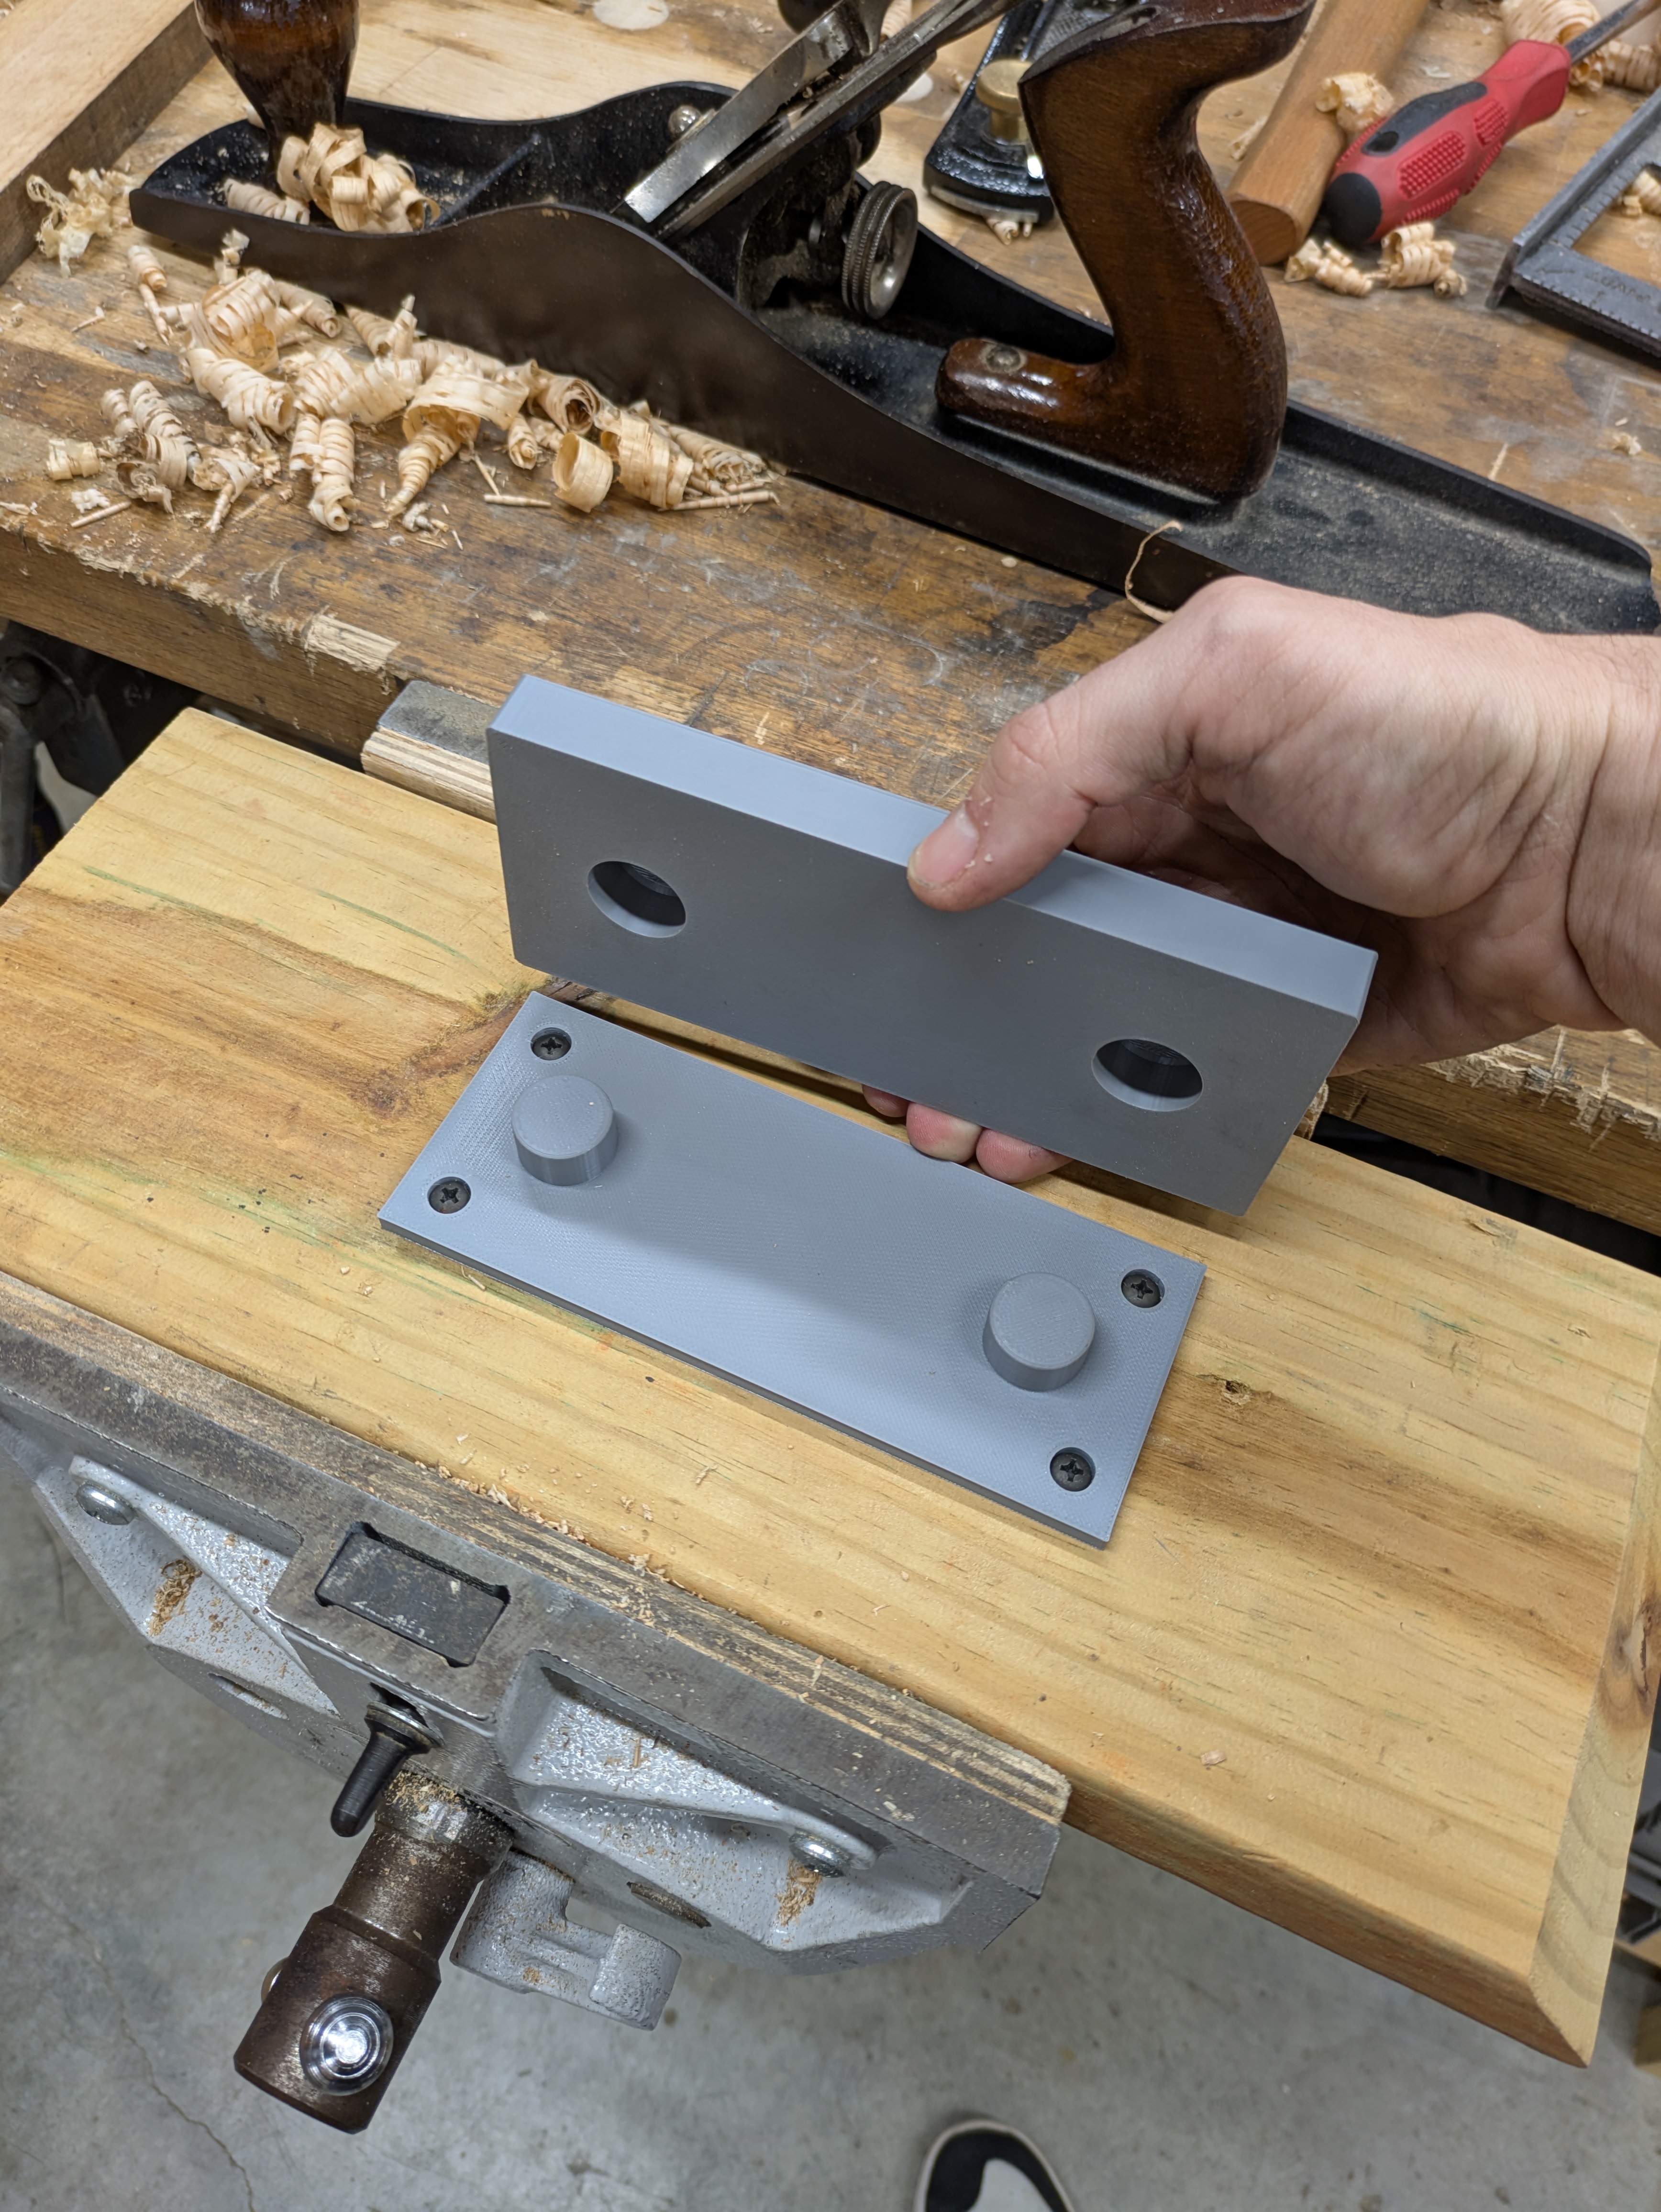
Sharpening Station
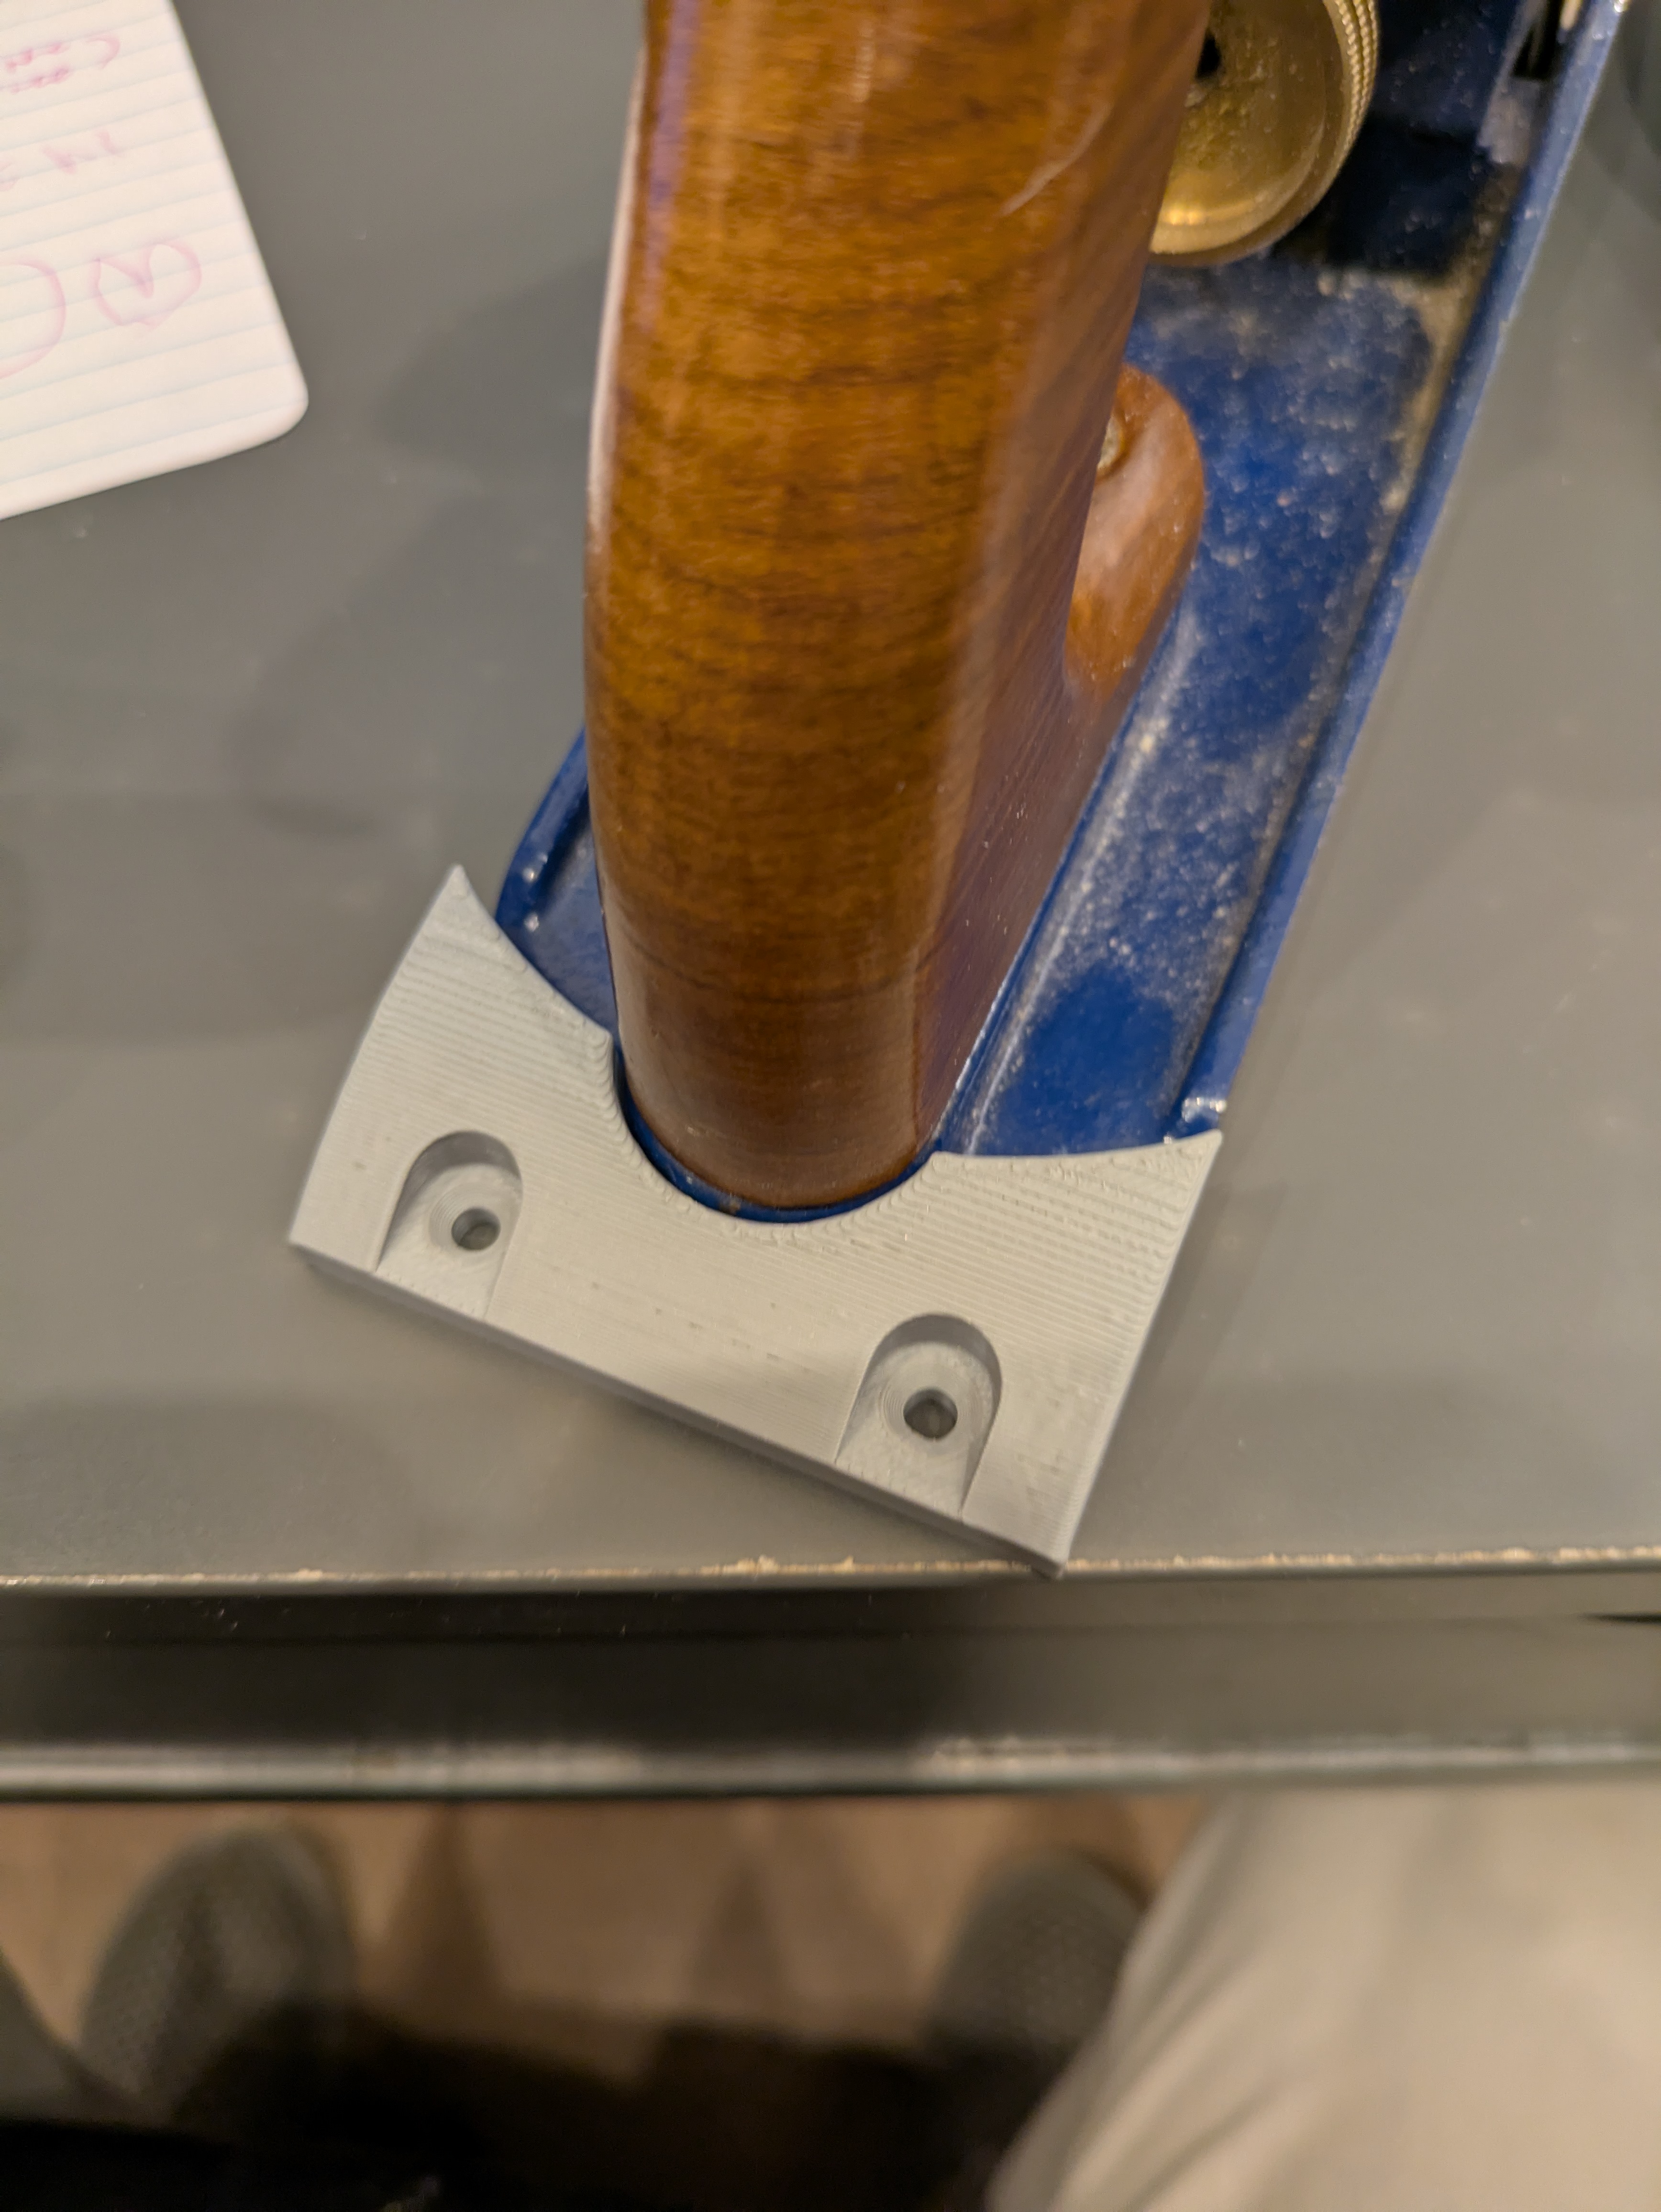
One of the first things I needed after a place to put my tools was a sharpening station to keep them in working order. I had just finished the table, so this was at the top of my mind. I had these diamond plates mounted to little blocks of wood, but I wasn’t super happy with the results so I designed a Lego-like mounting system and some flat blocks to mount them on. One big benefit of 3D printed parts is a fair degree of dimensional accuracy when you’ve dialed in the settings. These were nicely flat and square and I didn’t have to do much to achieve that.
Download the 7z bundle containing FreeCAD design files and STL objects.
Bench Hooks
While we’re on the topic of woodworking, I made these bench hooks with PETG, and they’re quite nice. They are a bit slippery compared to wooden ones, but I think you might be able to address this with some spray glue and sandpaper on the hook face. This was also the first print that made me realize that the holes add time to the print, and in some cases can actually make the resulting part heavier. 3D printed parts can be made hollow with different levels of infill, so it’s often unnecessary to put holes in the part like you would need to for injection molded parts. In fact, there are a lot of design patterns you will see with traditionally manufactured parts that don’t need to be used when working with 3D printing. In this case they’re mostly decorative anyway, but I’ve been mindful of this fact with my later designs.
Download the 7z bundle containing FreeCAD design files and STL objects.
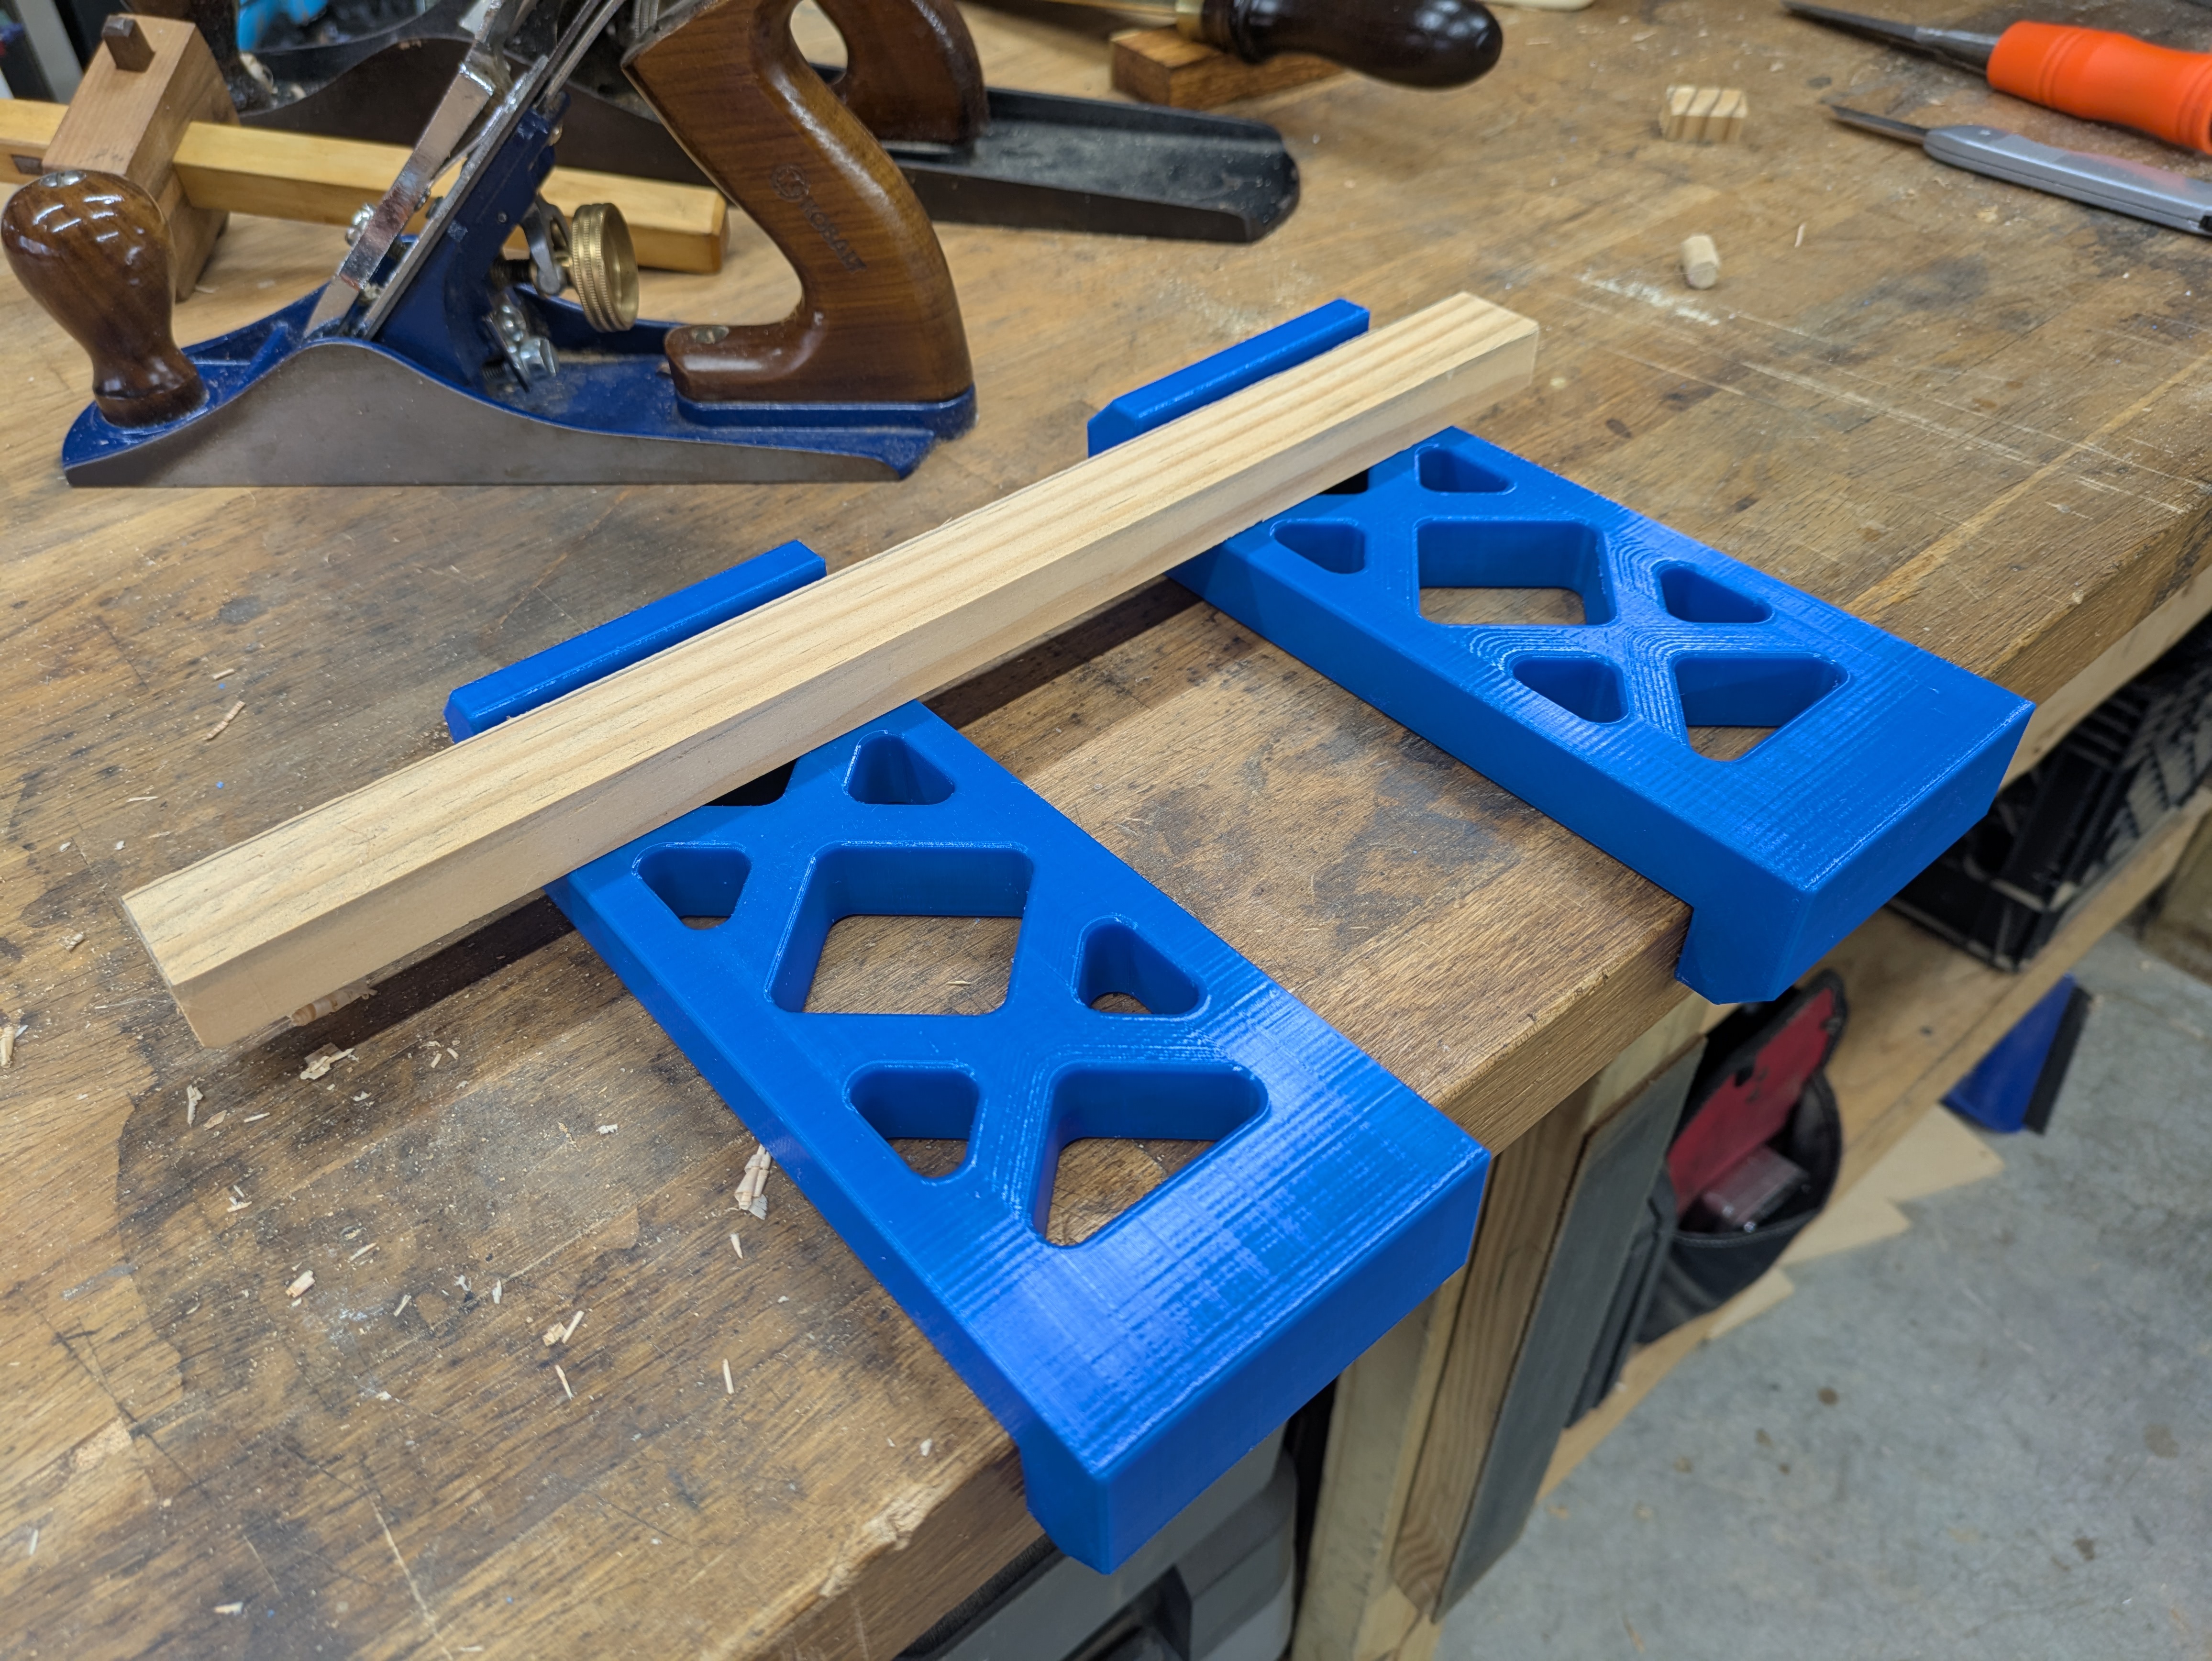
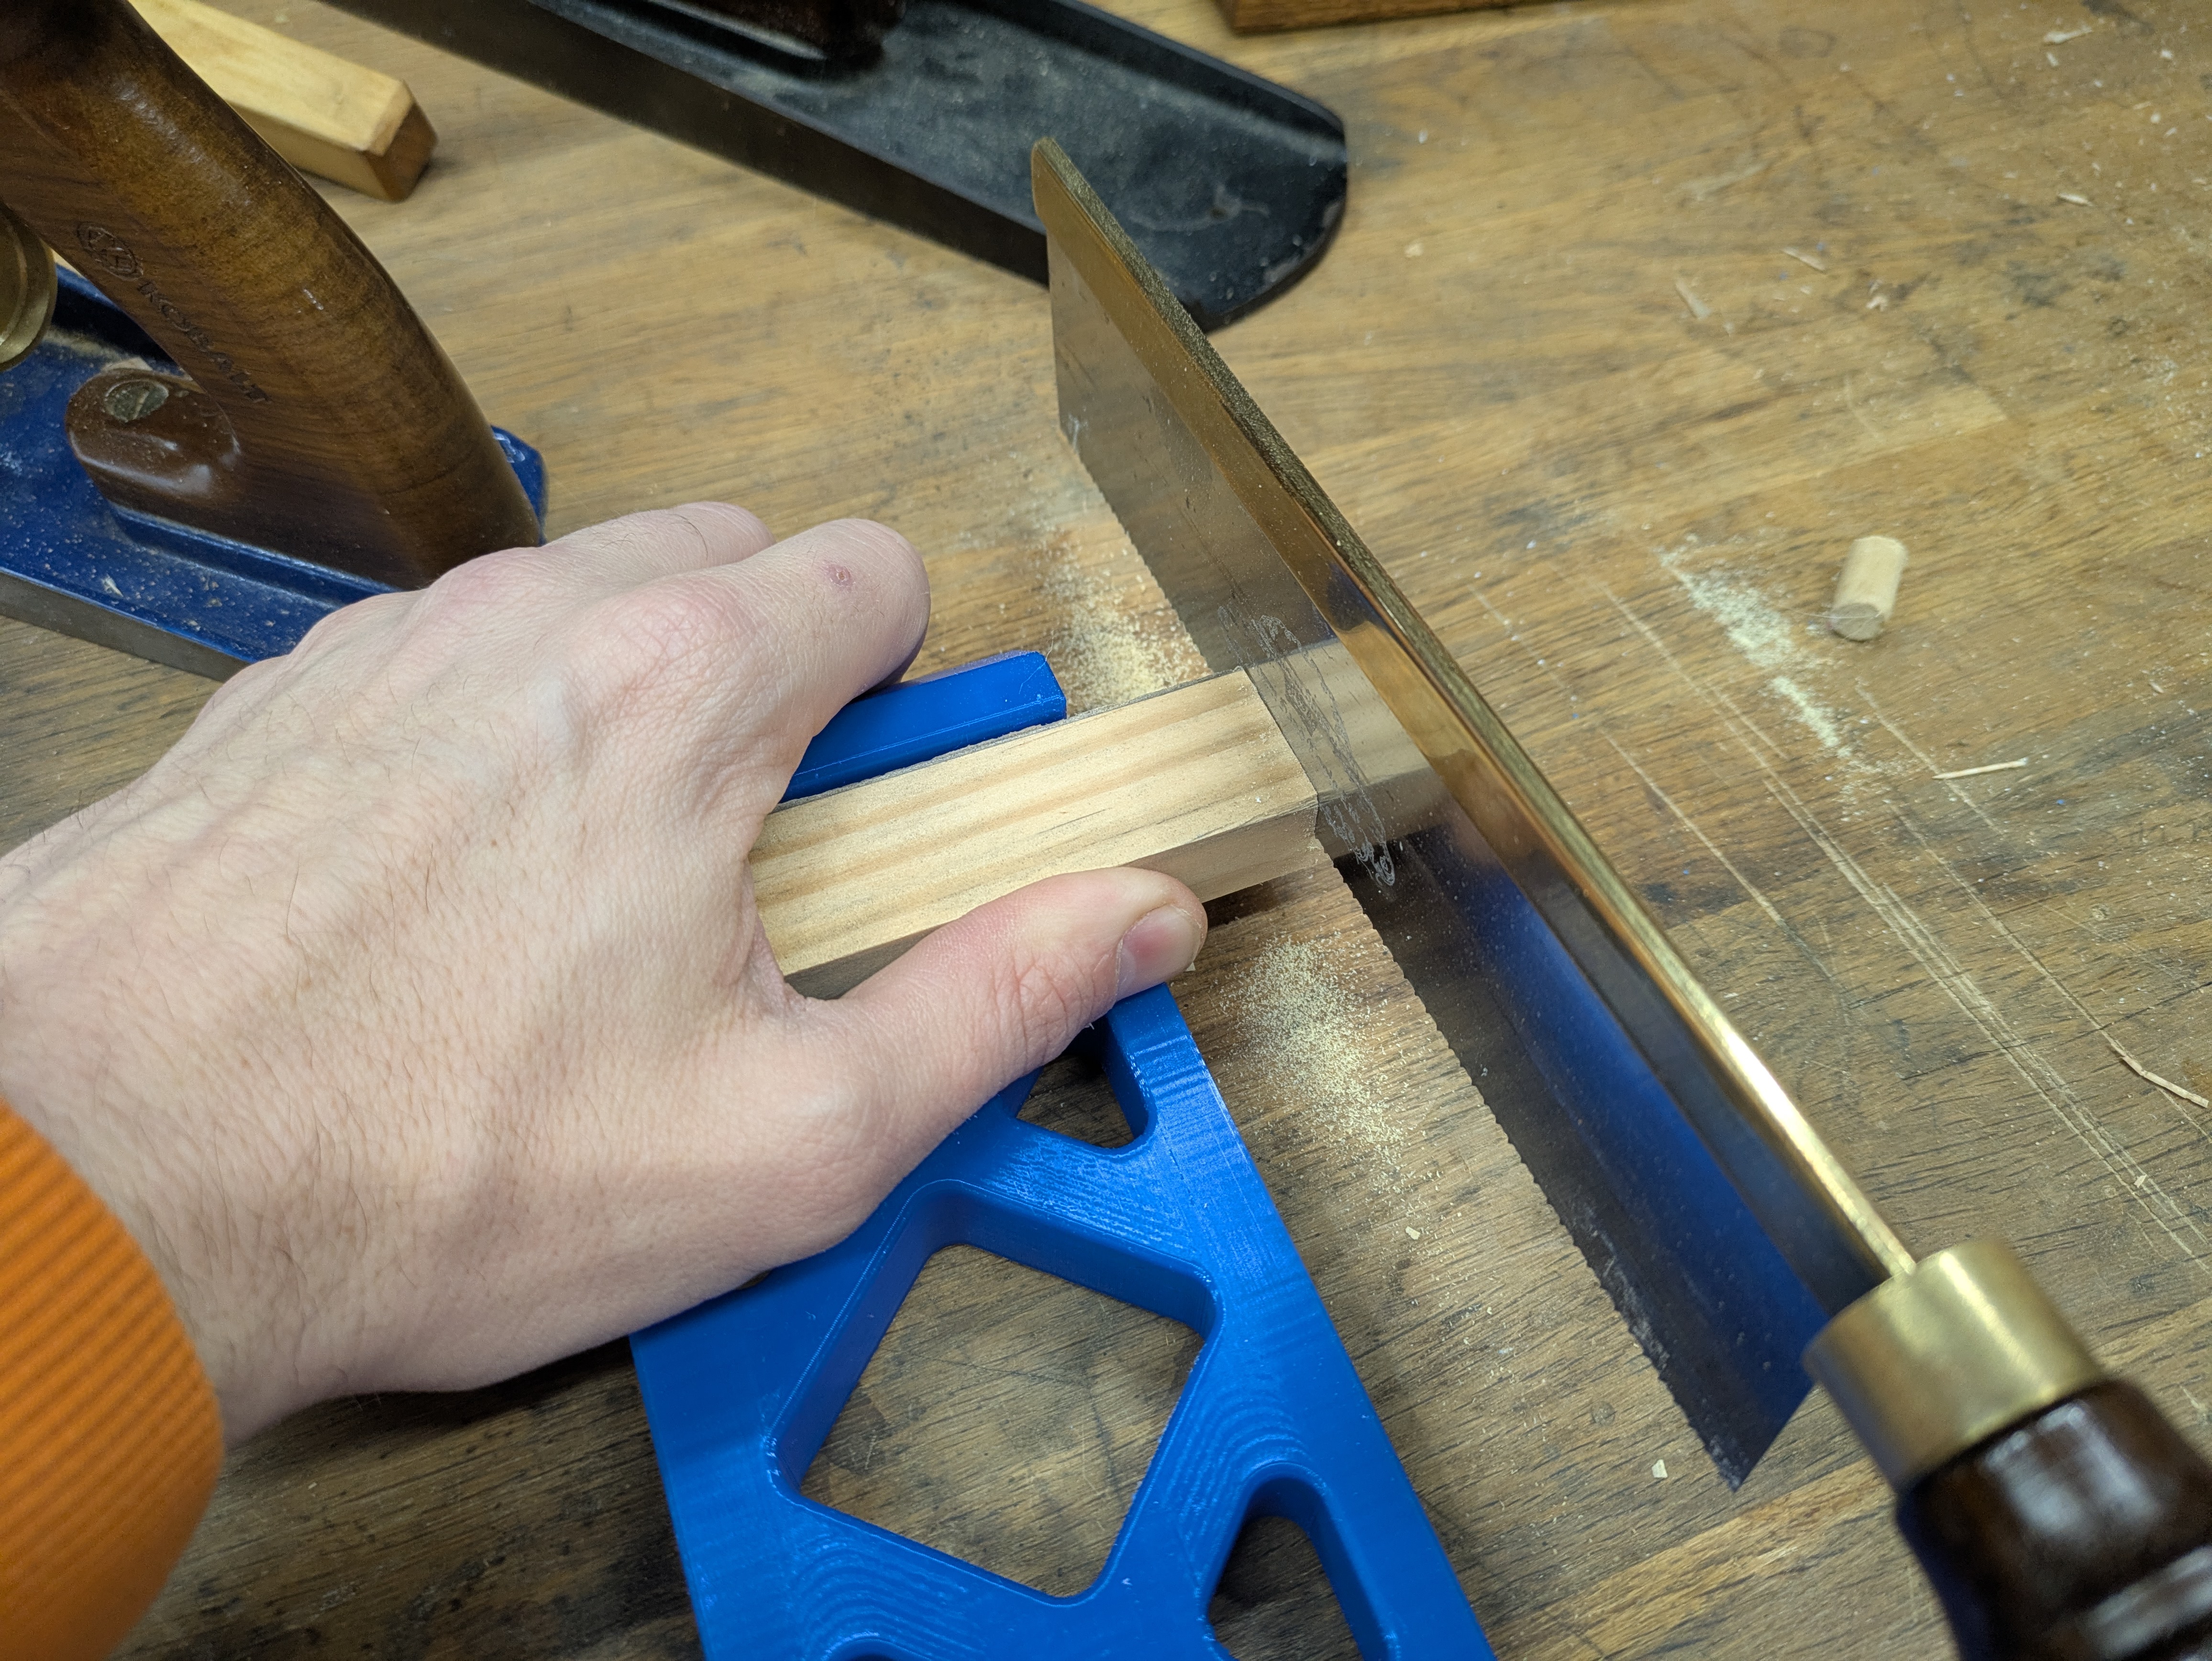
Dovetail Guides
Continuing the woodworking tools theme, I made these quick dovetail guides for my table. It occurred to me that it would be easy to custom make guides for specific projects to save a ton of time and effort. This one paid off quite well as I had 8 dovetails to cut and I was able to simply line up the guides with the hollow triangle to the center of my board and strike a line without any additional measuring or guesswork.
Download the 7z bundle containing FreeCAD design files and STL objects.
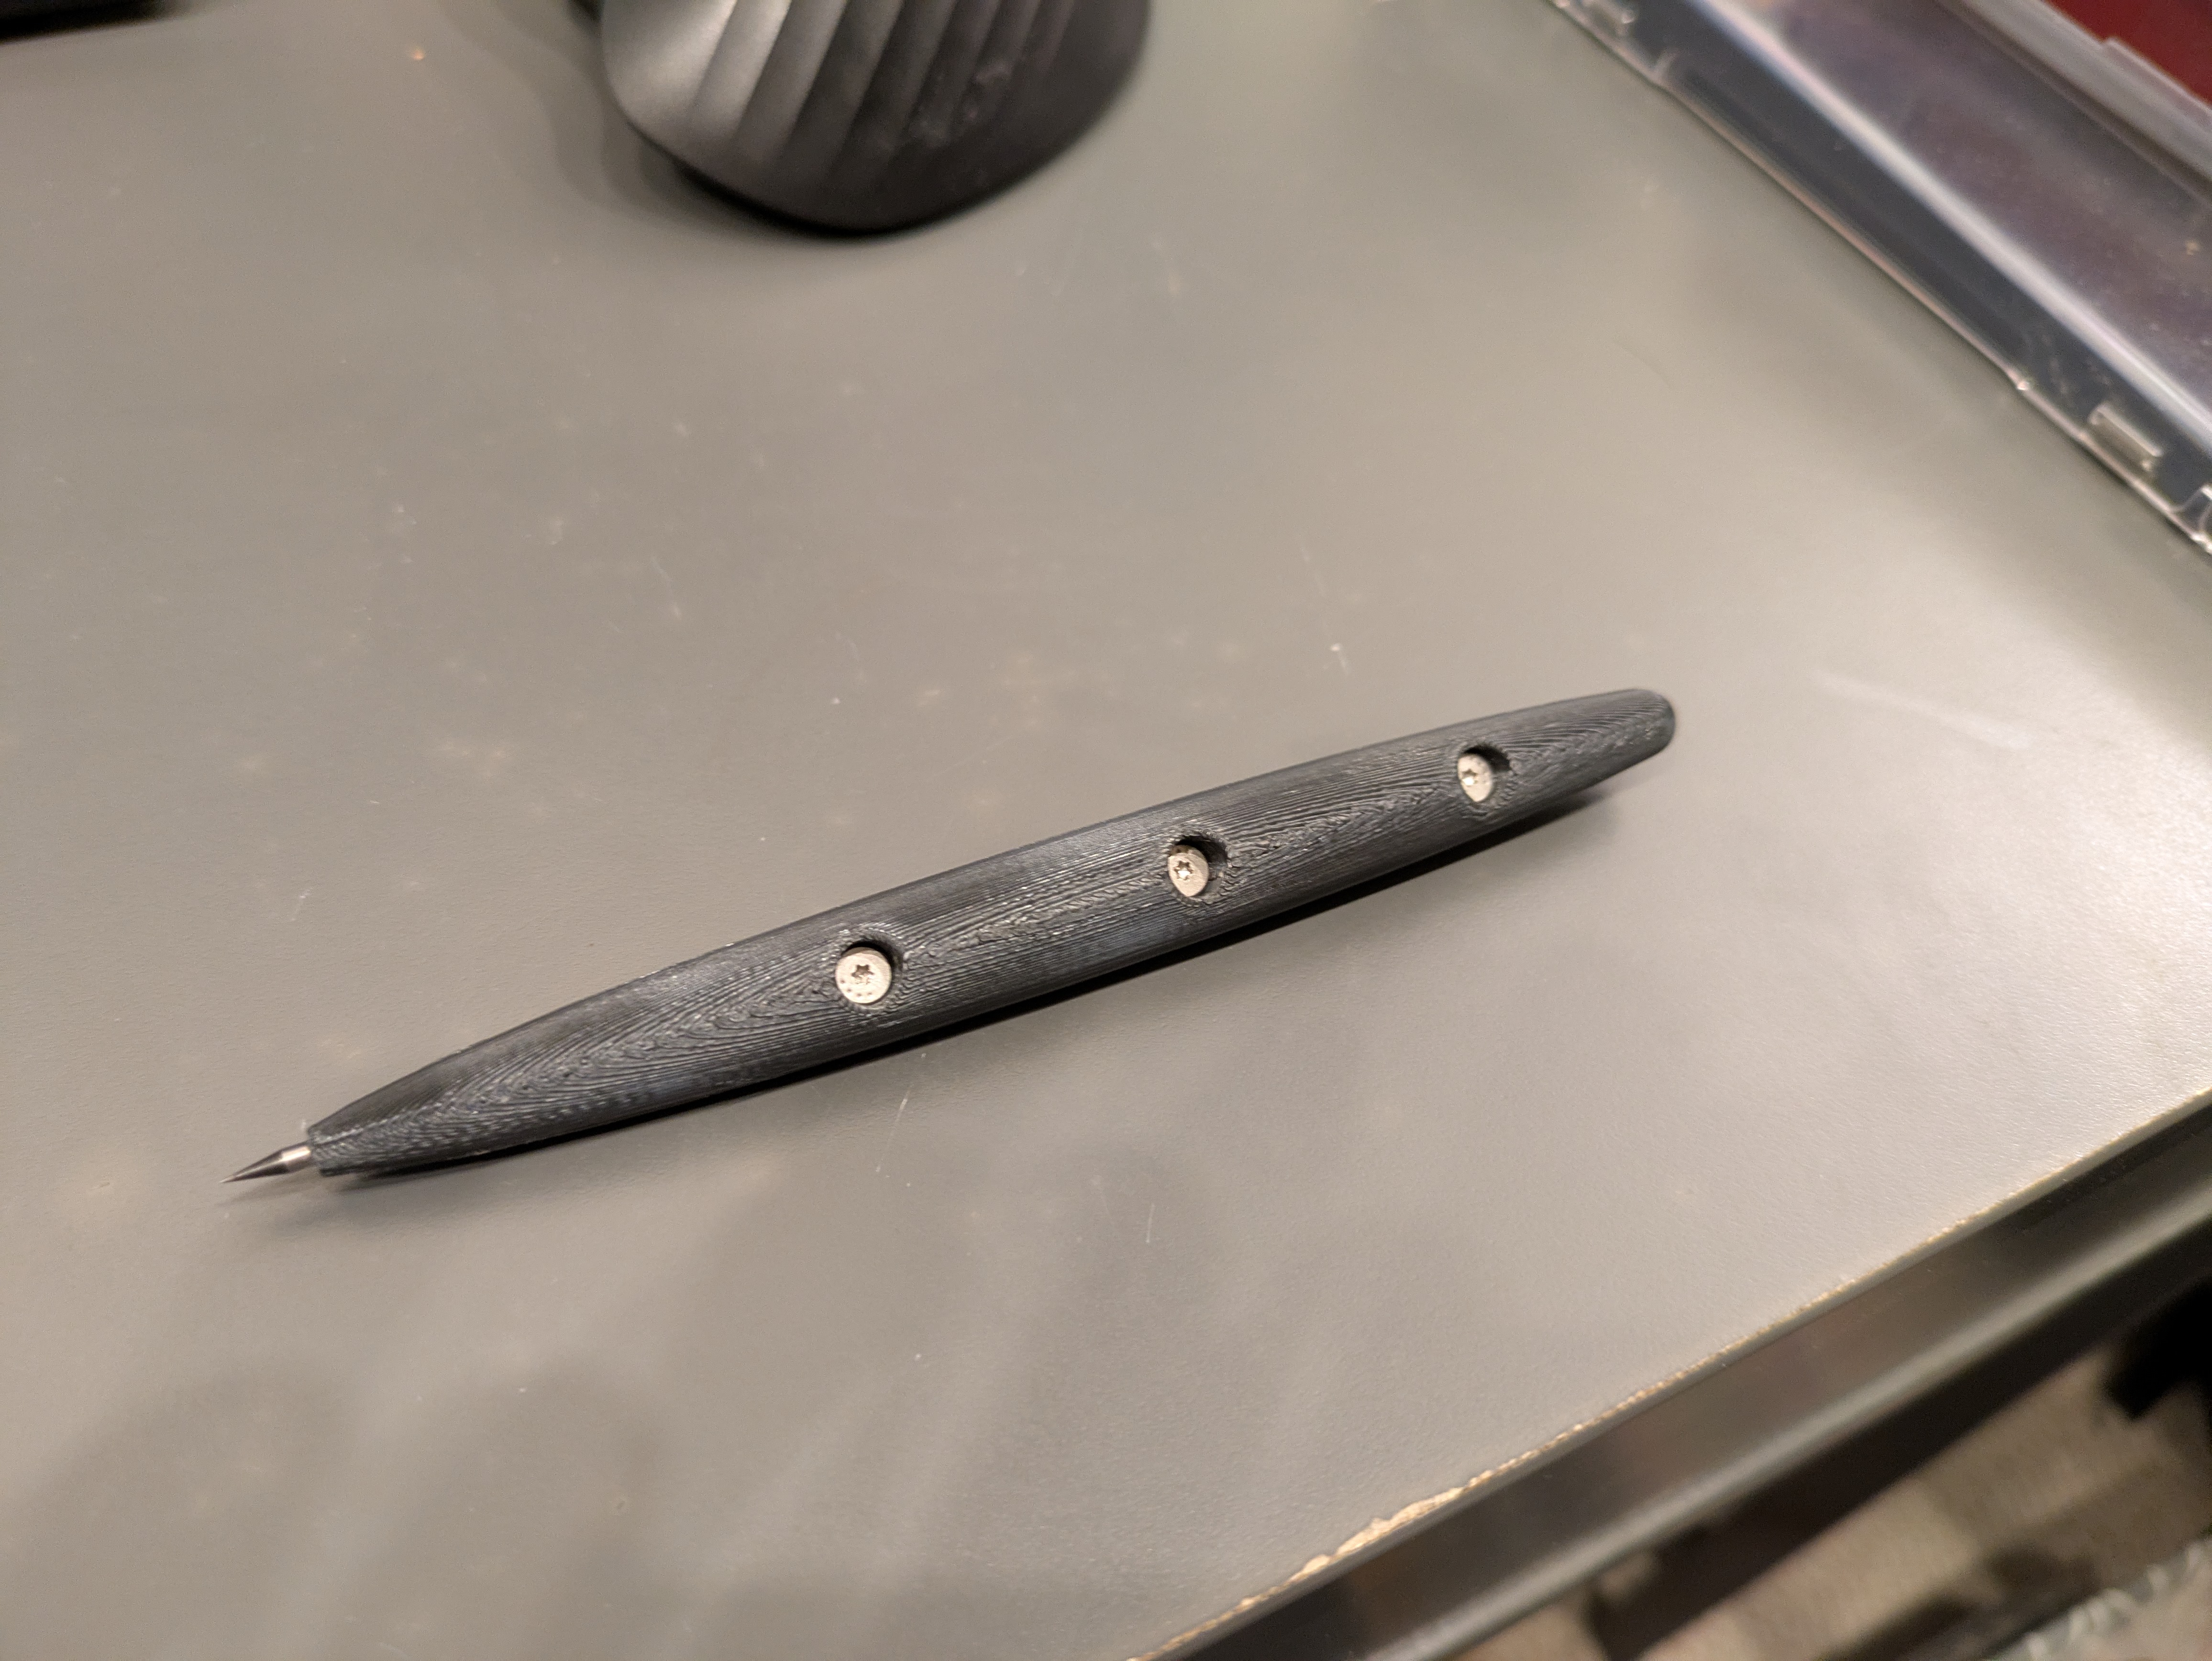
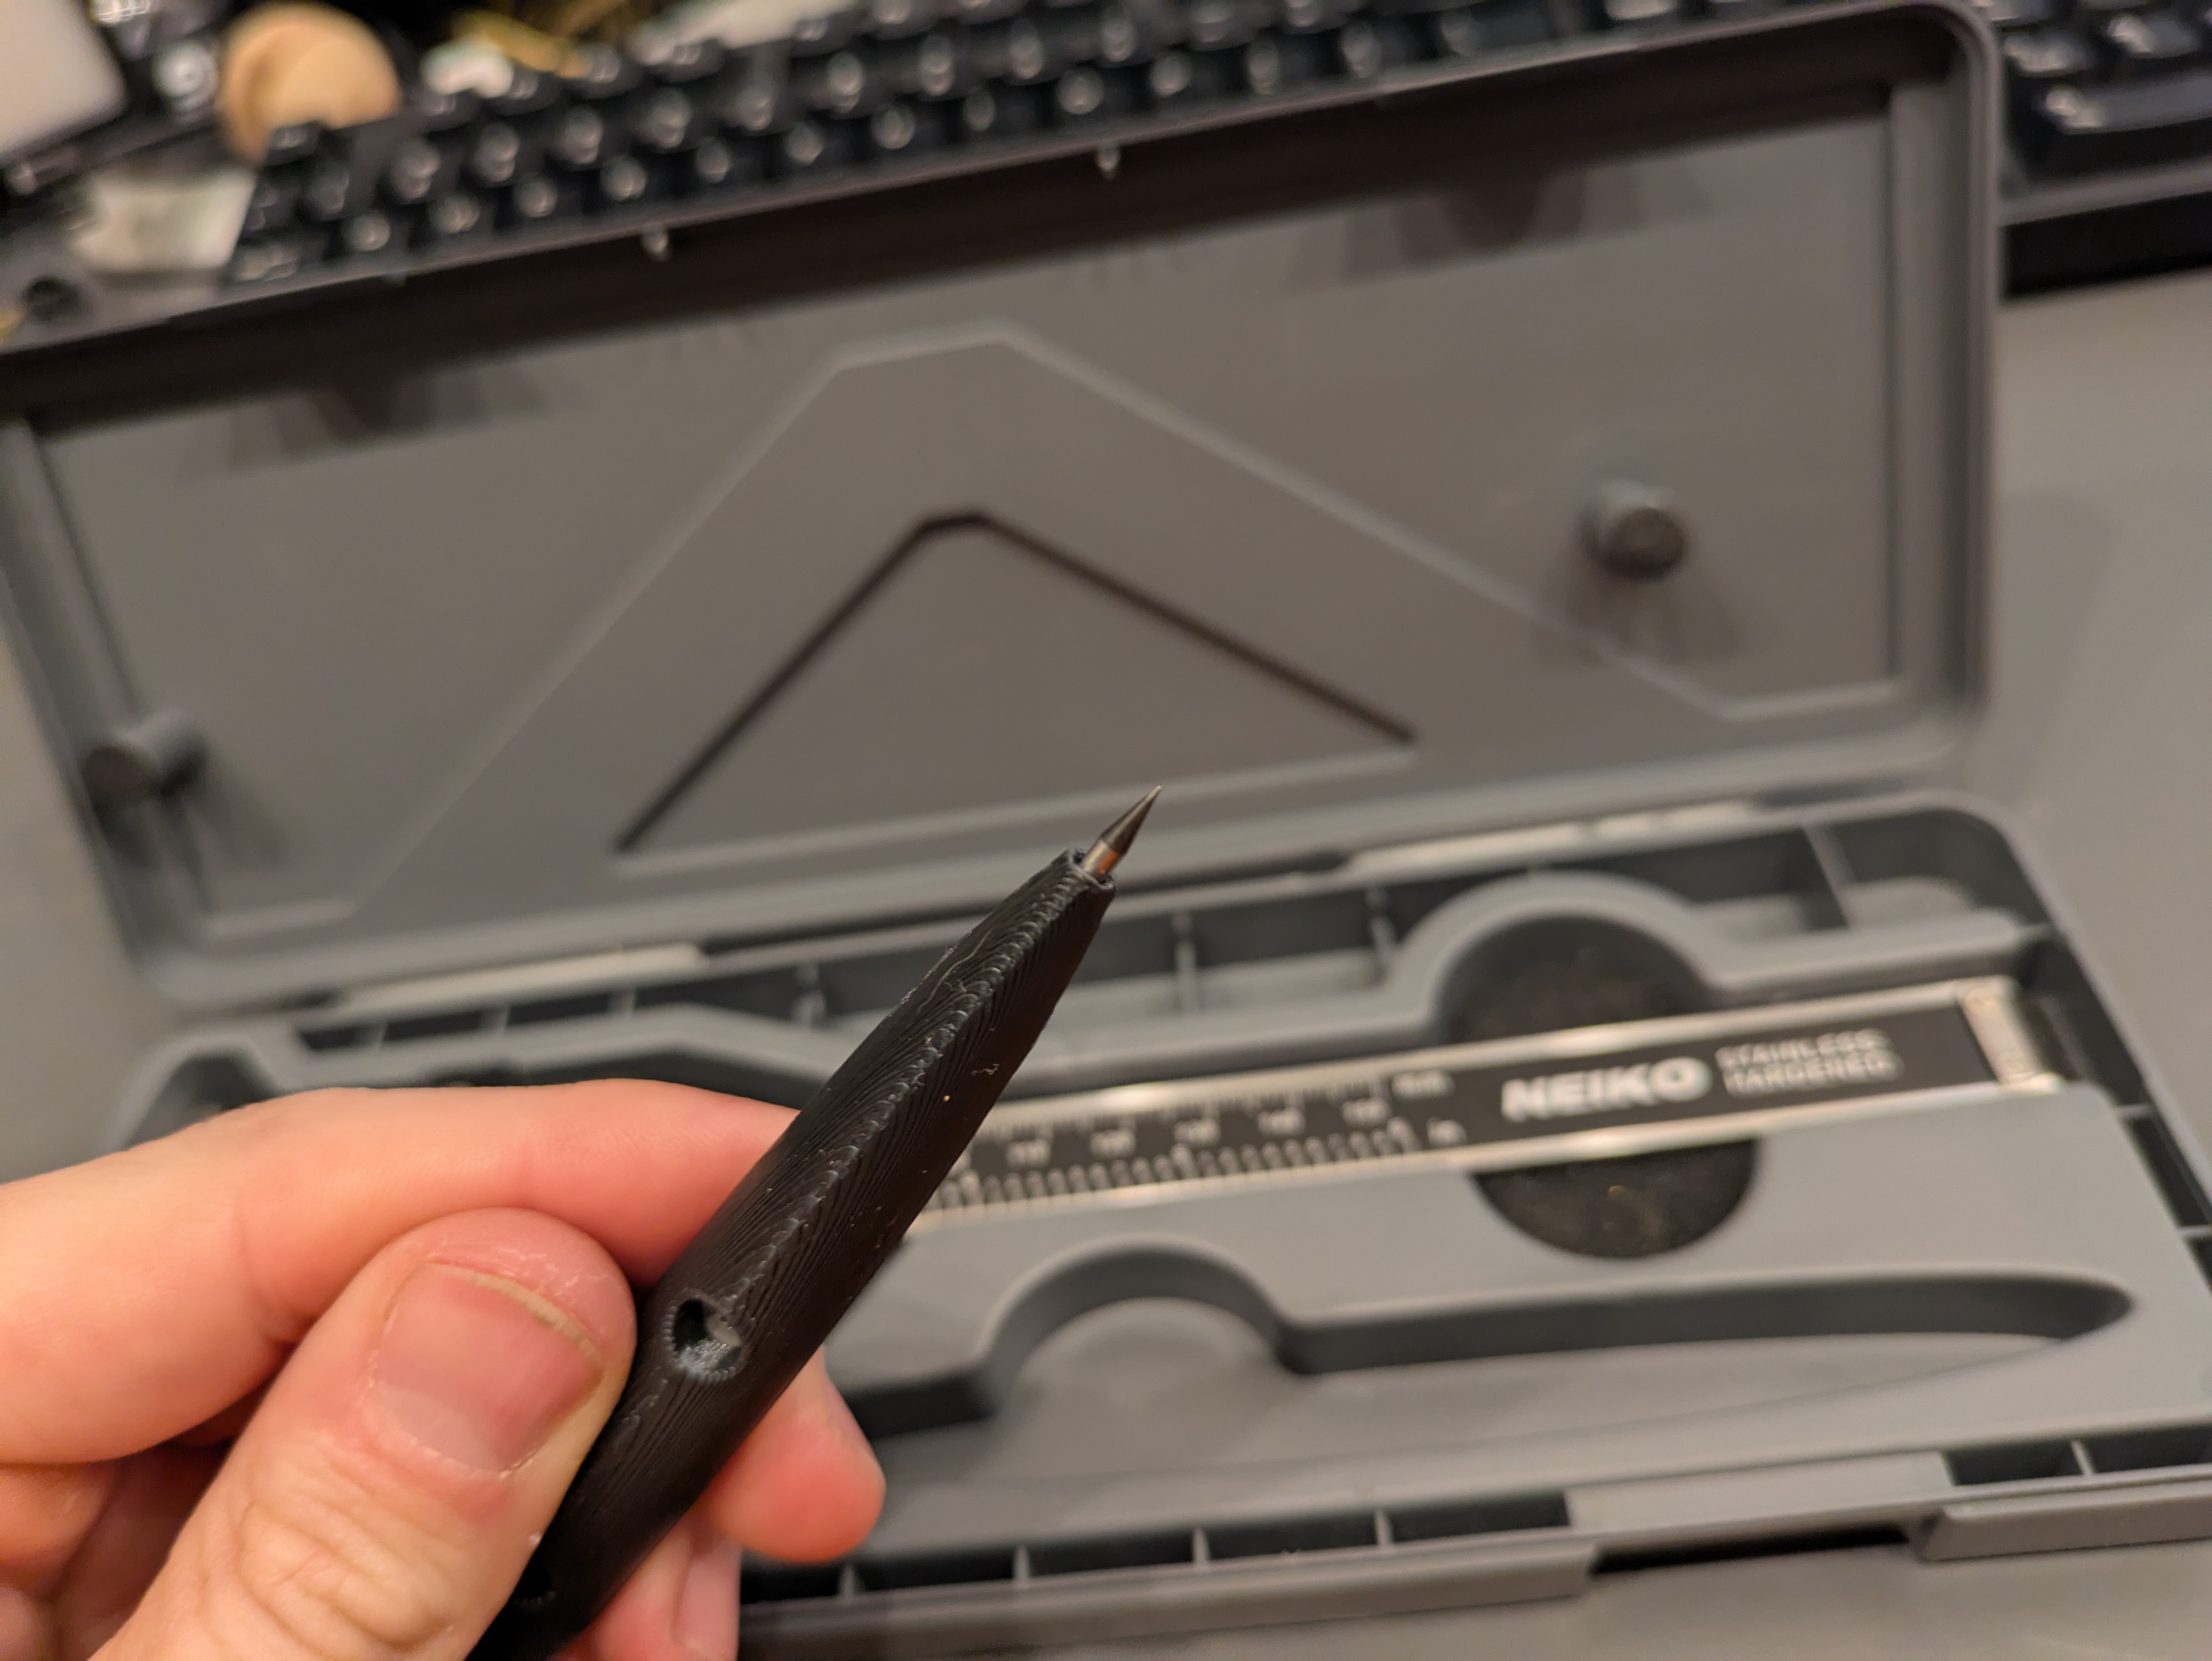
Marking pen
This one had been bugging me for a while. My calipers had a spot in its case for what I assume was some kind of marking tool. However all I had was a hardened steel pin from an old combination square. It wasn’t exactly ergonomic to use and the pin rattled around in the caliper case, which was annoying. This “pen” was the fix for holding the “pin” and I really like how it came out.
Download the 7z bundle containing FreeCAD design files and STL objects.
Mounts, Brackets, and Repairs
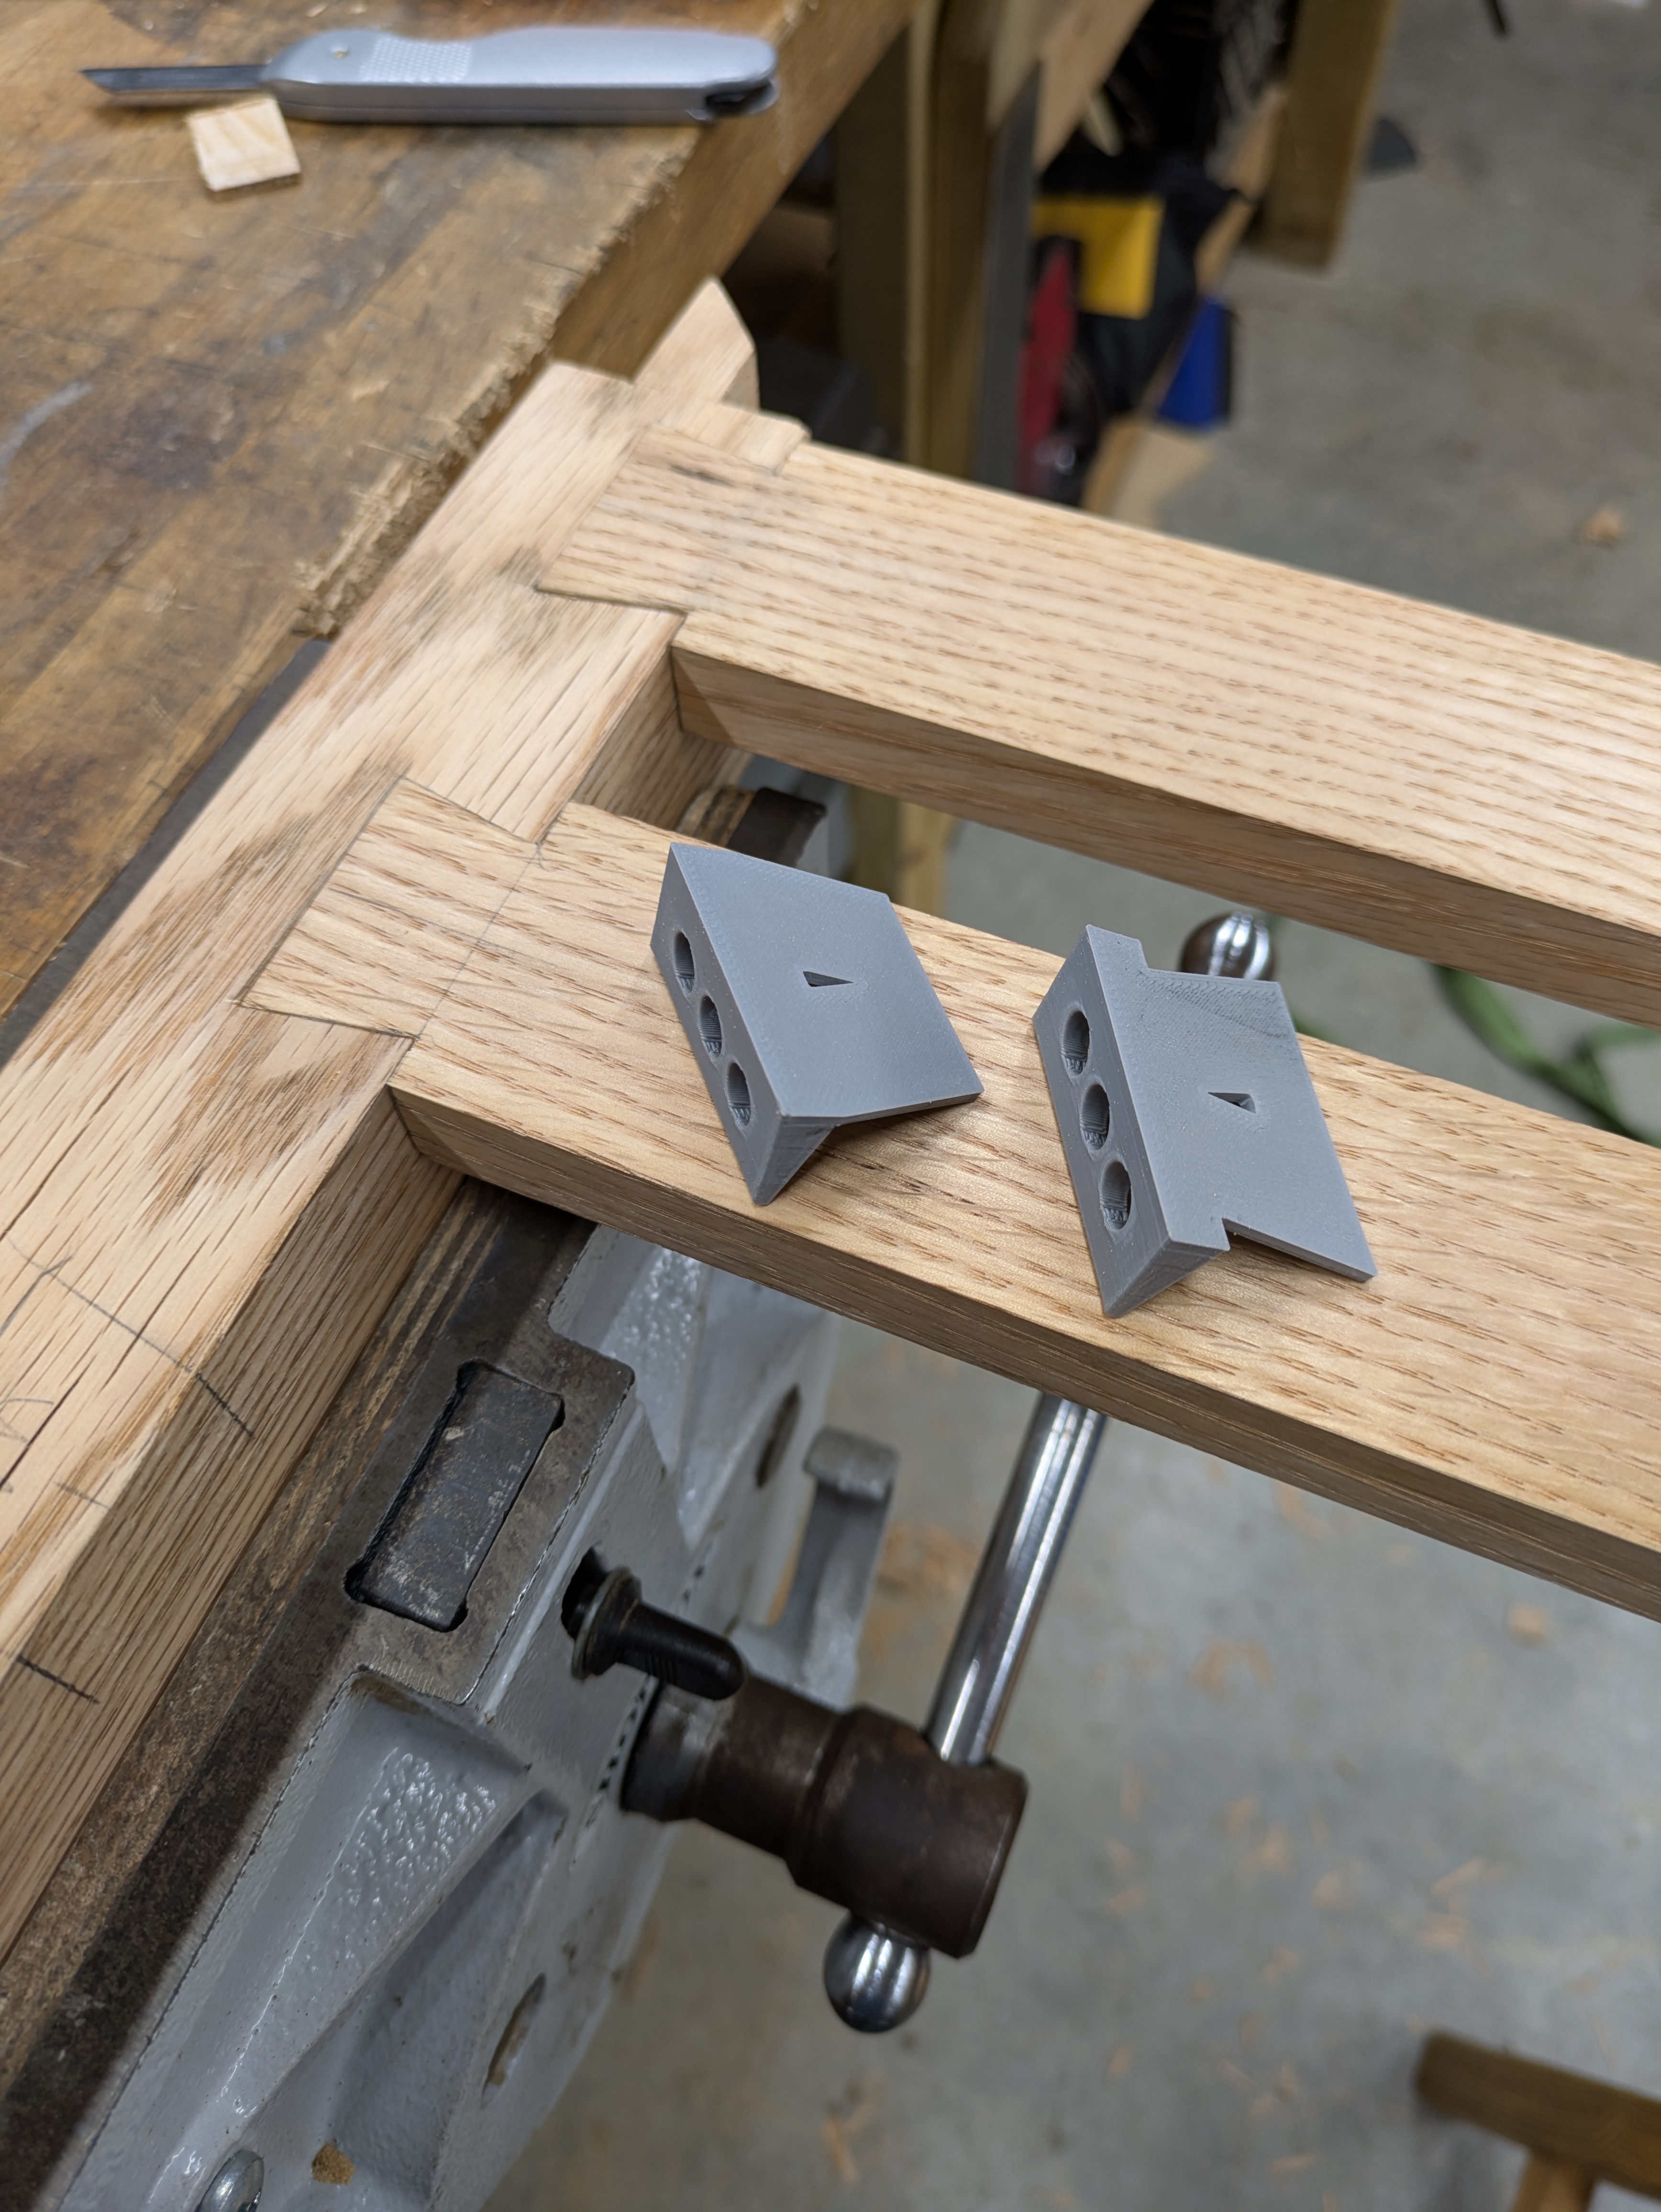
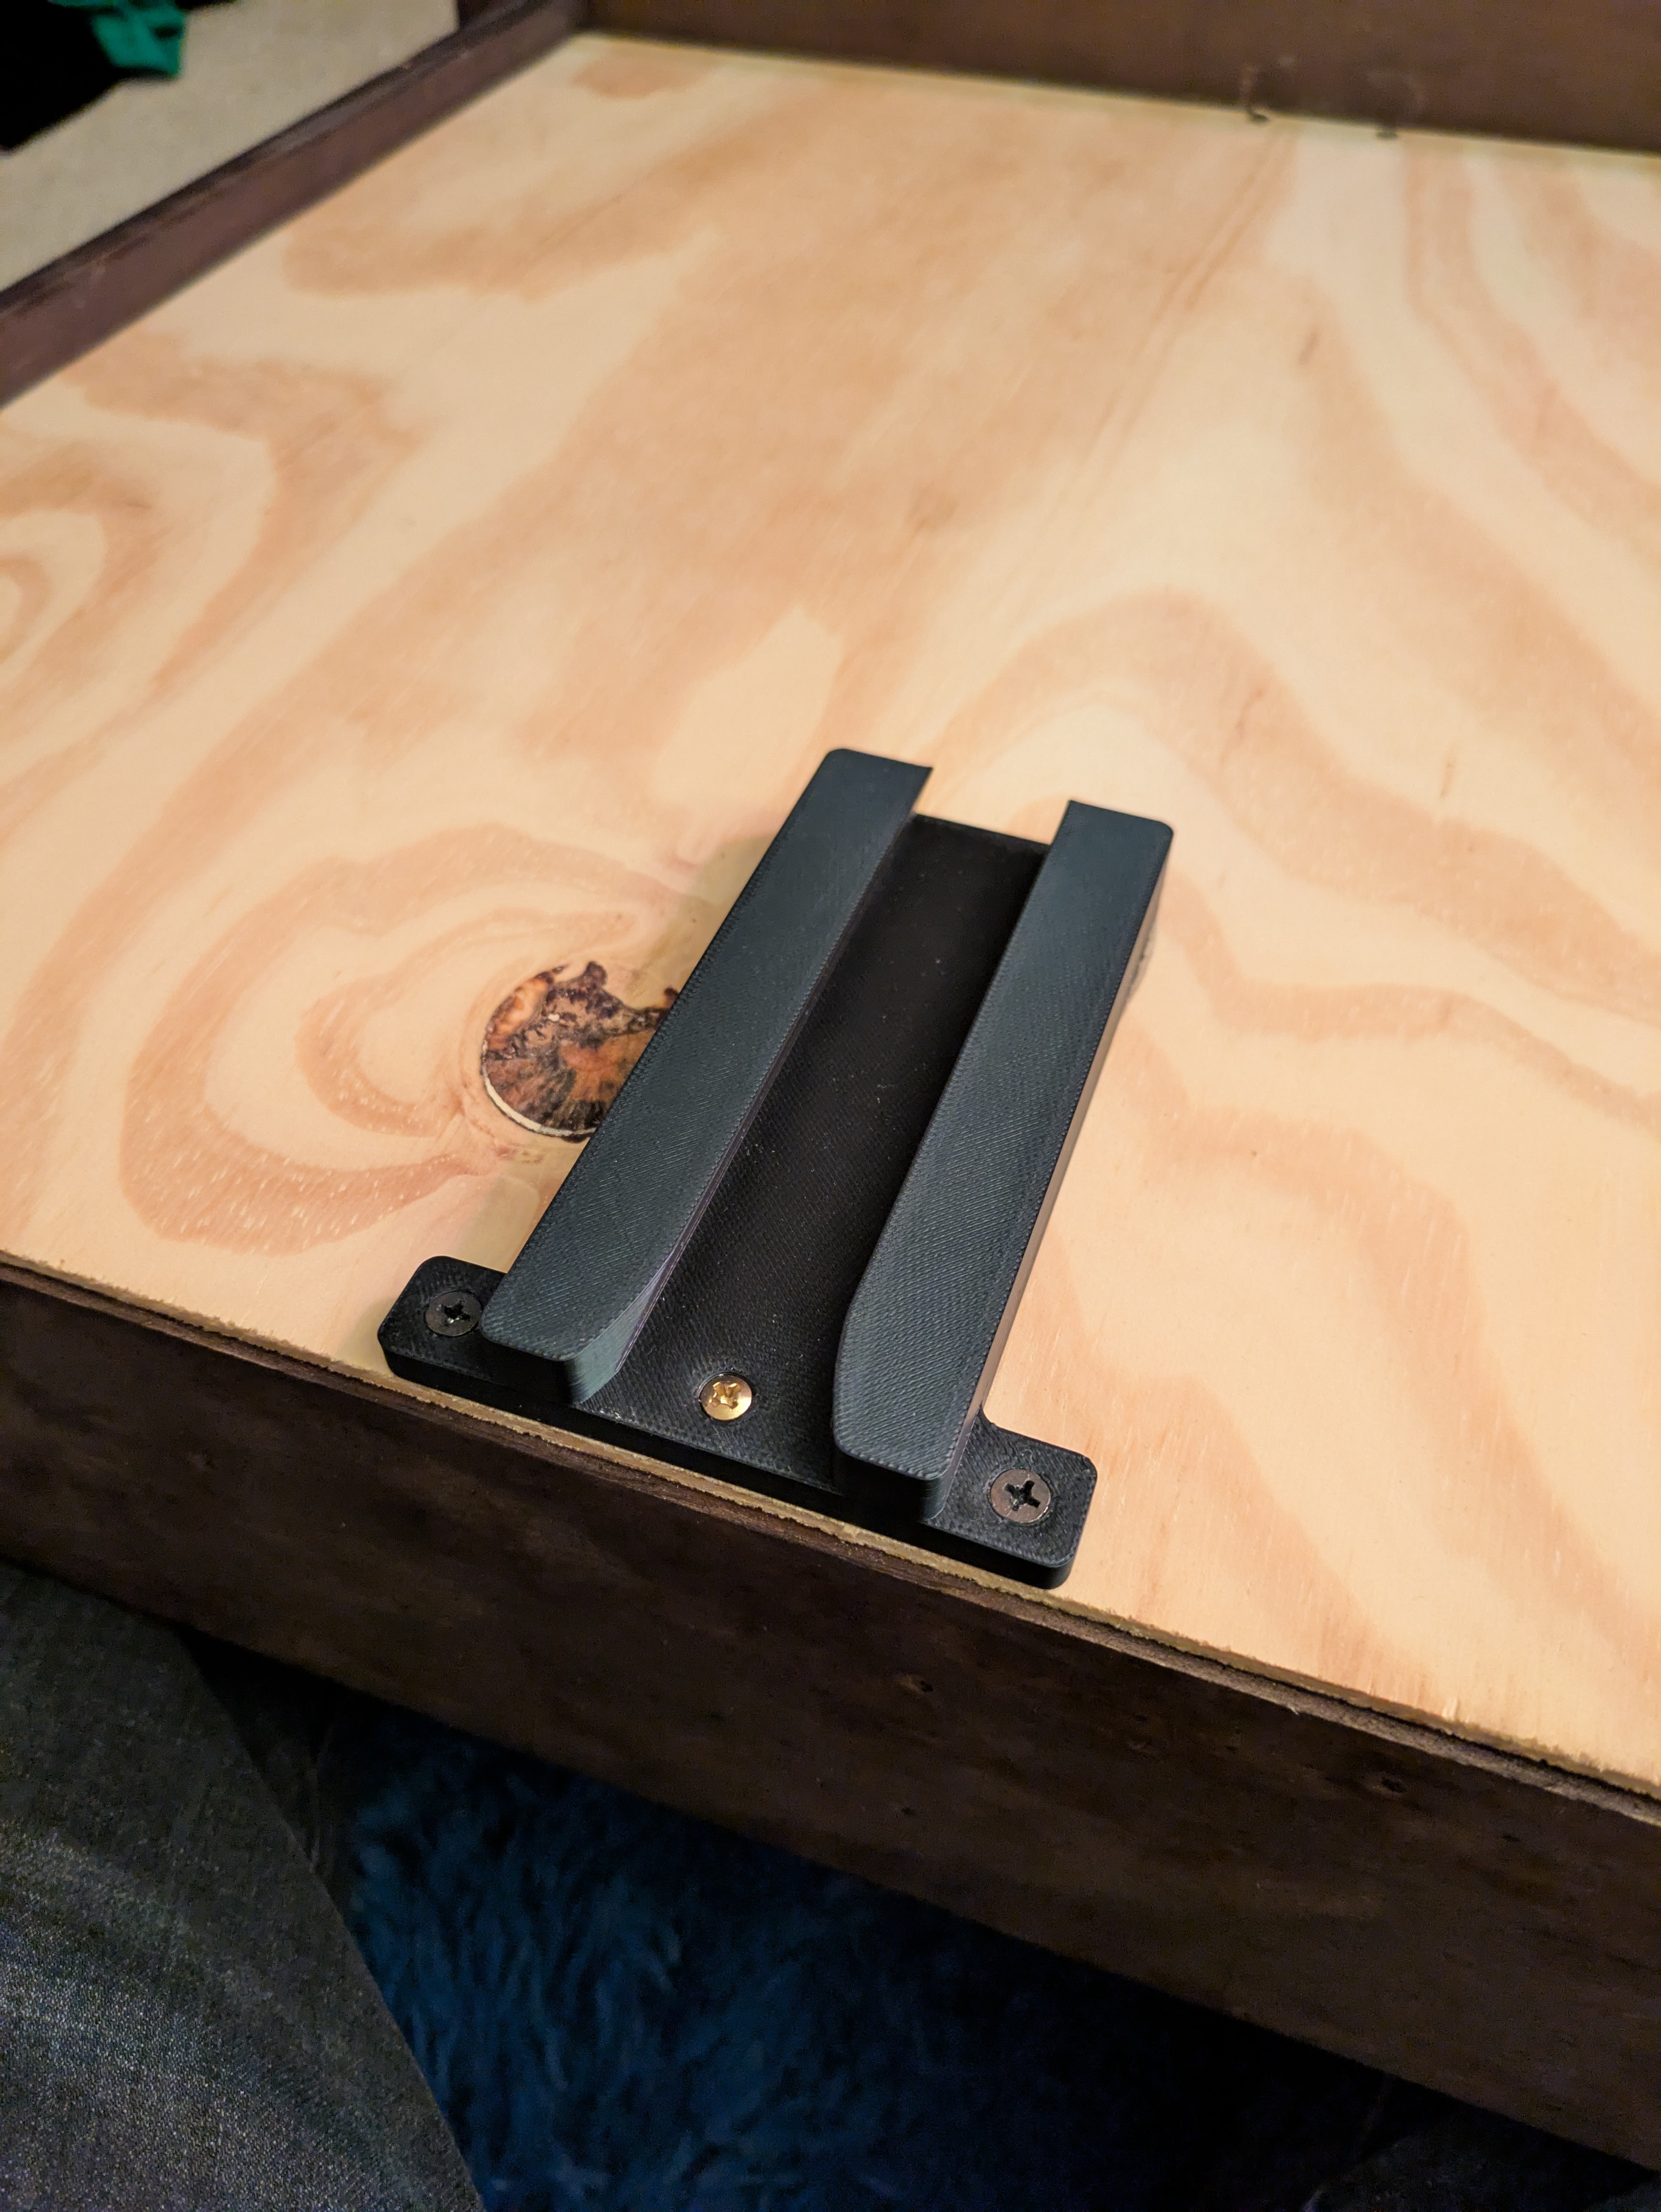
Drawer Fix
My son, bless his heart, isn’t the most thoughtful person when it comes to cause and effect. For example, if you step on your drawer while it’s open, would it break? Only one way to find out, of course. I could make this part out of wood, however, that wouldn’t be a trivial fix and when you have a 3D printer… why not, right? This was one of the first ones I took a stepwise approach to fixing. I needed to ensure the dovetail measurements were good before printing out the entire thing so I took a cross-section of a dovetail to test with. In the long run, this results in less waste. By printing a tiny piece to test fit first, you end up throwing away only a small number of test prints before the full-scale run. I’ve since incorporated this fully into my workflows for other parts. For added strength, I used a much heavier infill for this part too. It’s been months and it’s holding as strong as ever.
Download the 7z bundle containing FreeCAD design files and STL objects.
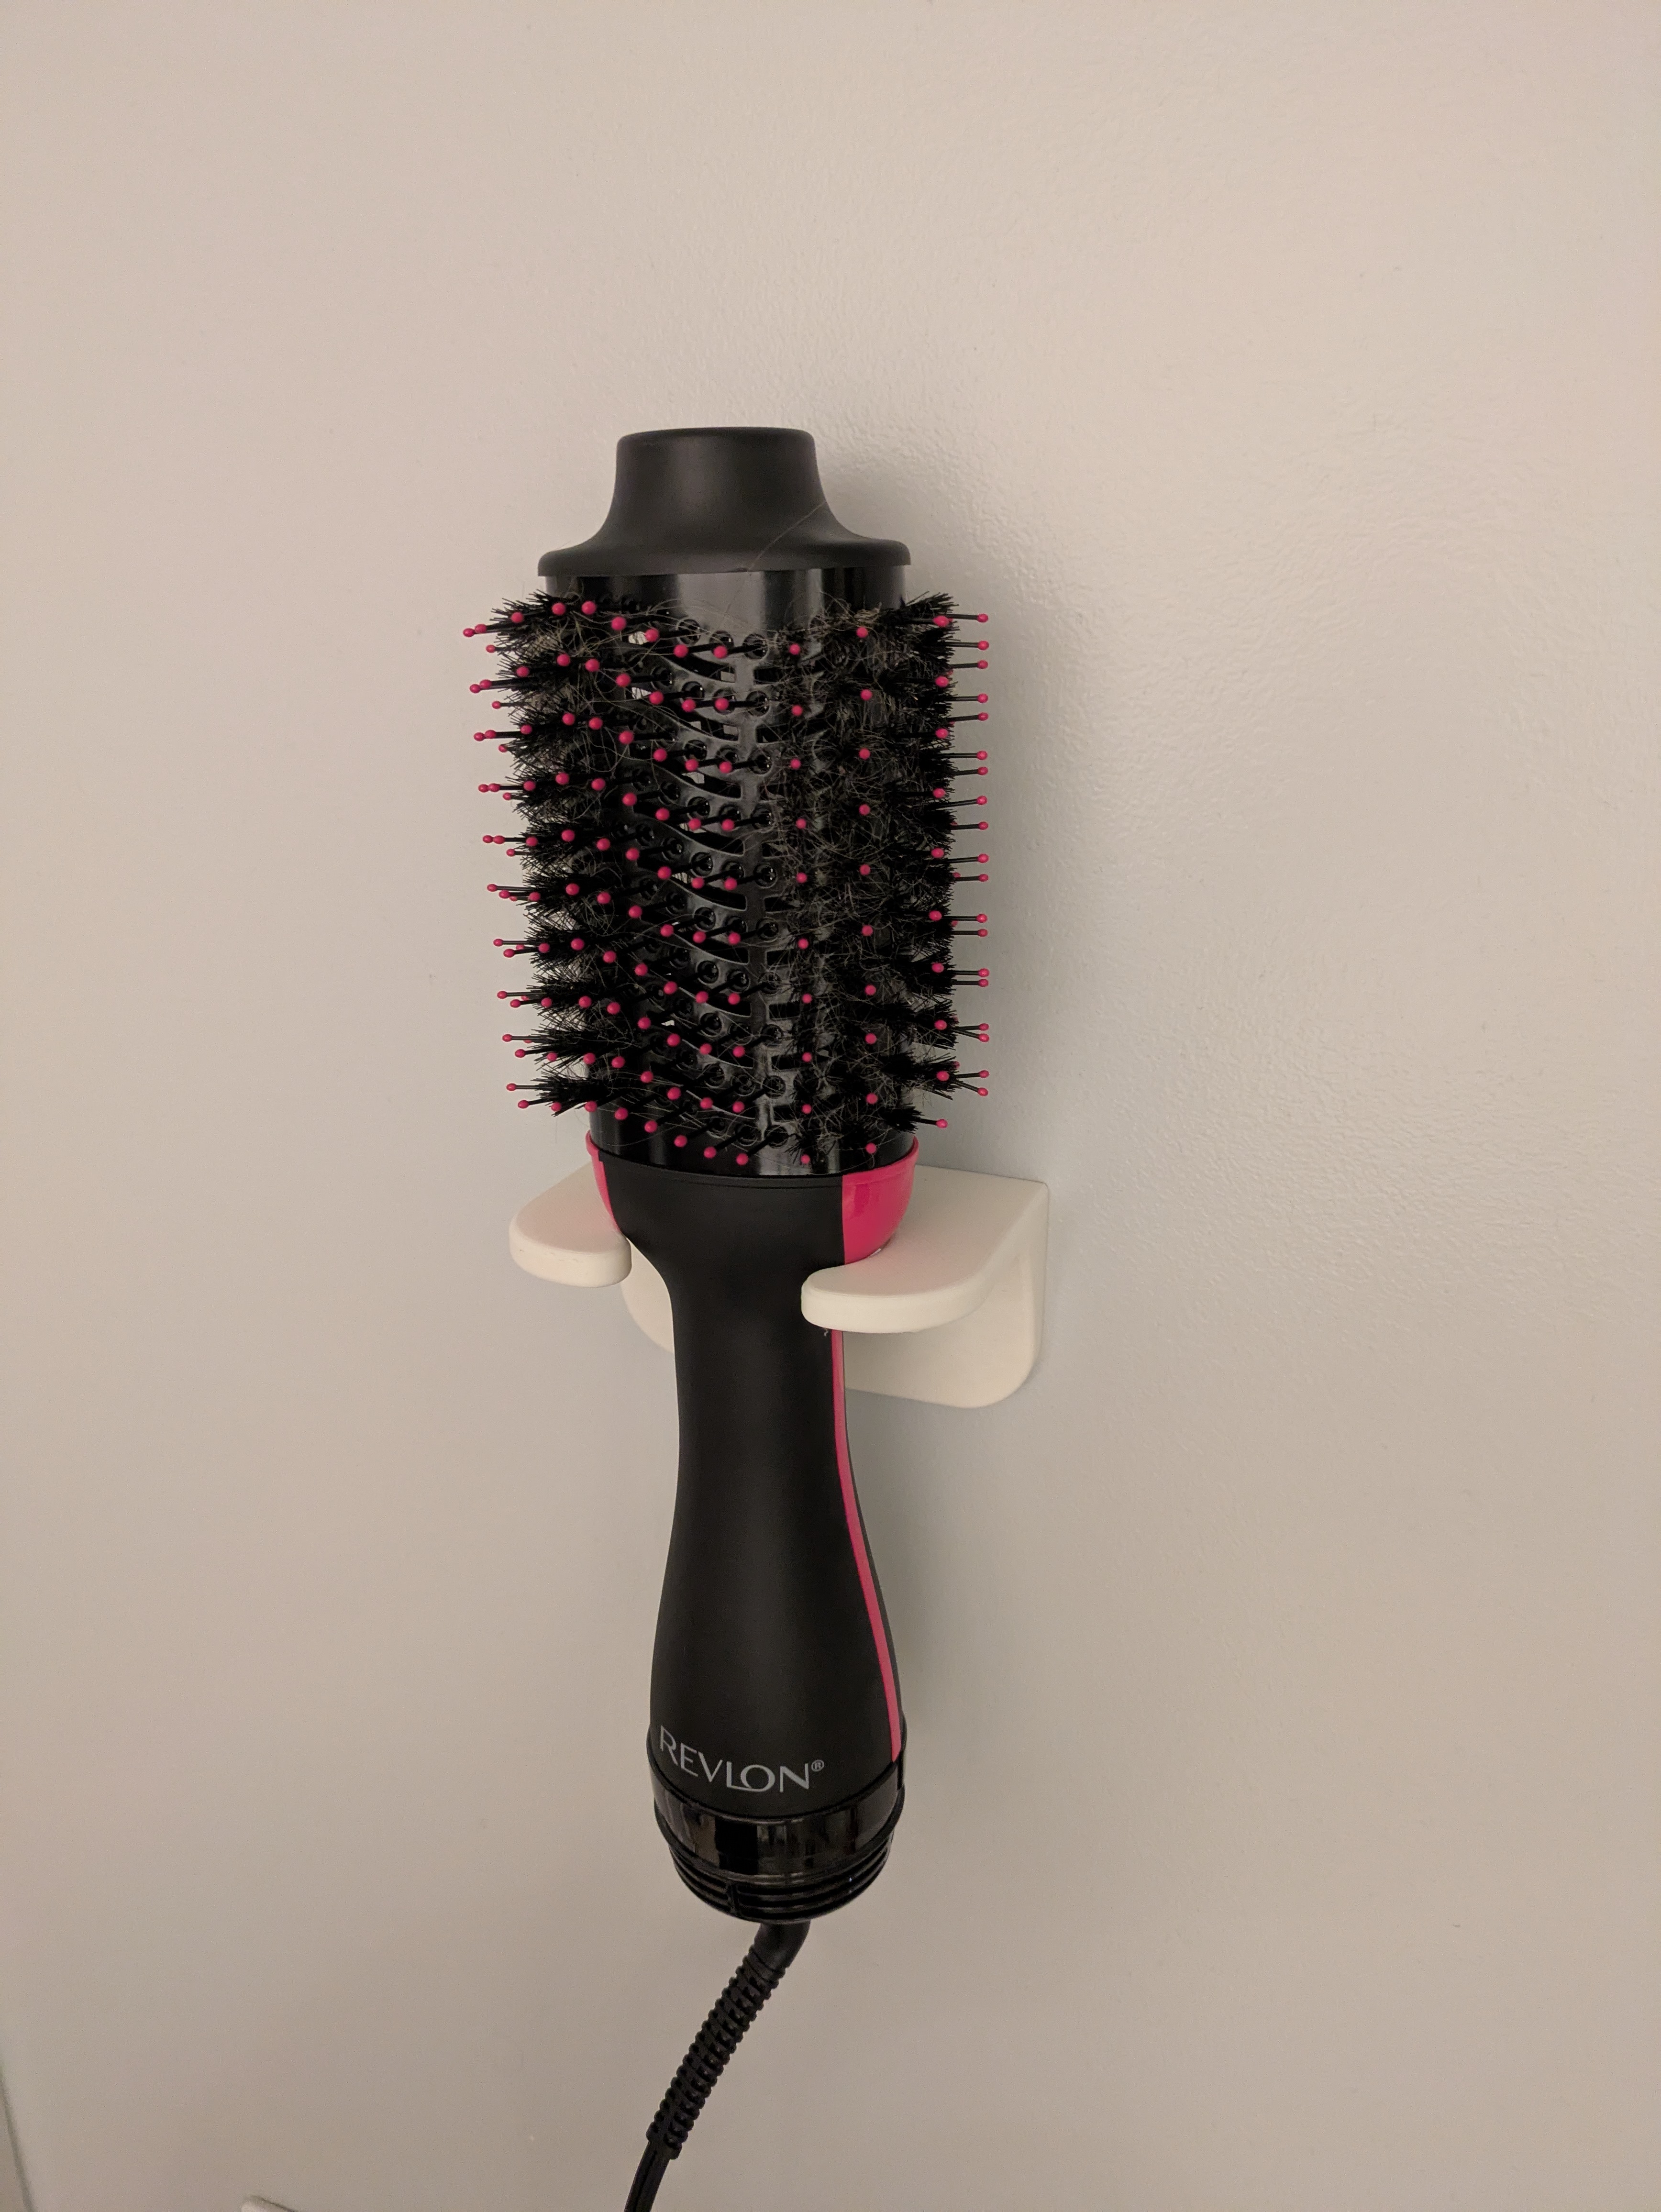
Hair Dryer Wall Mount
My wife asked me to make a little mount for her hair dryer because it doesn’t fit the one we have already. So, I whipped this one together in about 2 hours. Most of that was doing the partial print test-fitting to make sure everything fit as expected. I’ve found that one of the most useful things about 3D printing is the ability to make custom-fit brackets and mounts for just about anything you can think of.
Download the 7z bundle containing FreeCAD design files and STL objects.
Everything is Computer
Computer Tower Parts
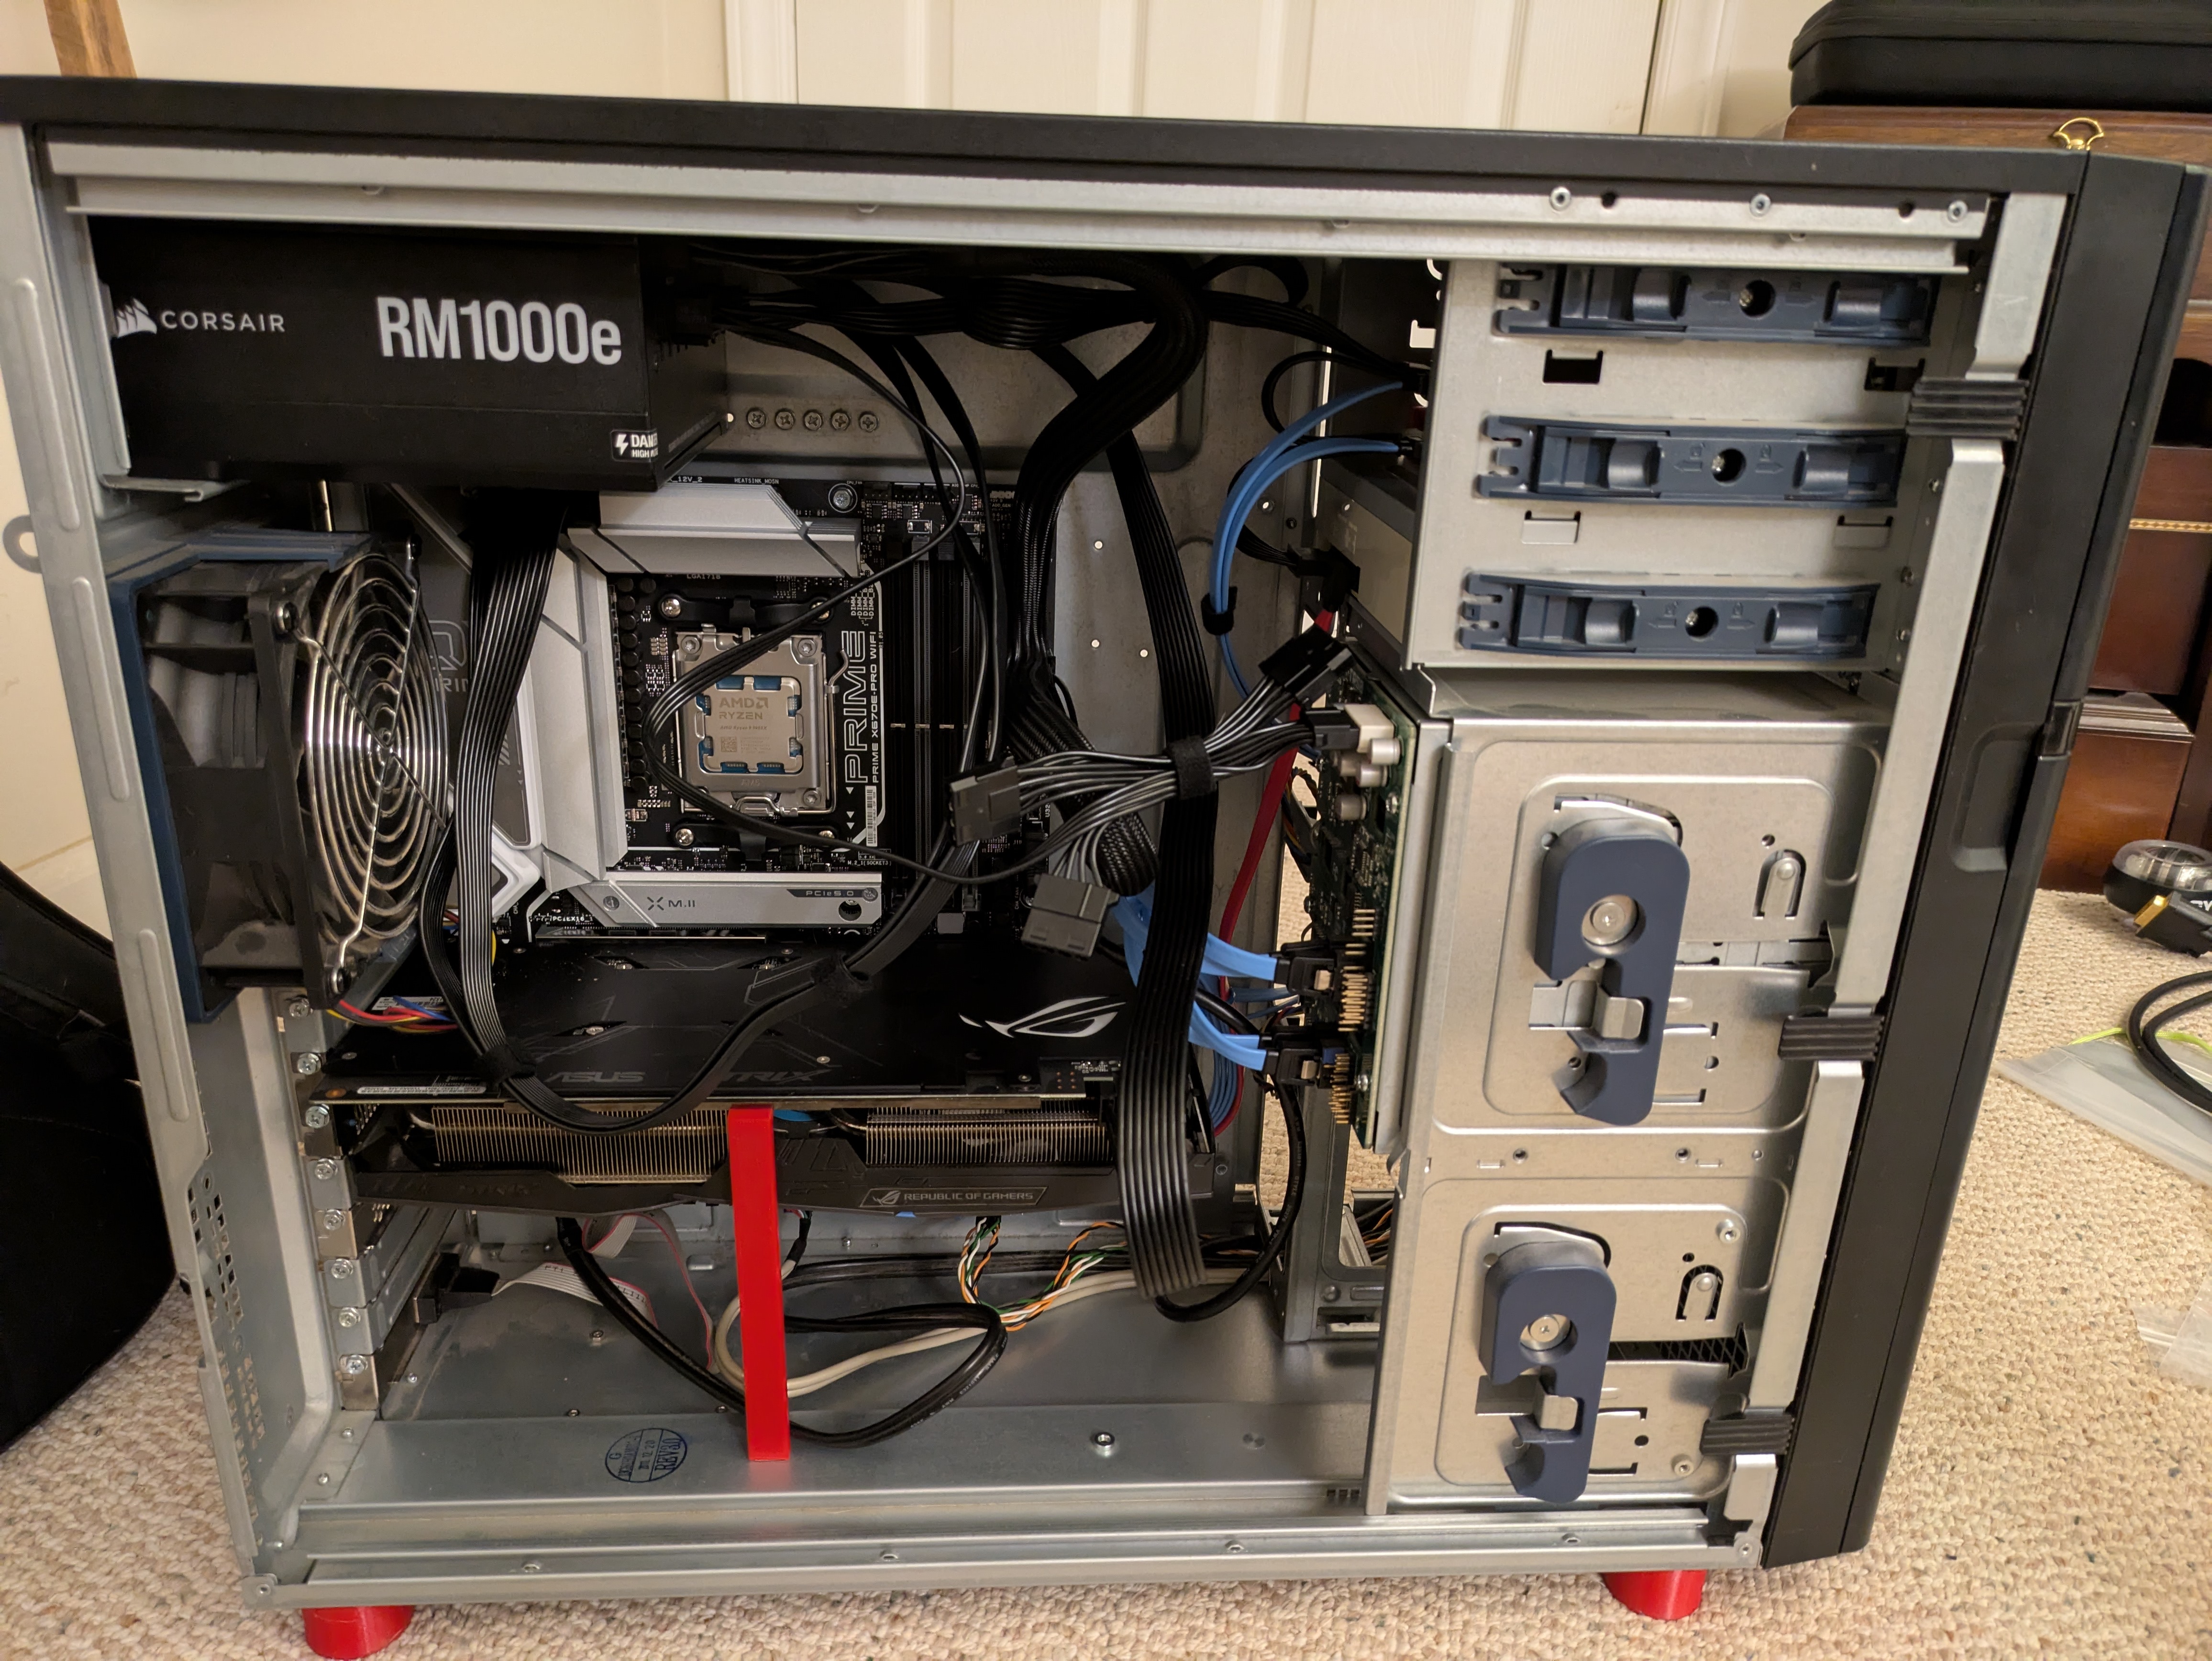
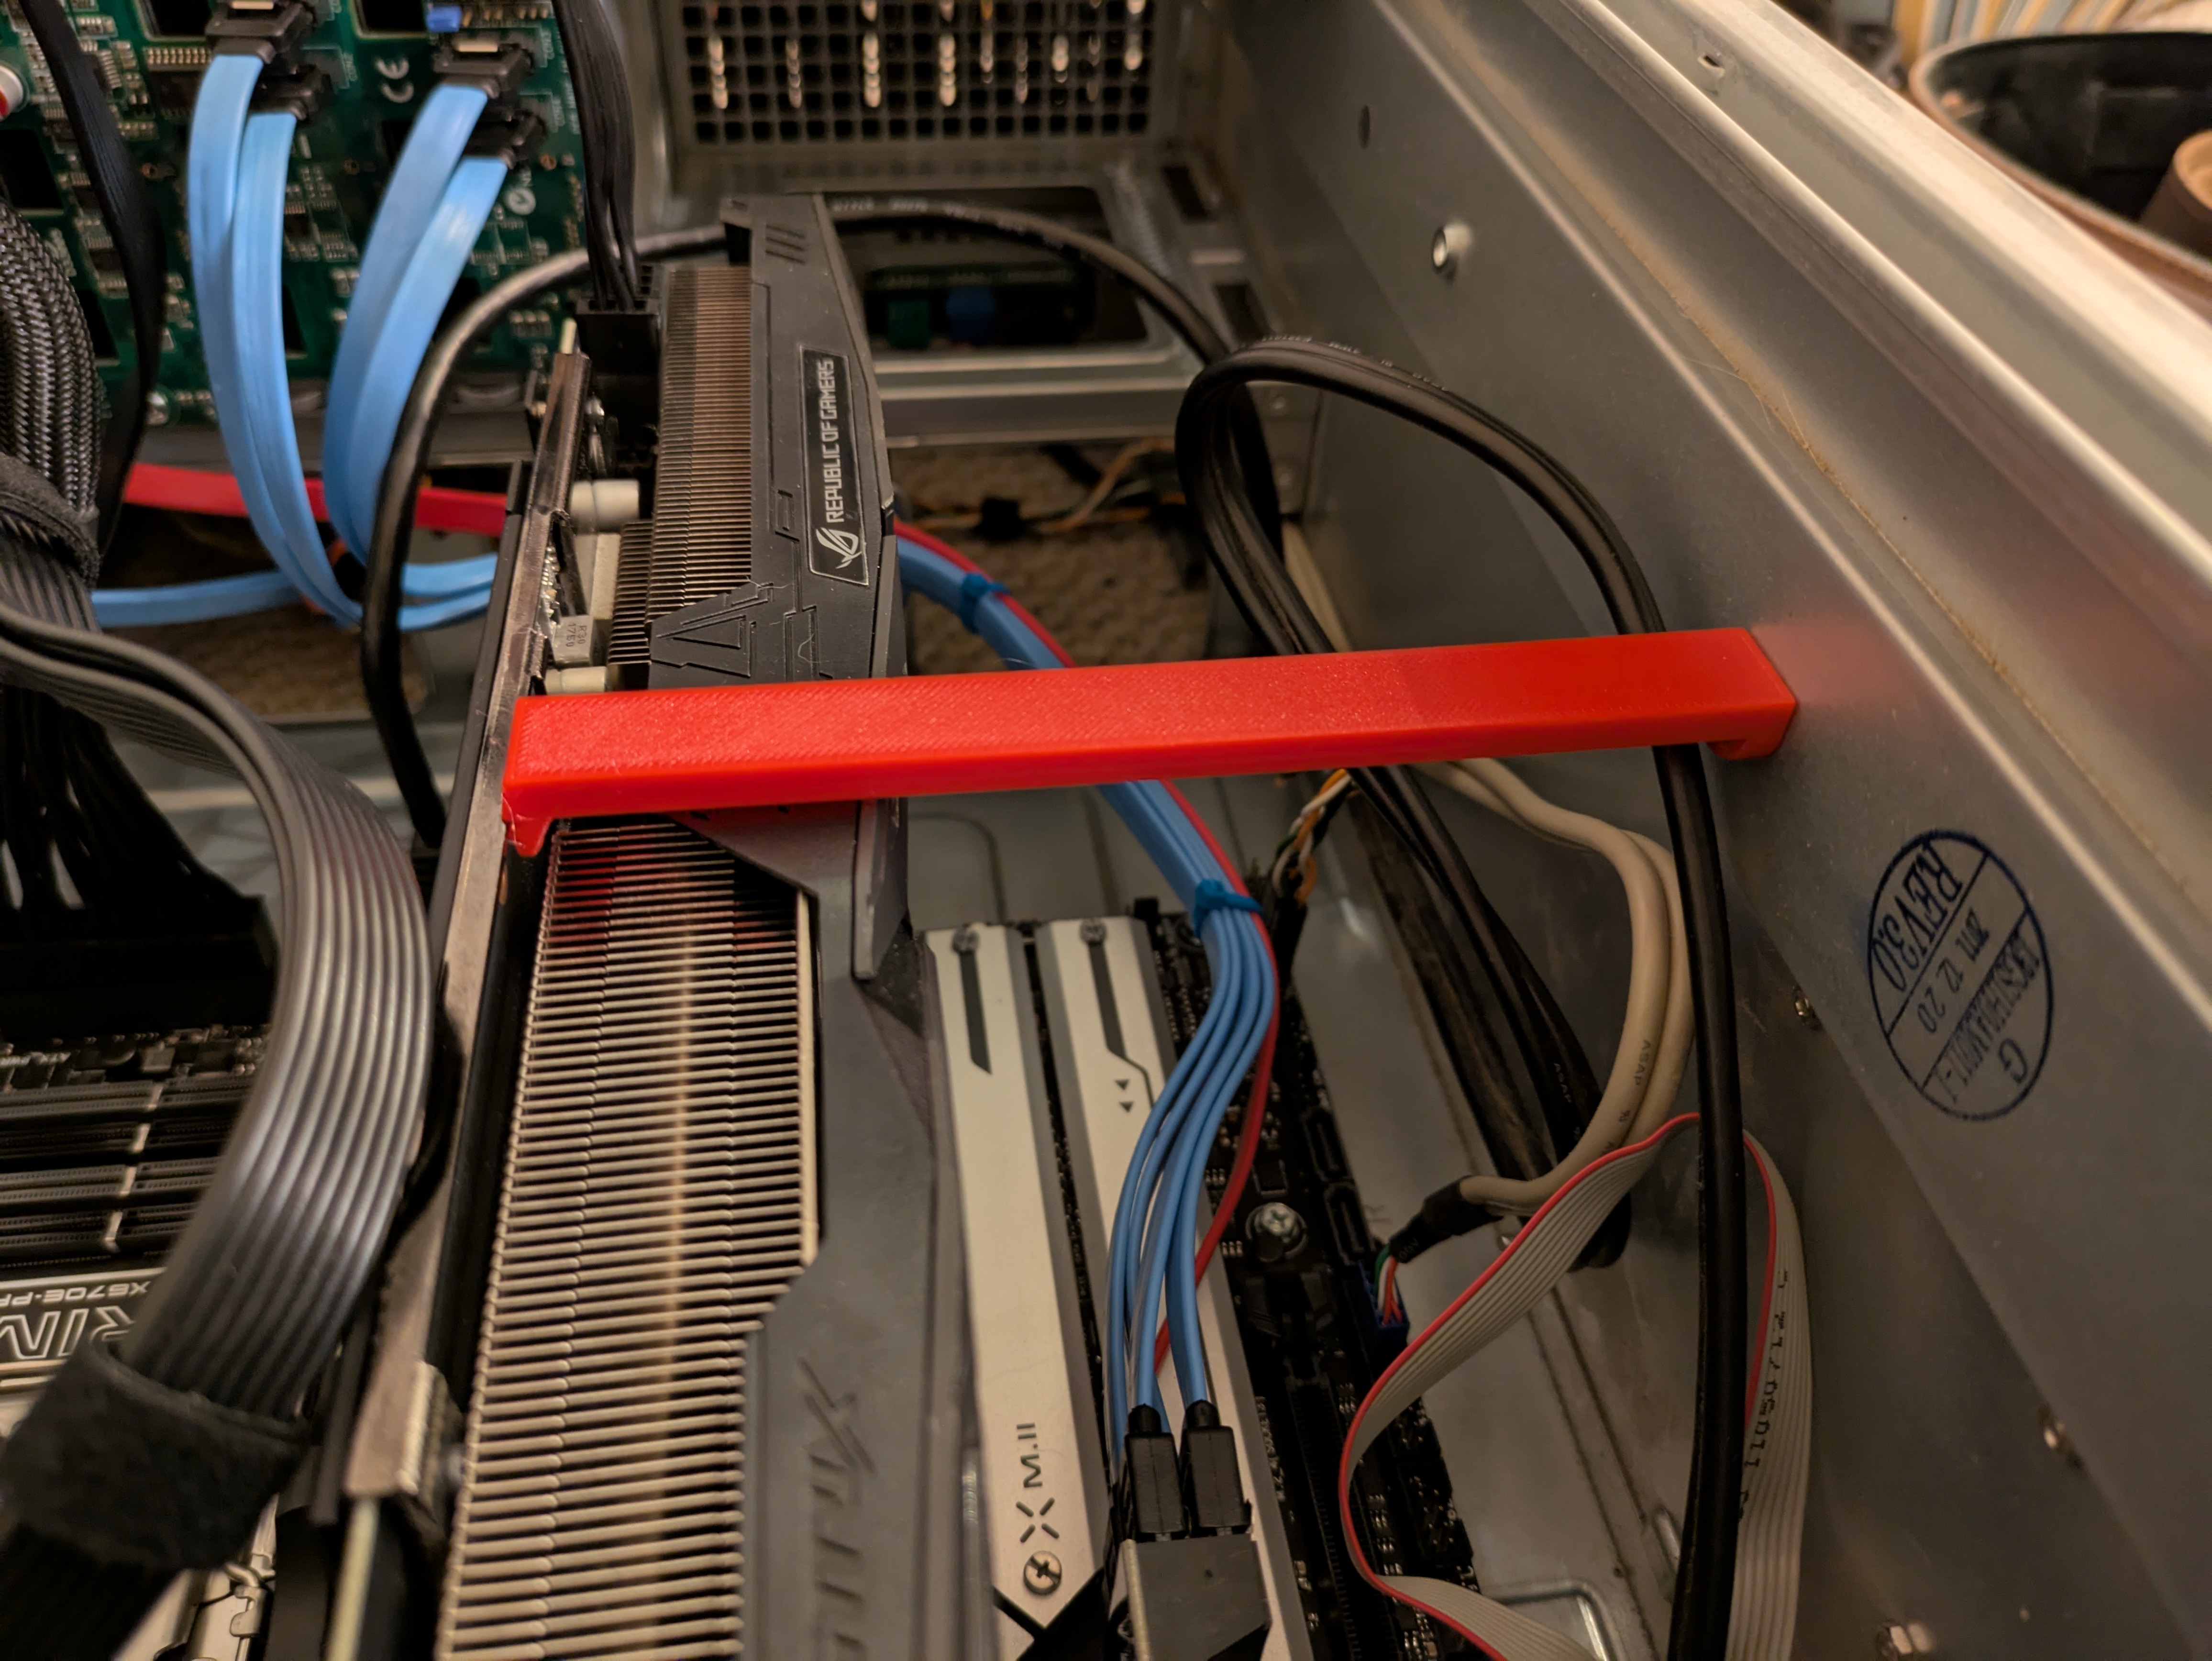
I recently upgraded my computer, but I needed some parts to make it work how I wanted. For one thing, the feet were way too close to the ground so the front door to my case would drag on the carpet whenever you would open it. So I slapped some feet together in CAD in about 5 minutes and boom, now it has a solid 2" lift. Then I needed to fix my sagging graphics card. This one was a little harder to nail down, dimension-wise, but after one failed attempt, I managed to fabricate one that fit perfectly and will hold the GPU level. Not pictured (because I downloaded the design) is a tray I used for the SSD drives. These upgrades breathed new life into this old case.
Download the 7z bundle containing FreeCAD design files and STL objects.
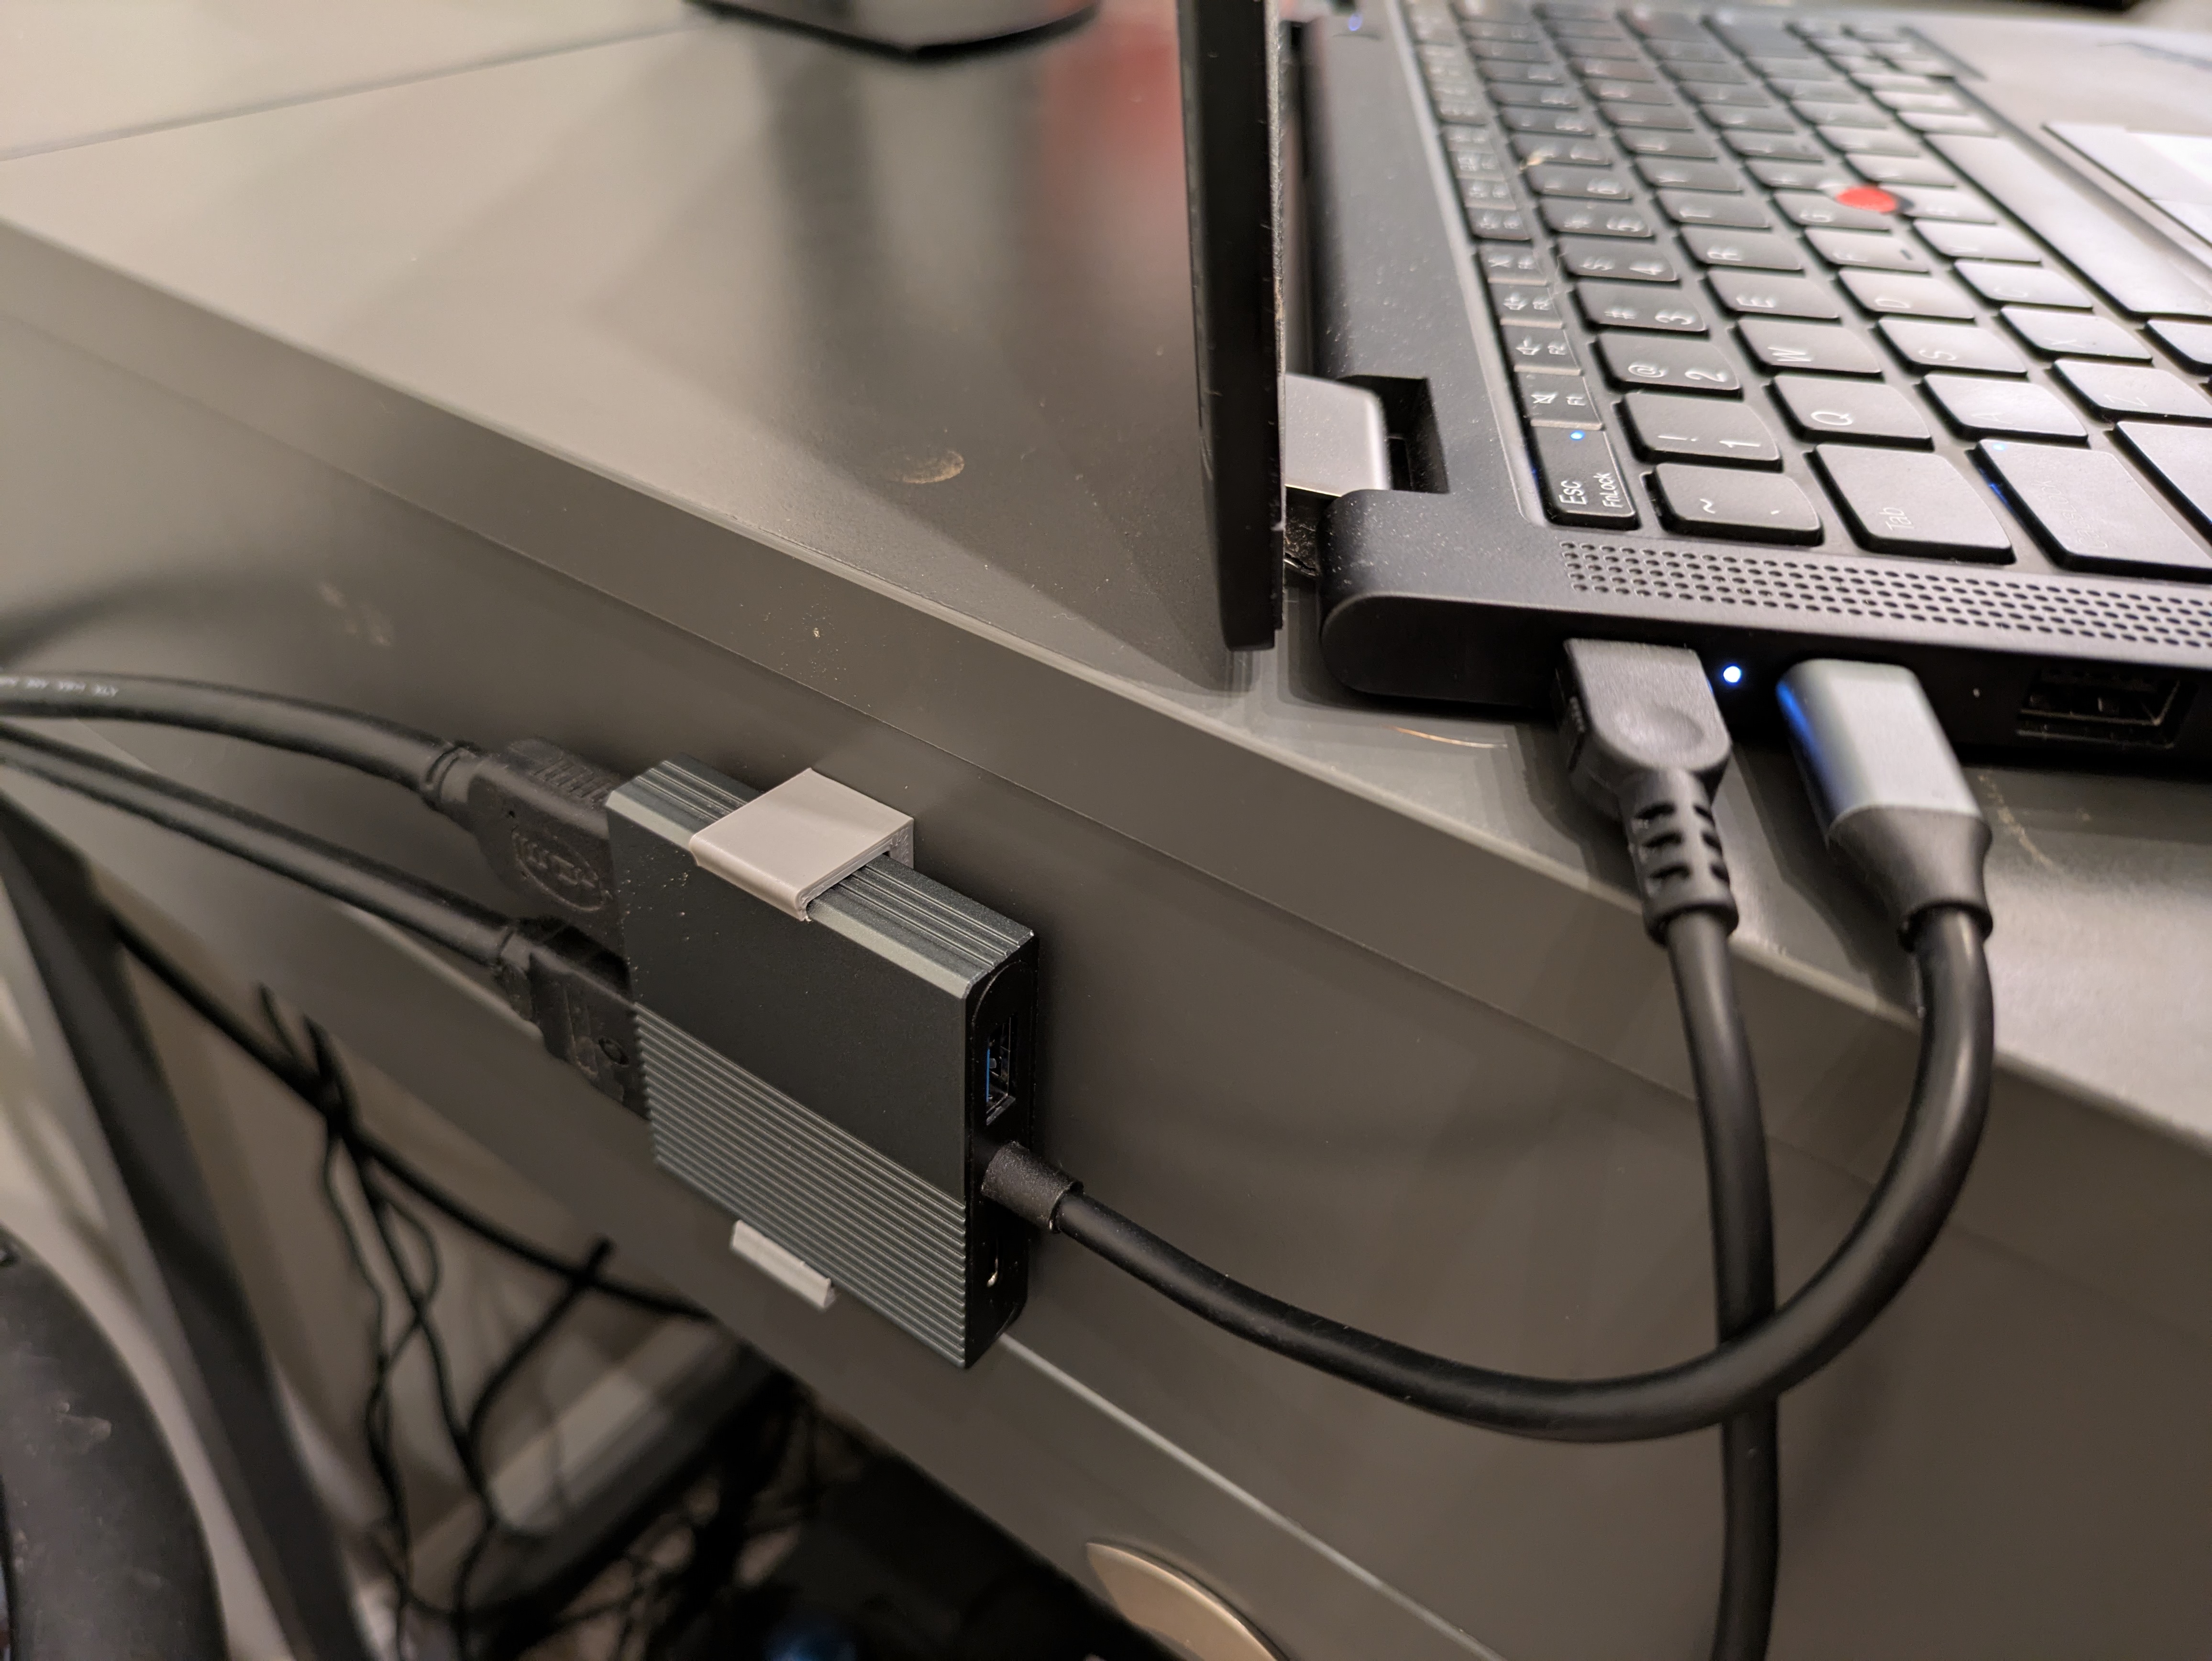
Laptop Mini-dock Mount
This one was a simple fix. I had a little USB-C to HDMI dual-screen dongle hanging off the side of my desk. 5 minutes in CAD resulted in this little bracket. Easy! I think this was one of the first custom designs I came up with, if I remember correctly.
Download the 7z bundle containing FreeCAD design files and STL objects.
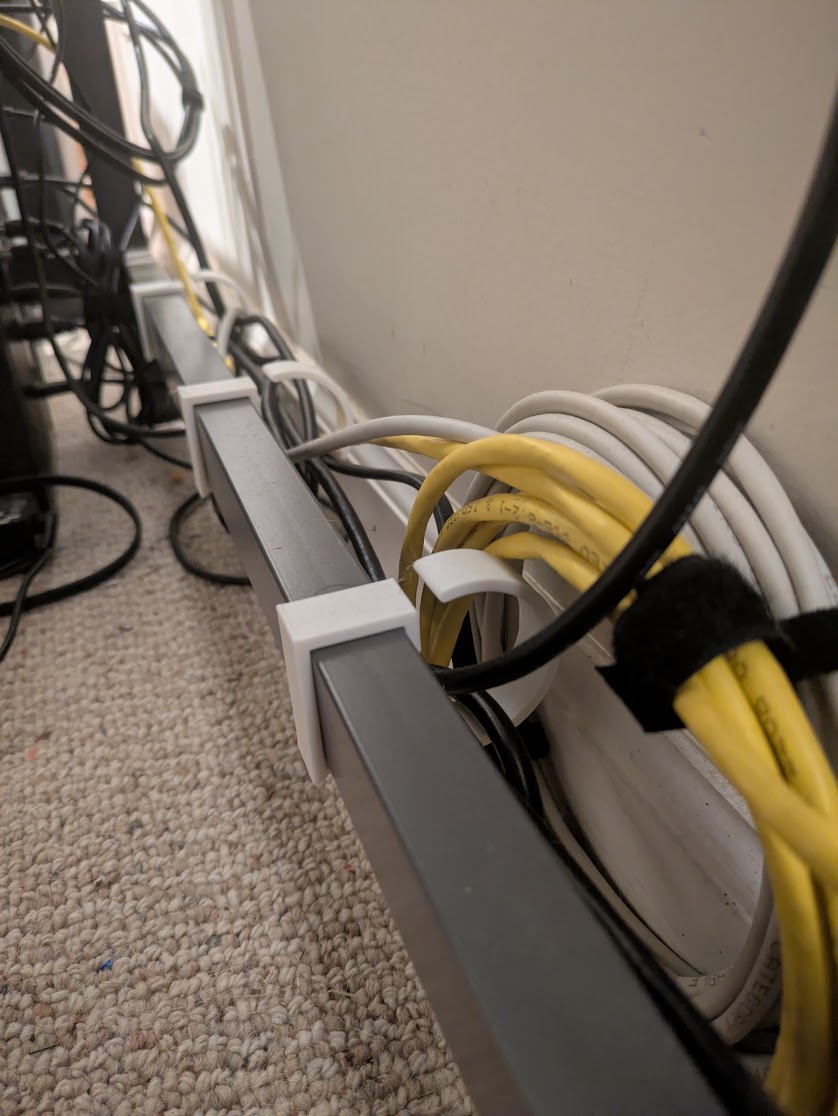
UPS and Cable Cleanup
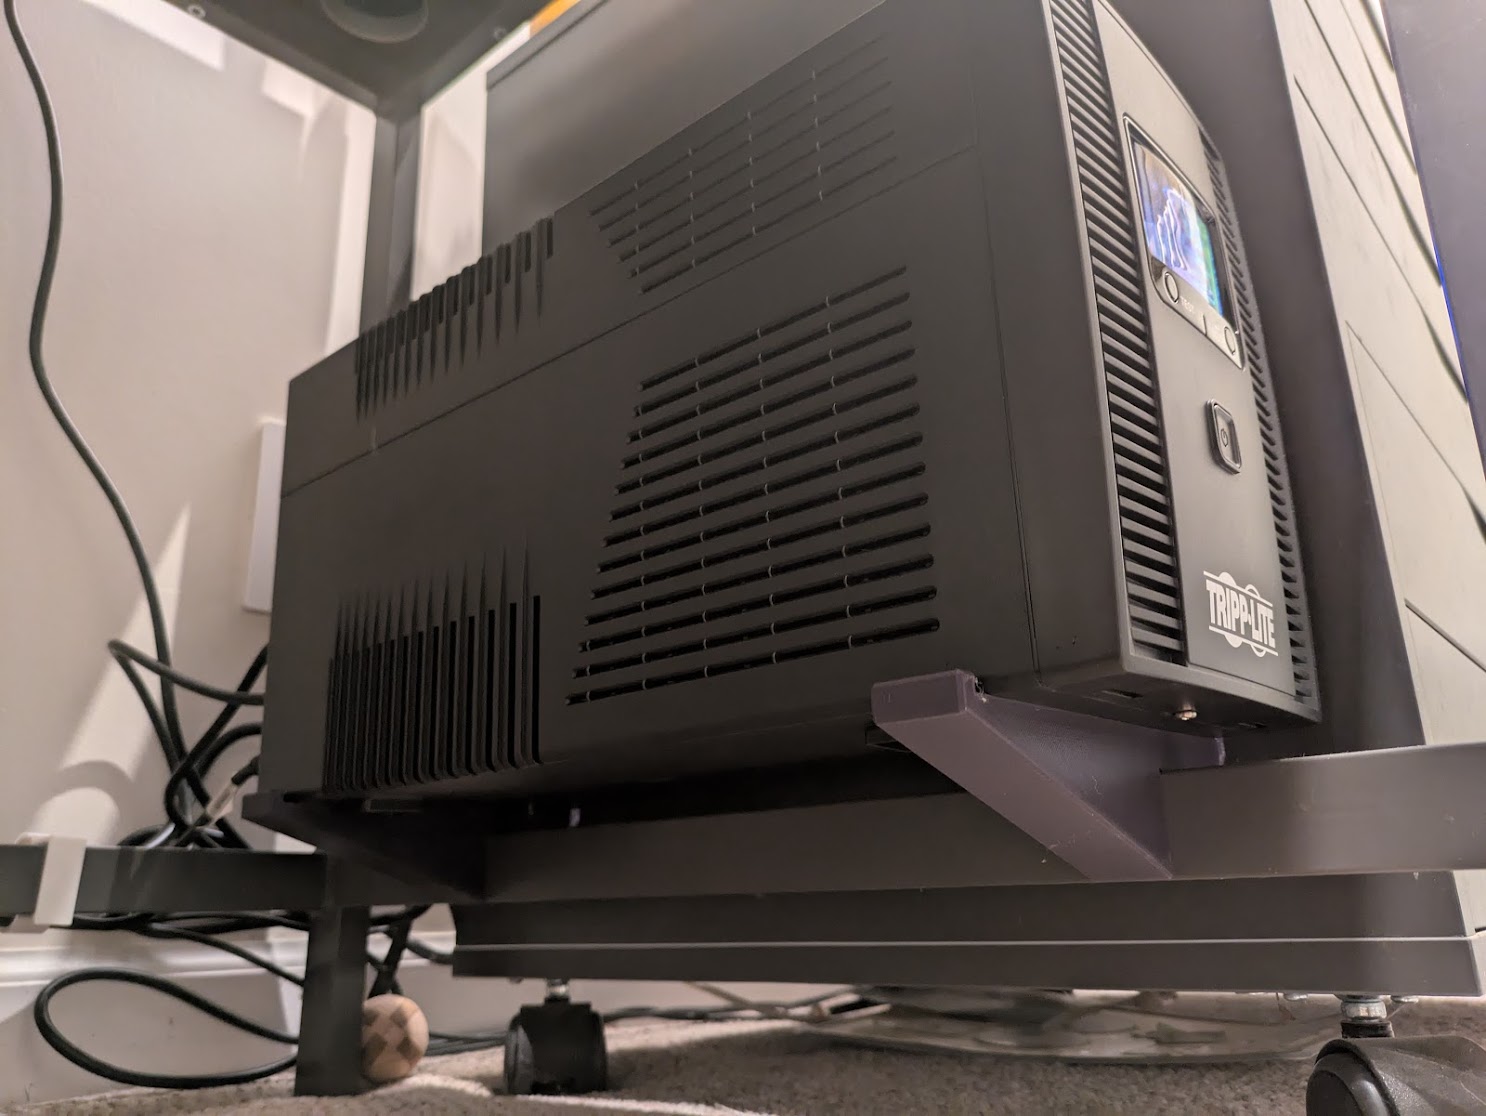
I wanted to make the mess under my desk at least a little more reasonable. The UPS, for example, was on the floor and sticking out just a little too close to my feet for comfort, so I made these little brackets that fit on my desk rails. This way the UPS isn’t on the floor taking up room, and collecting dust from the carpet. The little cable clips weren’t as successful as I had hoped in cleaning up the cable routing mess behind my desk, but the do get the job done.
Download the 7z bundle containing FreeCAD design files and STL objects.
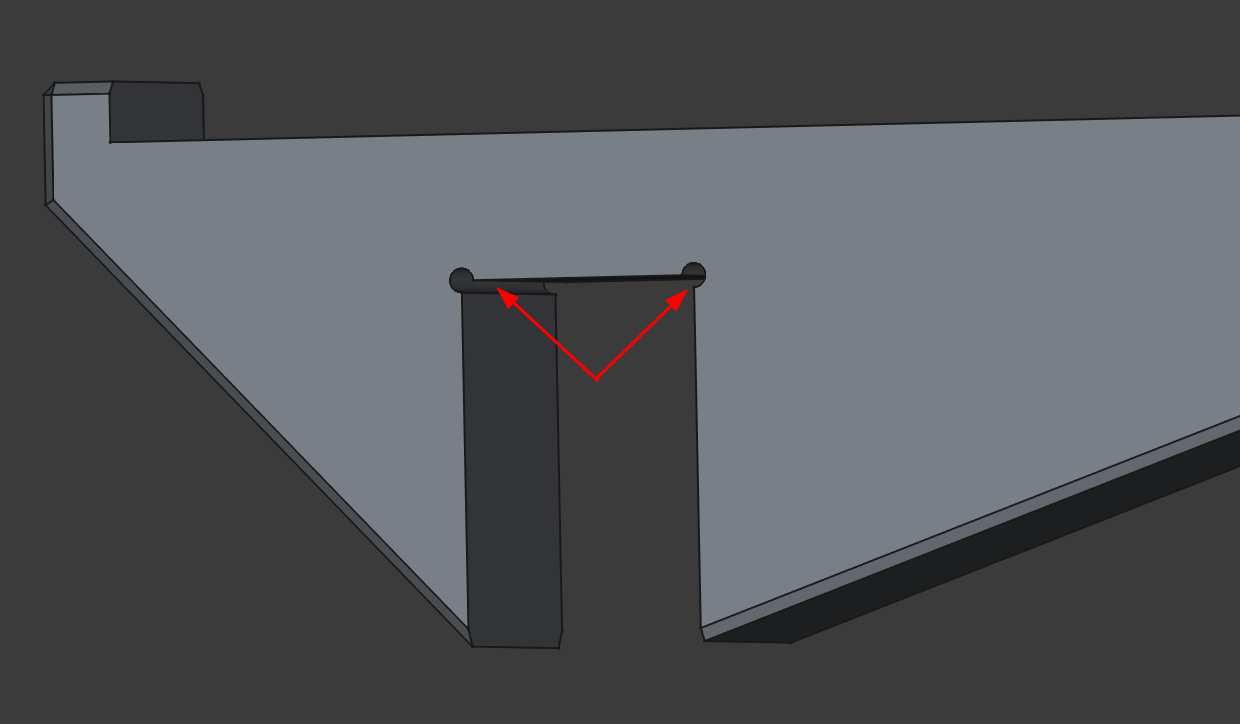
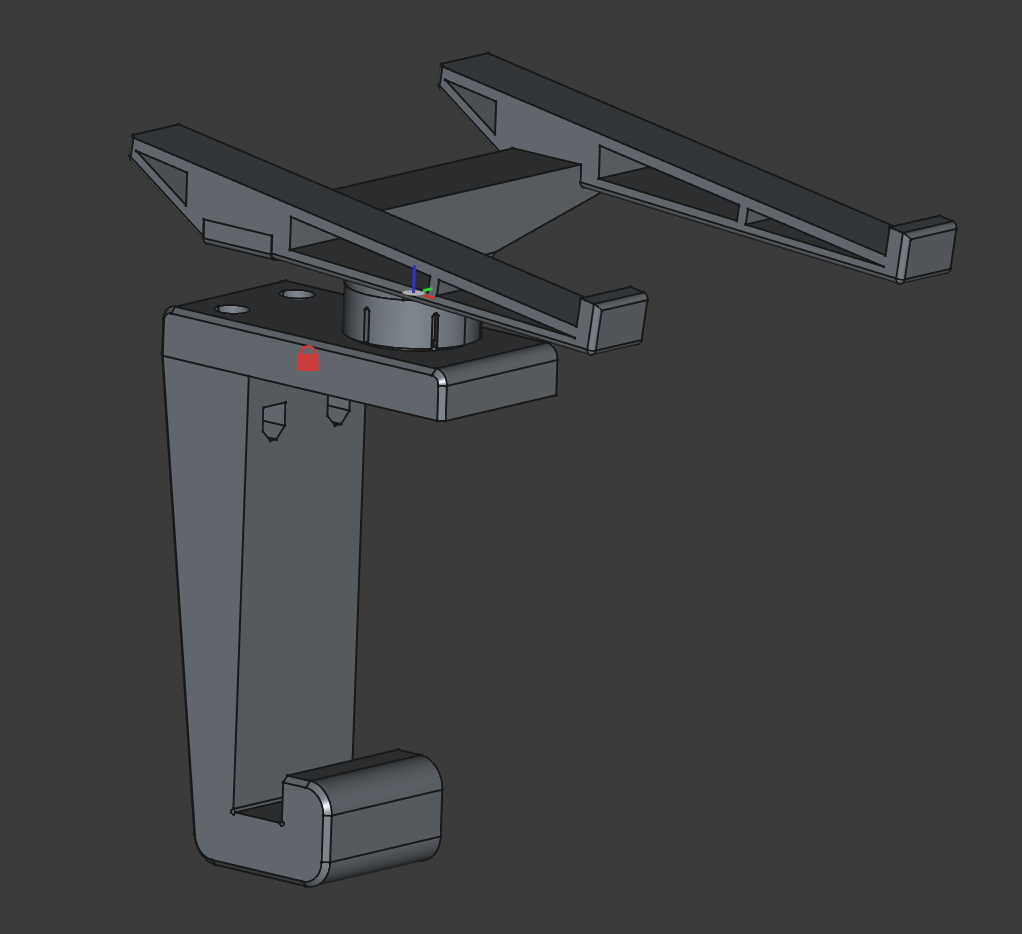
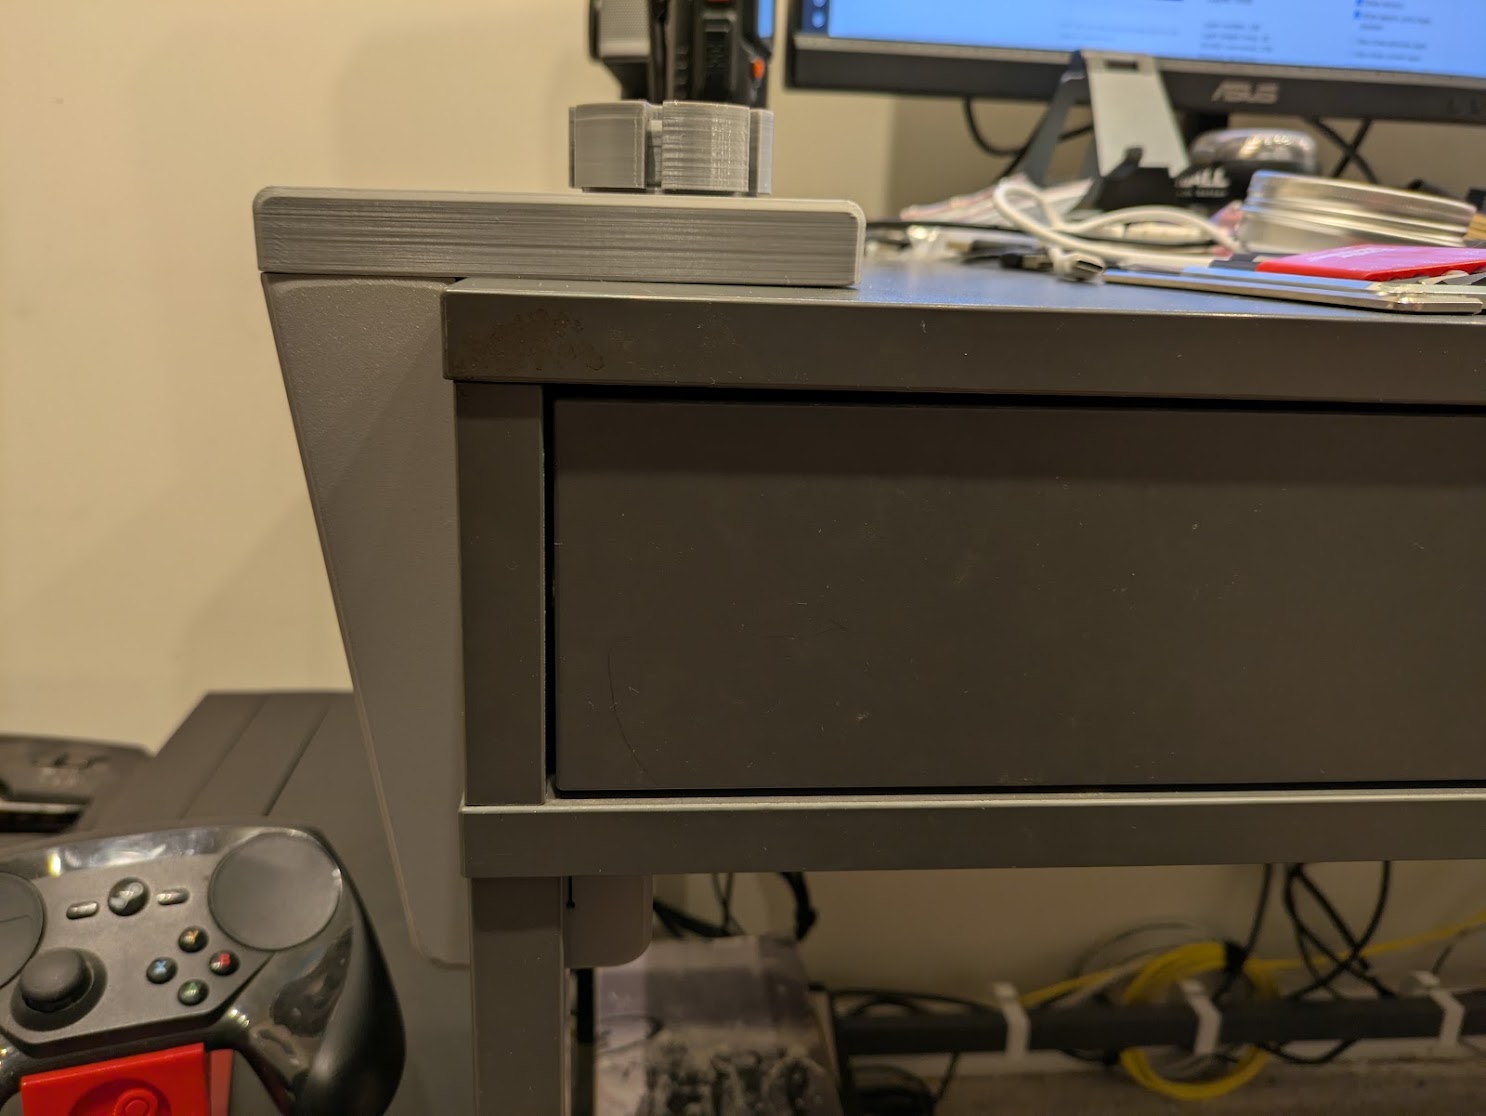
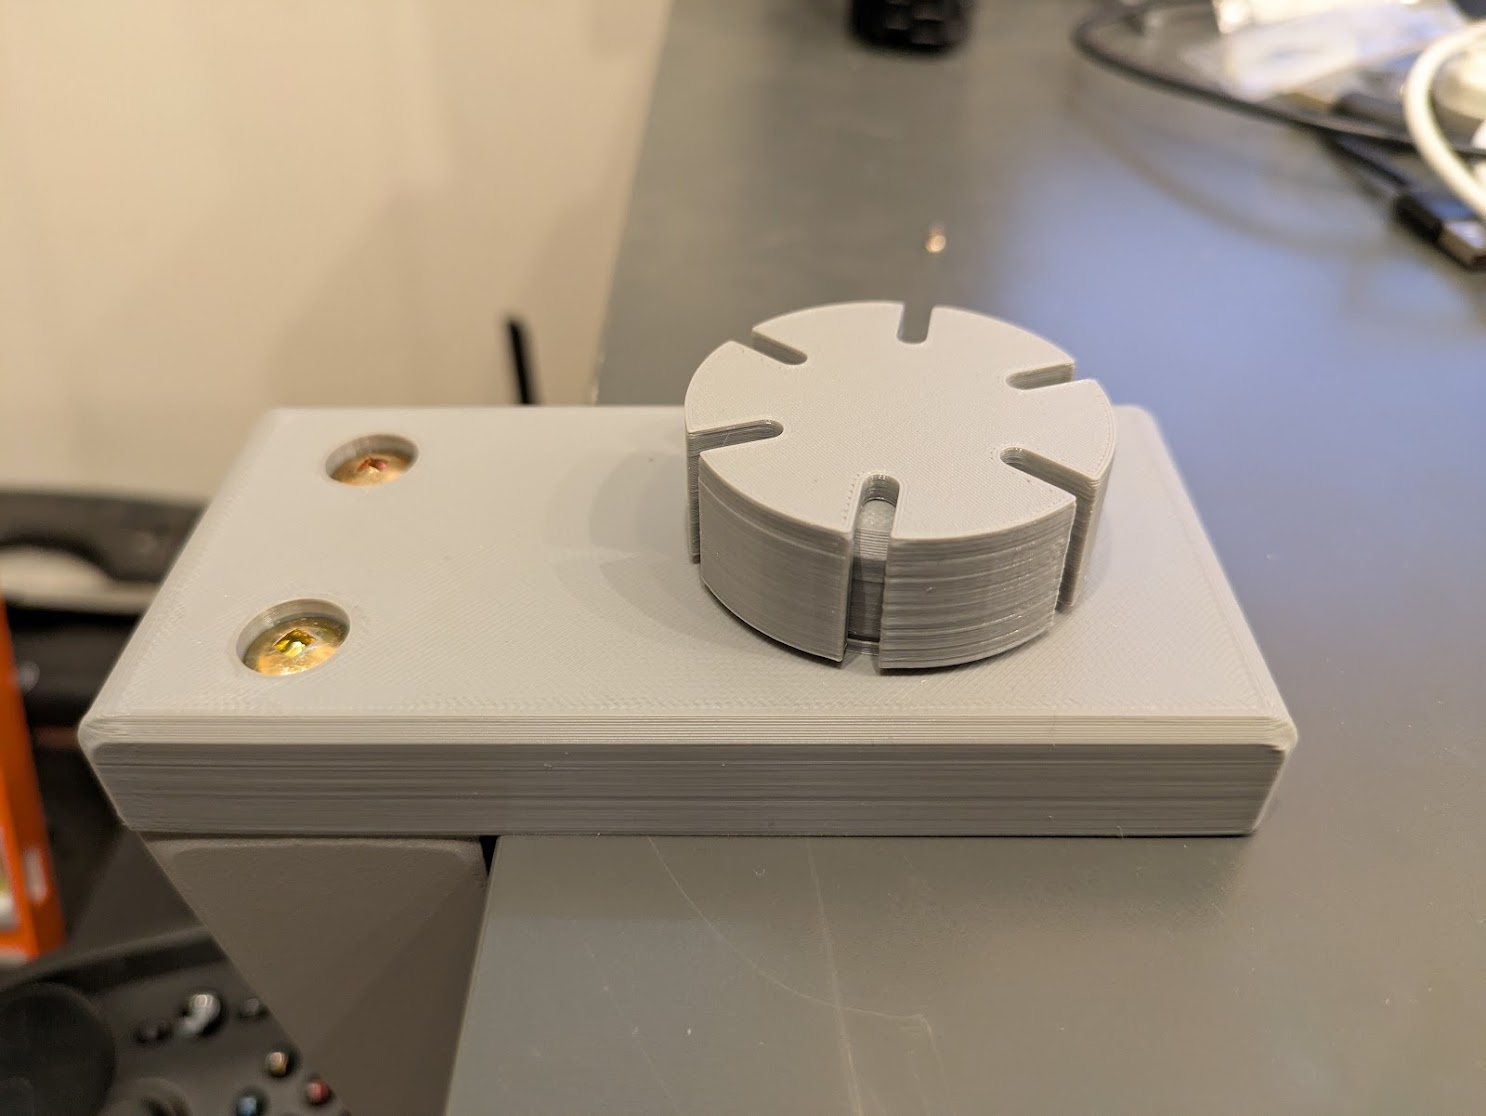
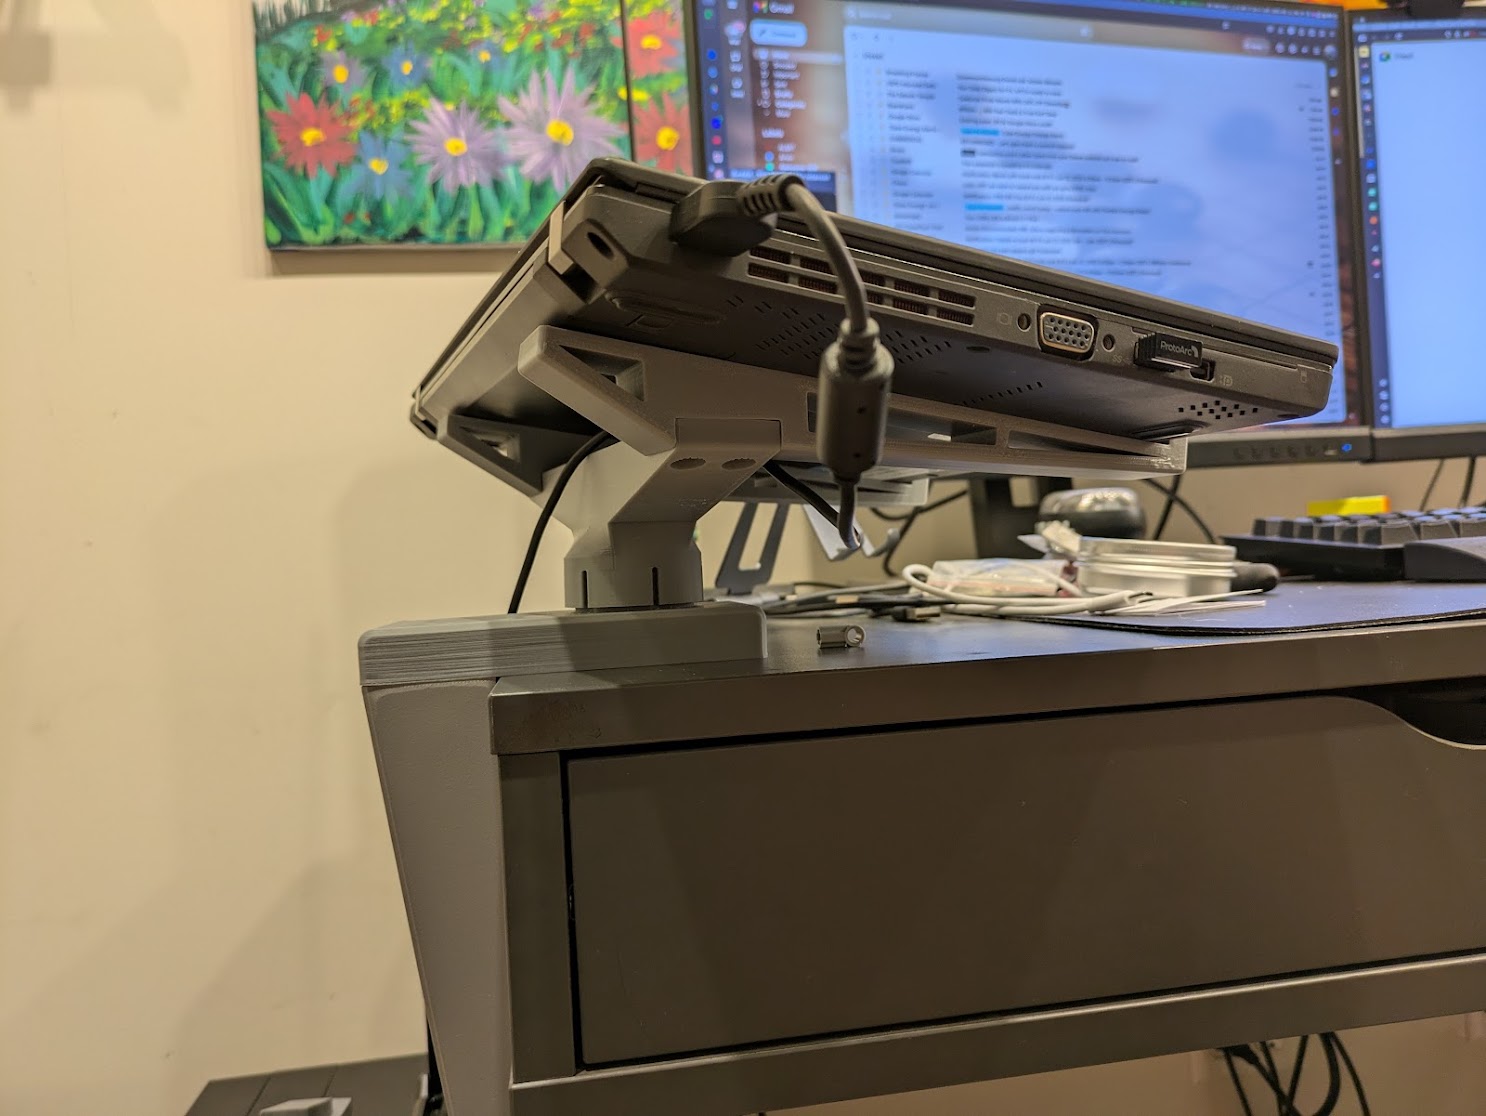
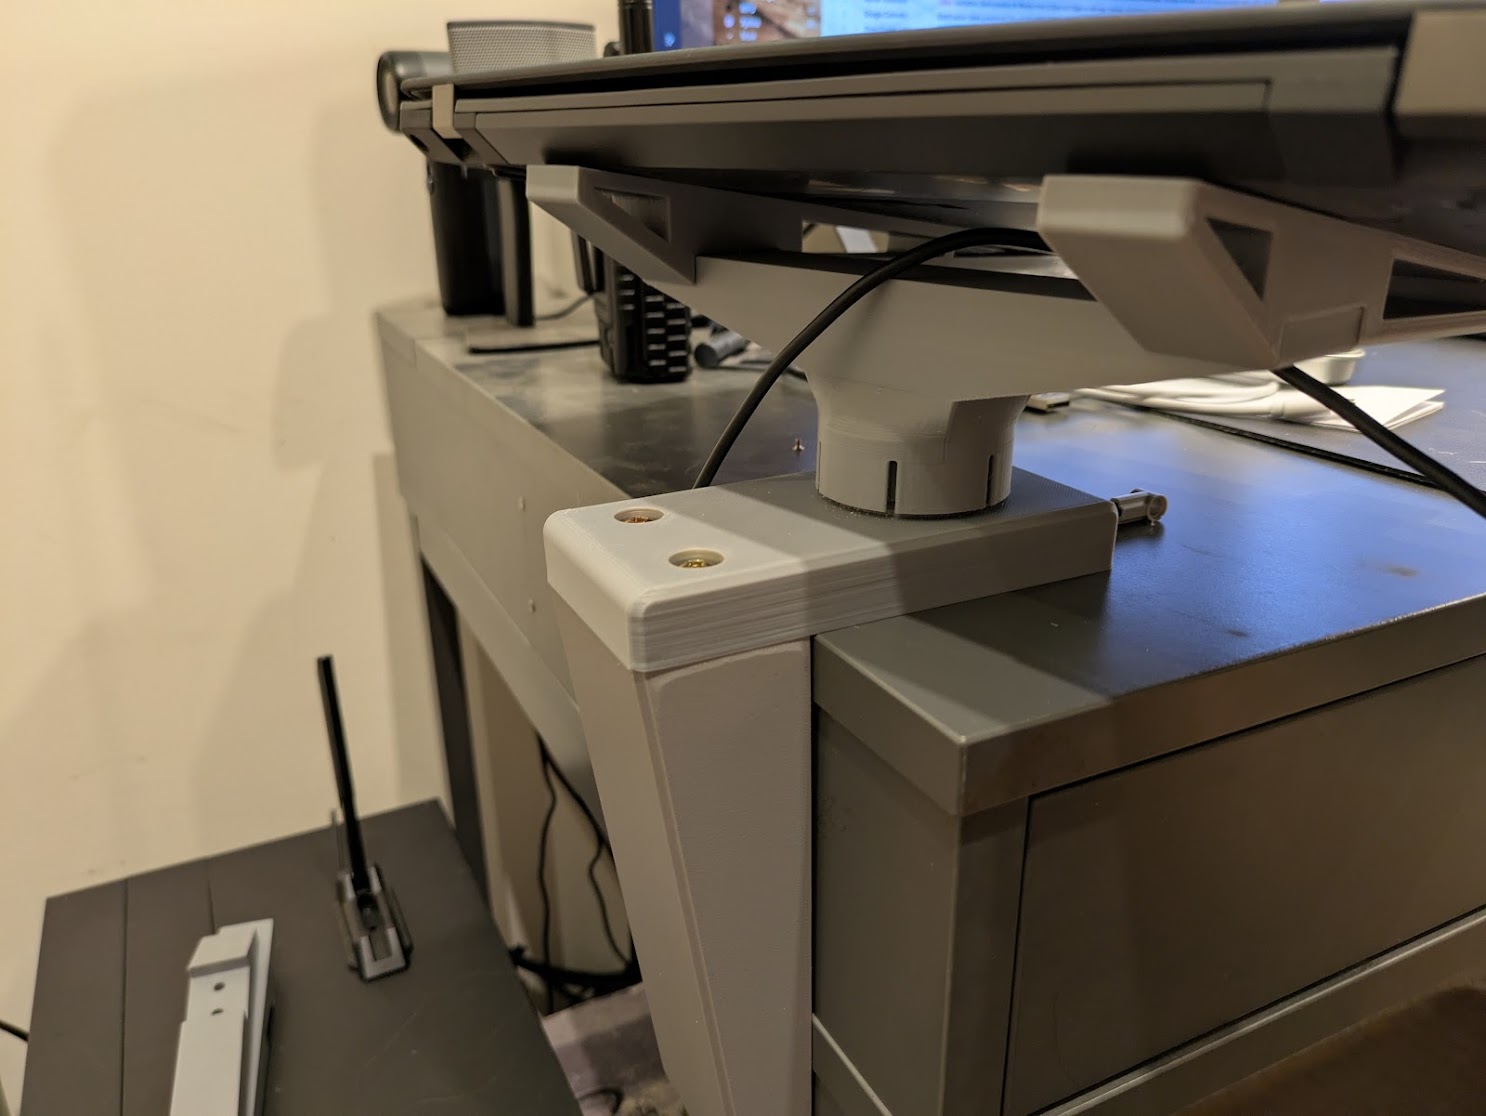
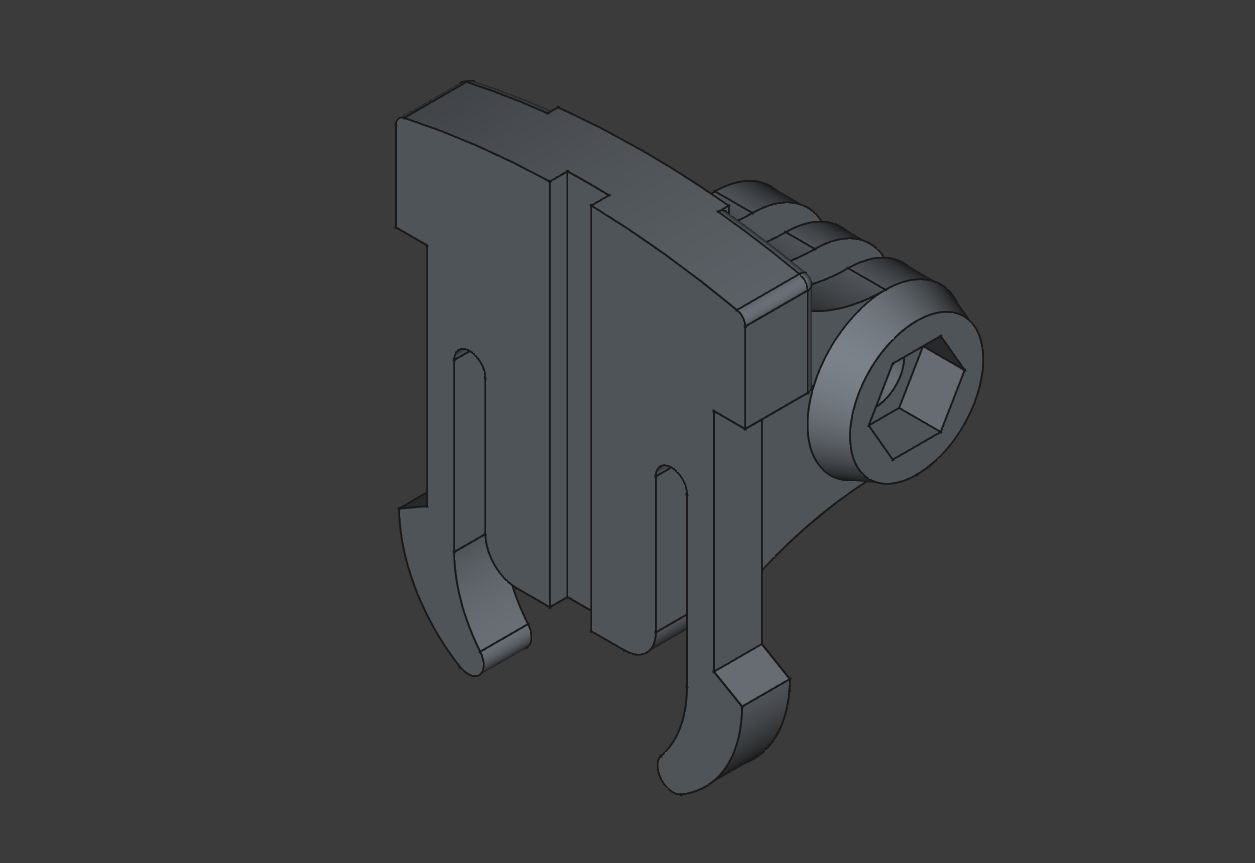
Kick-ass Laptop Mount
OK, this one might be my all time favorite design. I came up with this idea as I was trying to use a laptop on my limited desk space while at the same time having room for my desktop keyboard and mouse. It was pretty terrible, honestly. There was no room for anything and the laptop was always in the way. Then it occurred to me that I could make a swiveling laptop mount that would sit just off the side of the desk, freeing up that precious real estate on the edge. Additionally, since it won’t be on the desk, I’ll have room underneath for smaller items that would otherwise be in the way. I spent a ton of time trying to figure out how this would work, but then I came up with the snap-fit swivel mechanism. It took a few tries, but the end result is very solid but rotates smoothly.
Download the 7z bundle containing FreeCAD design files and STL objects.

Pinewood Derby
Wheel Lathe
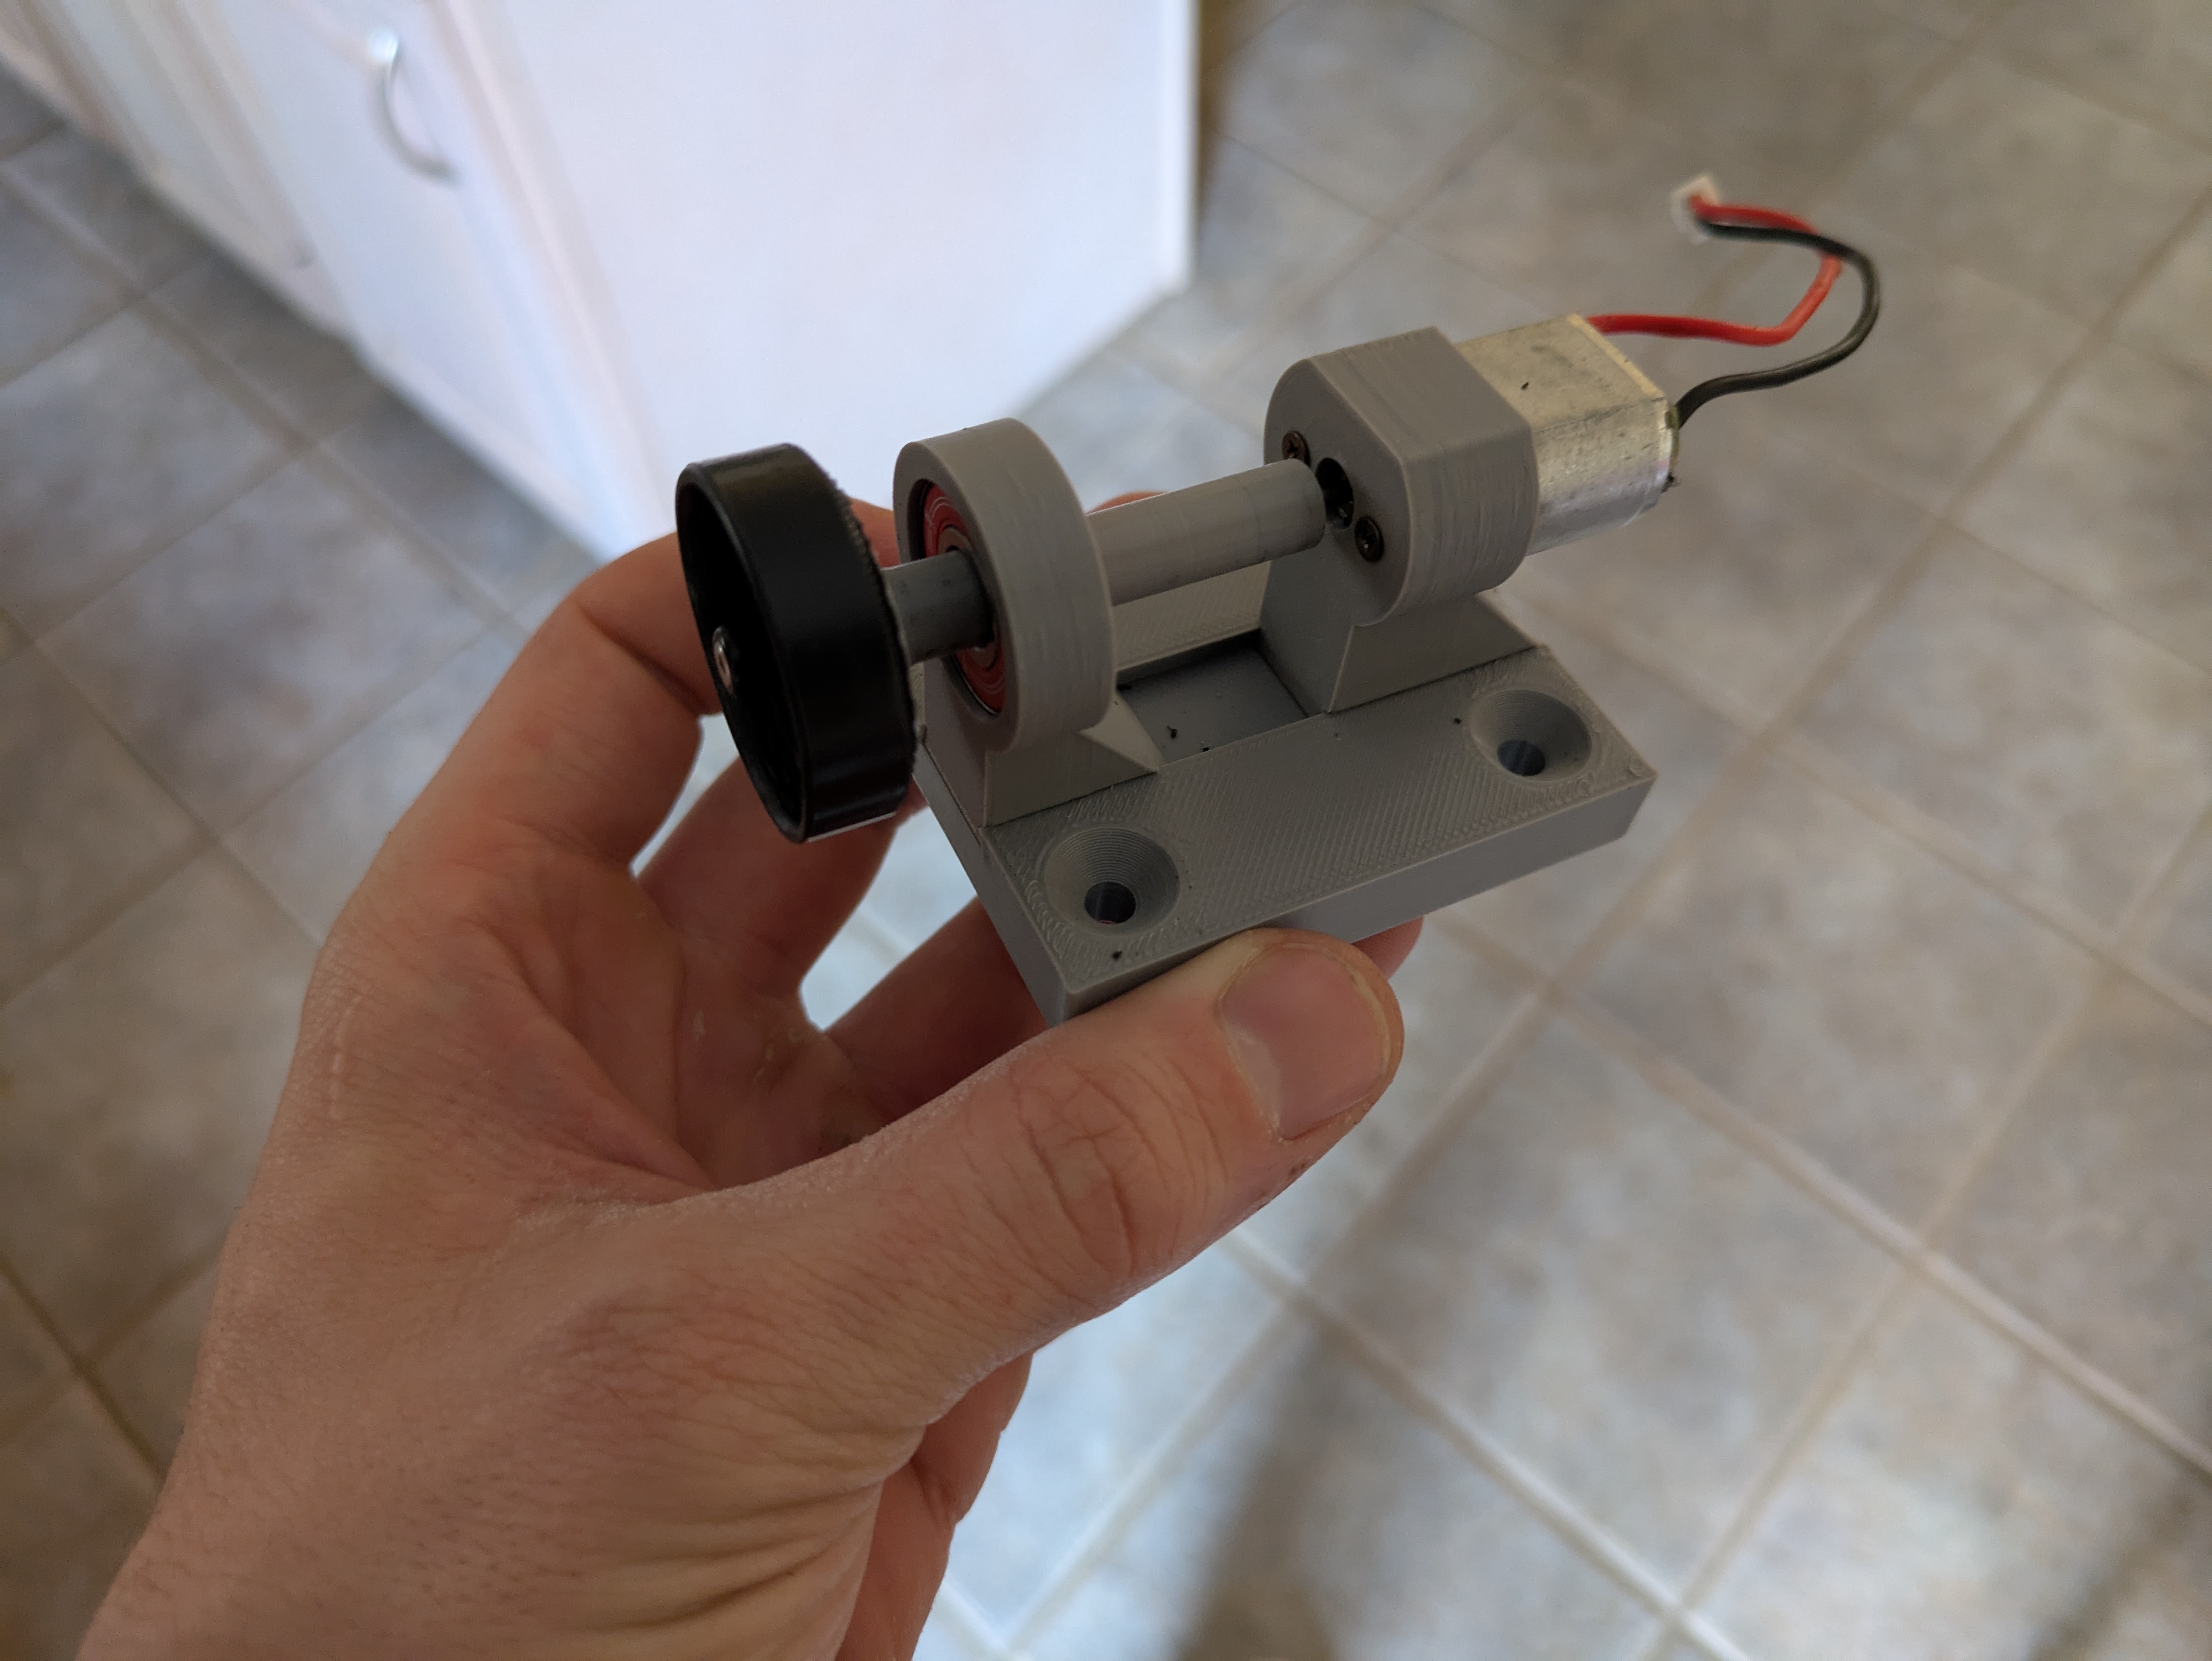
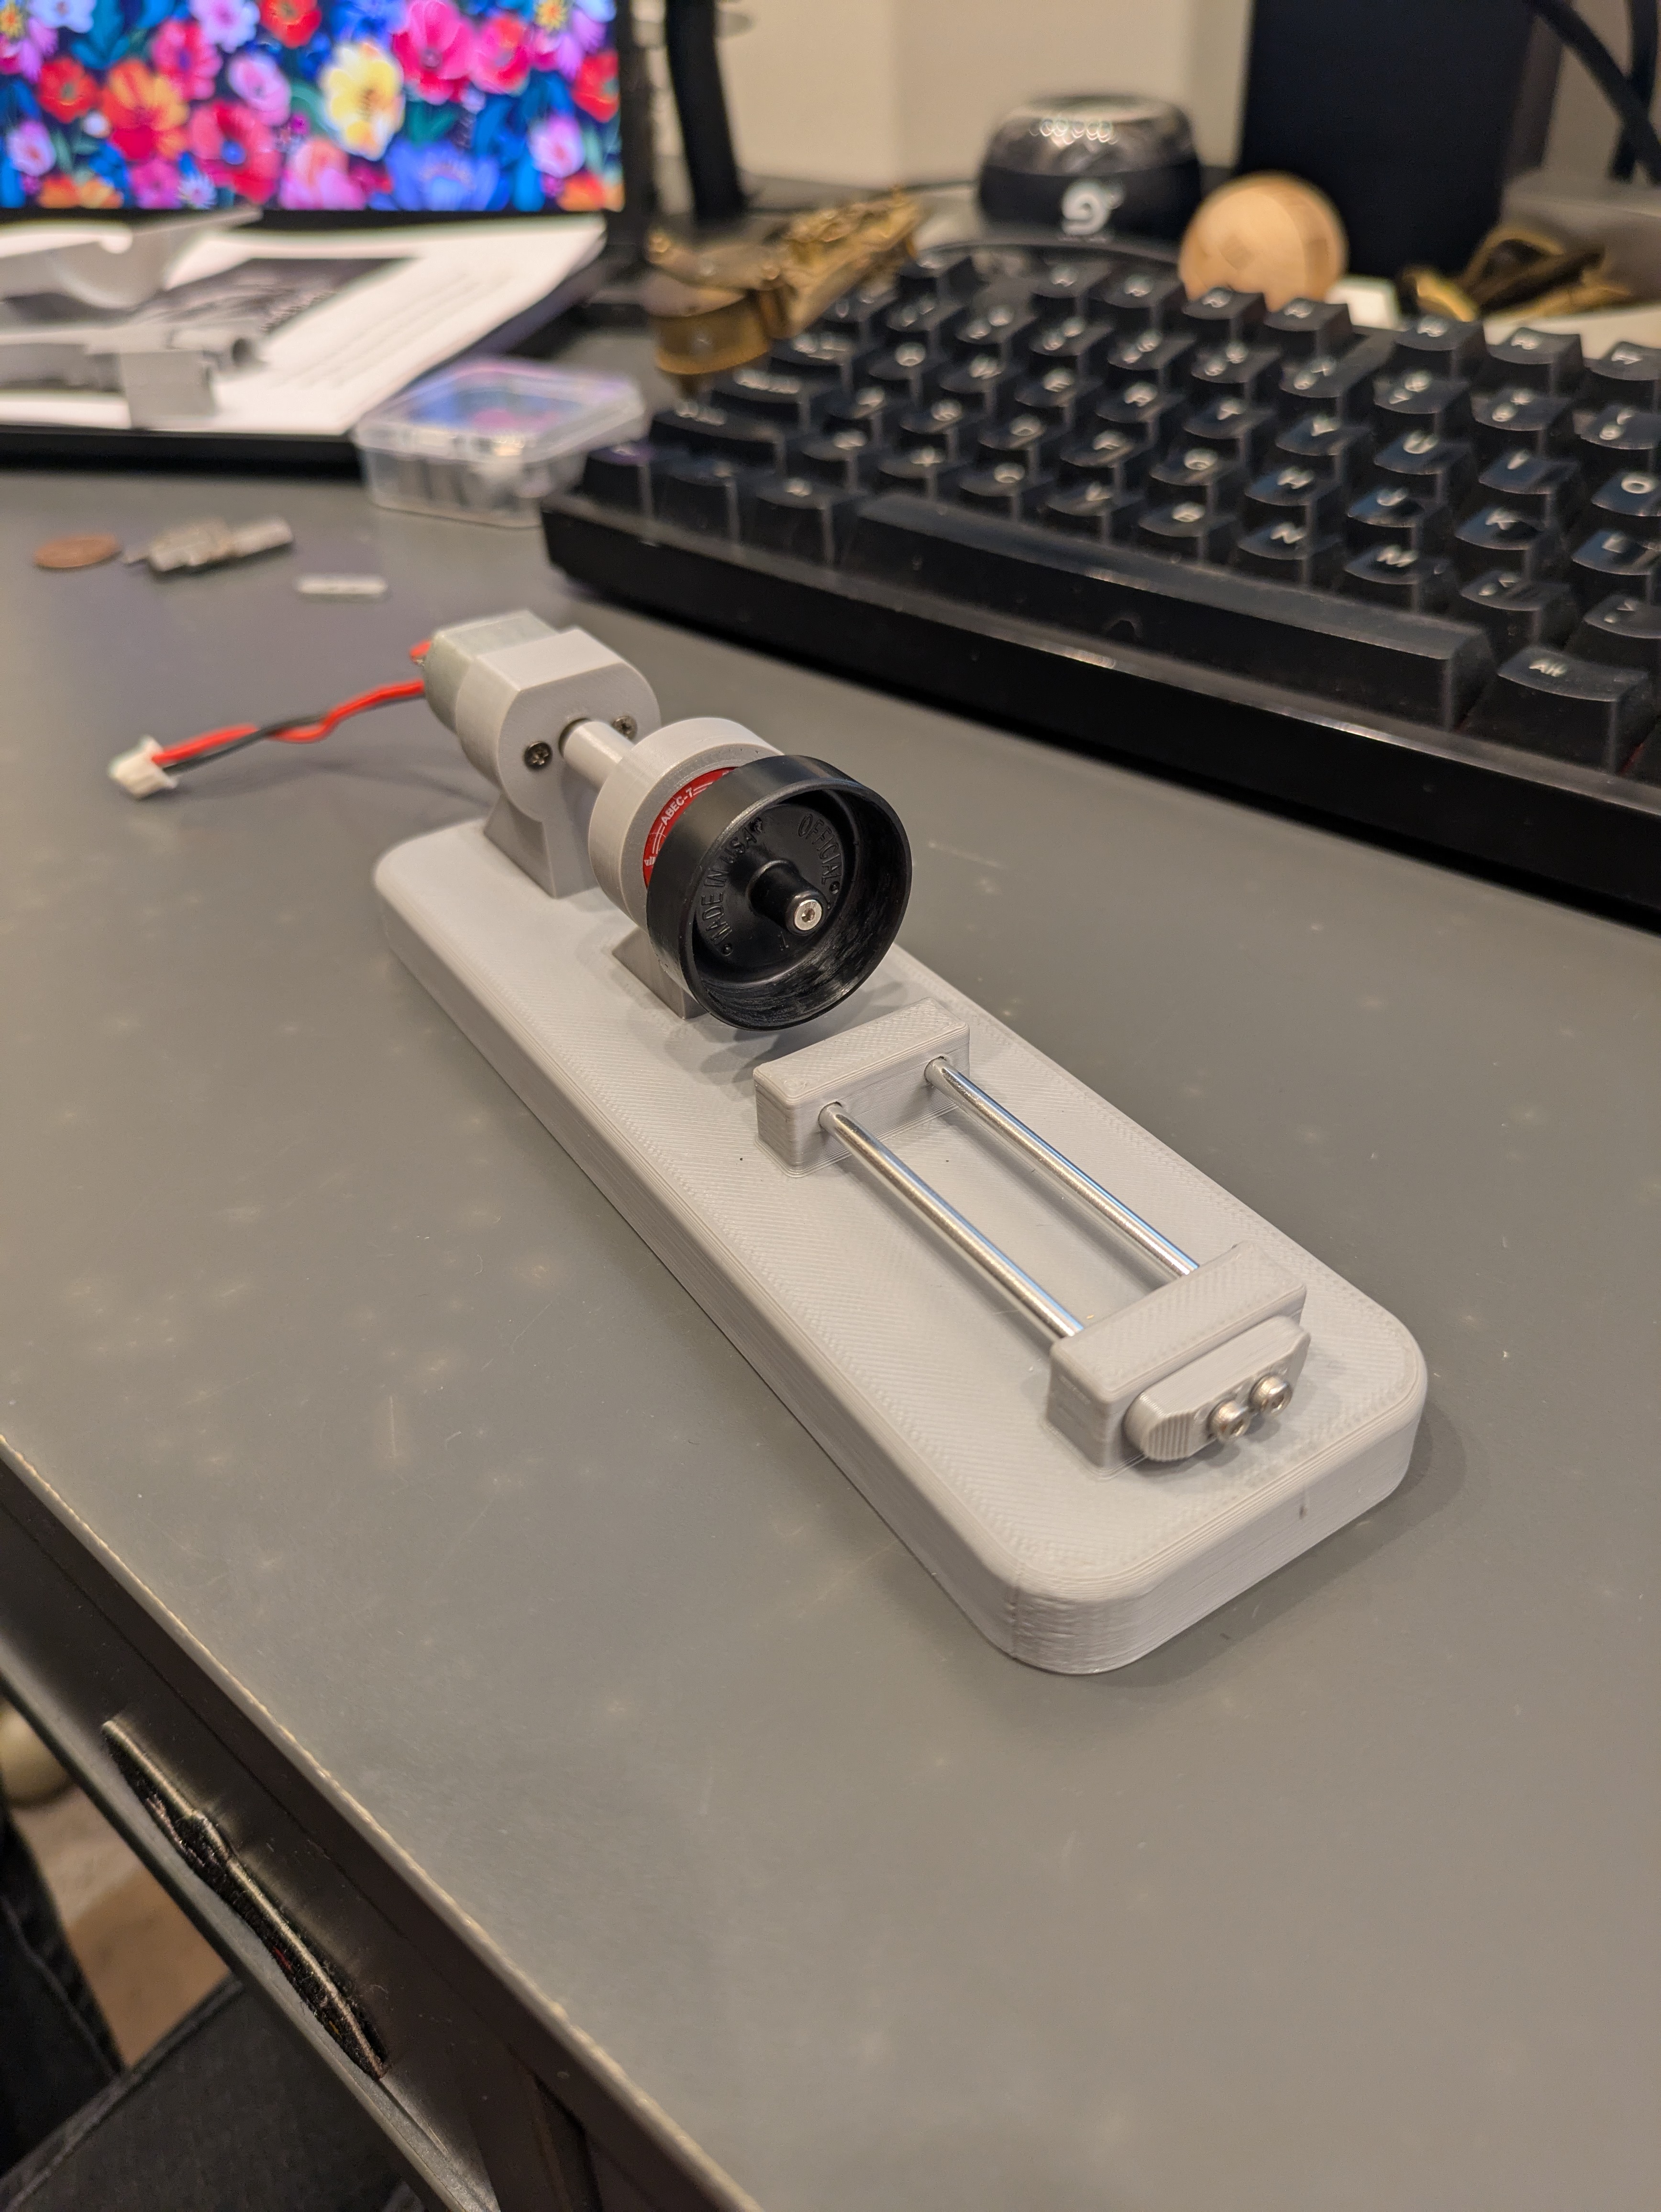
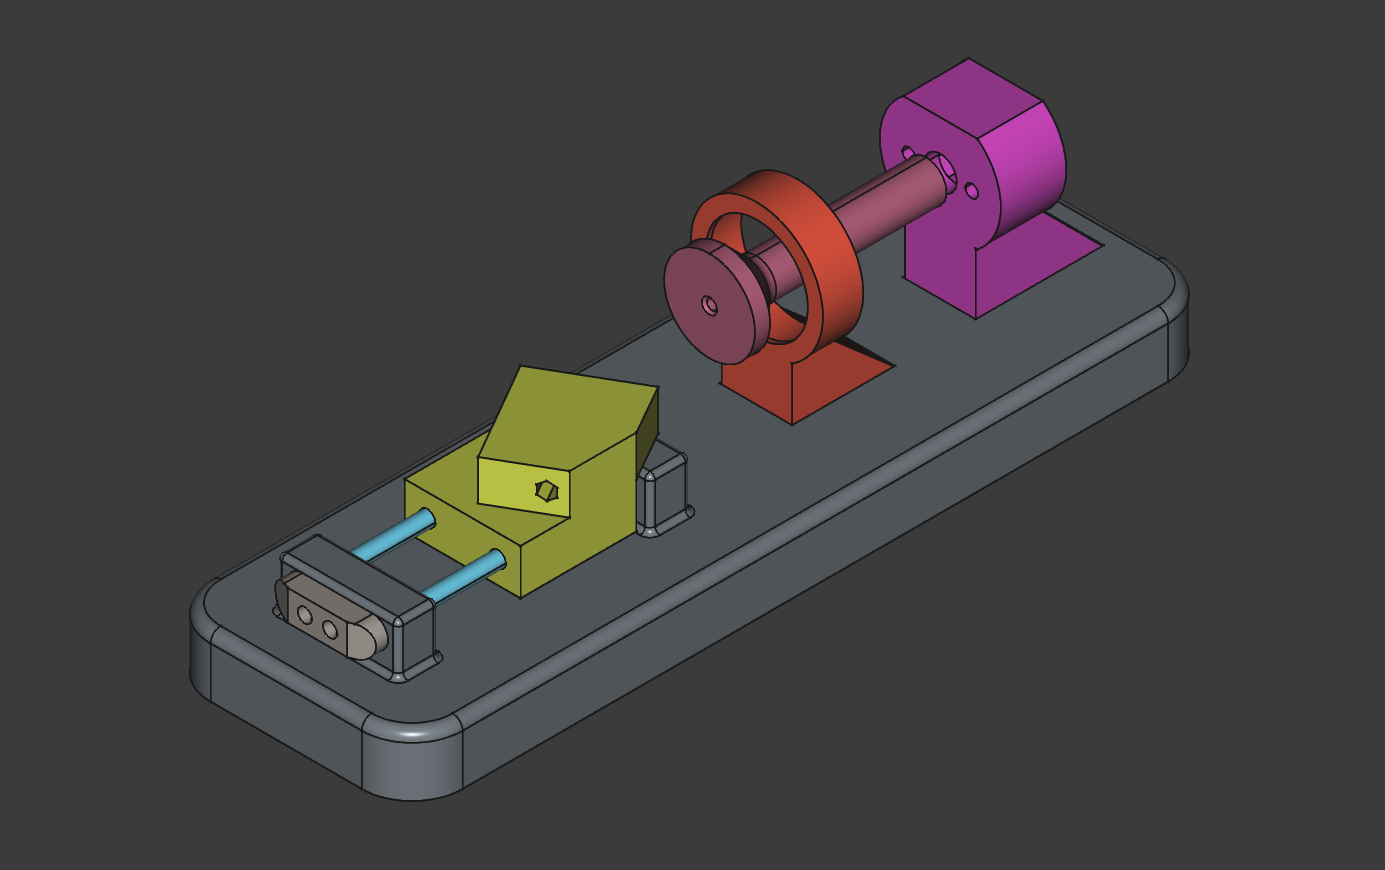
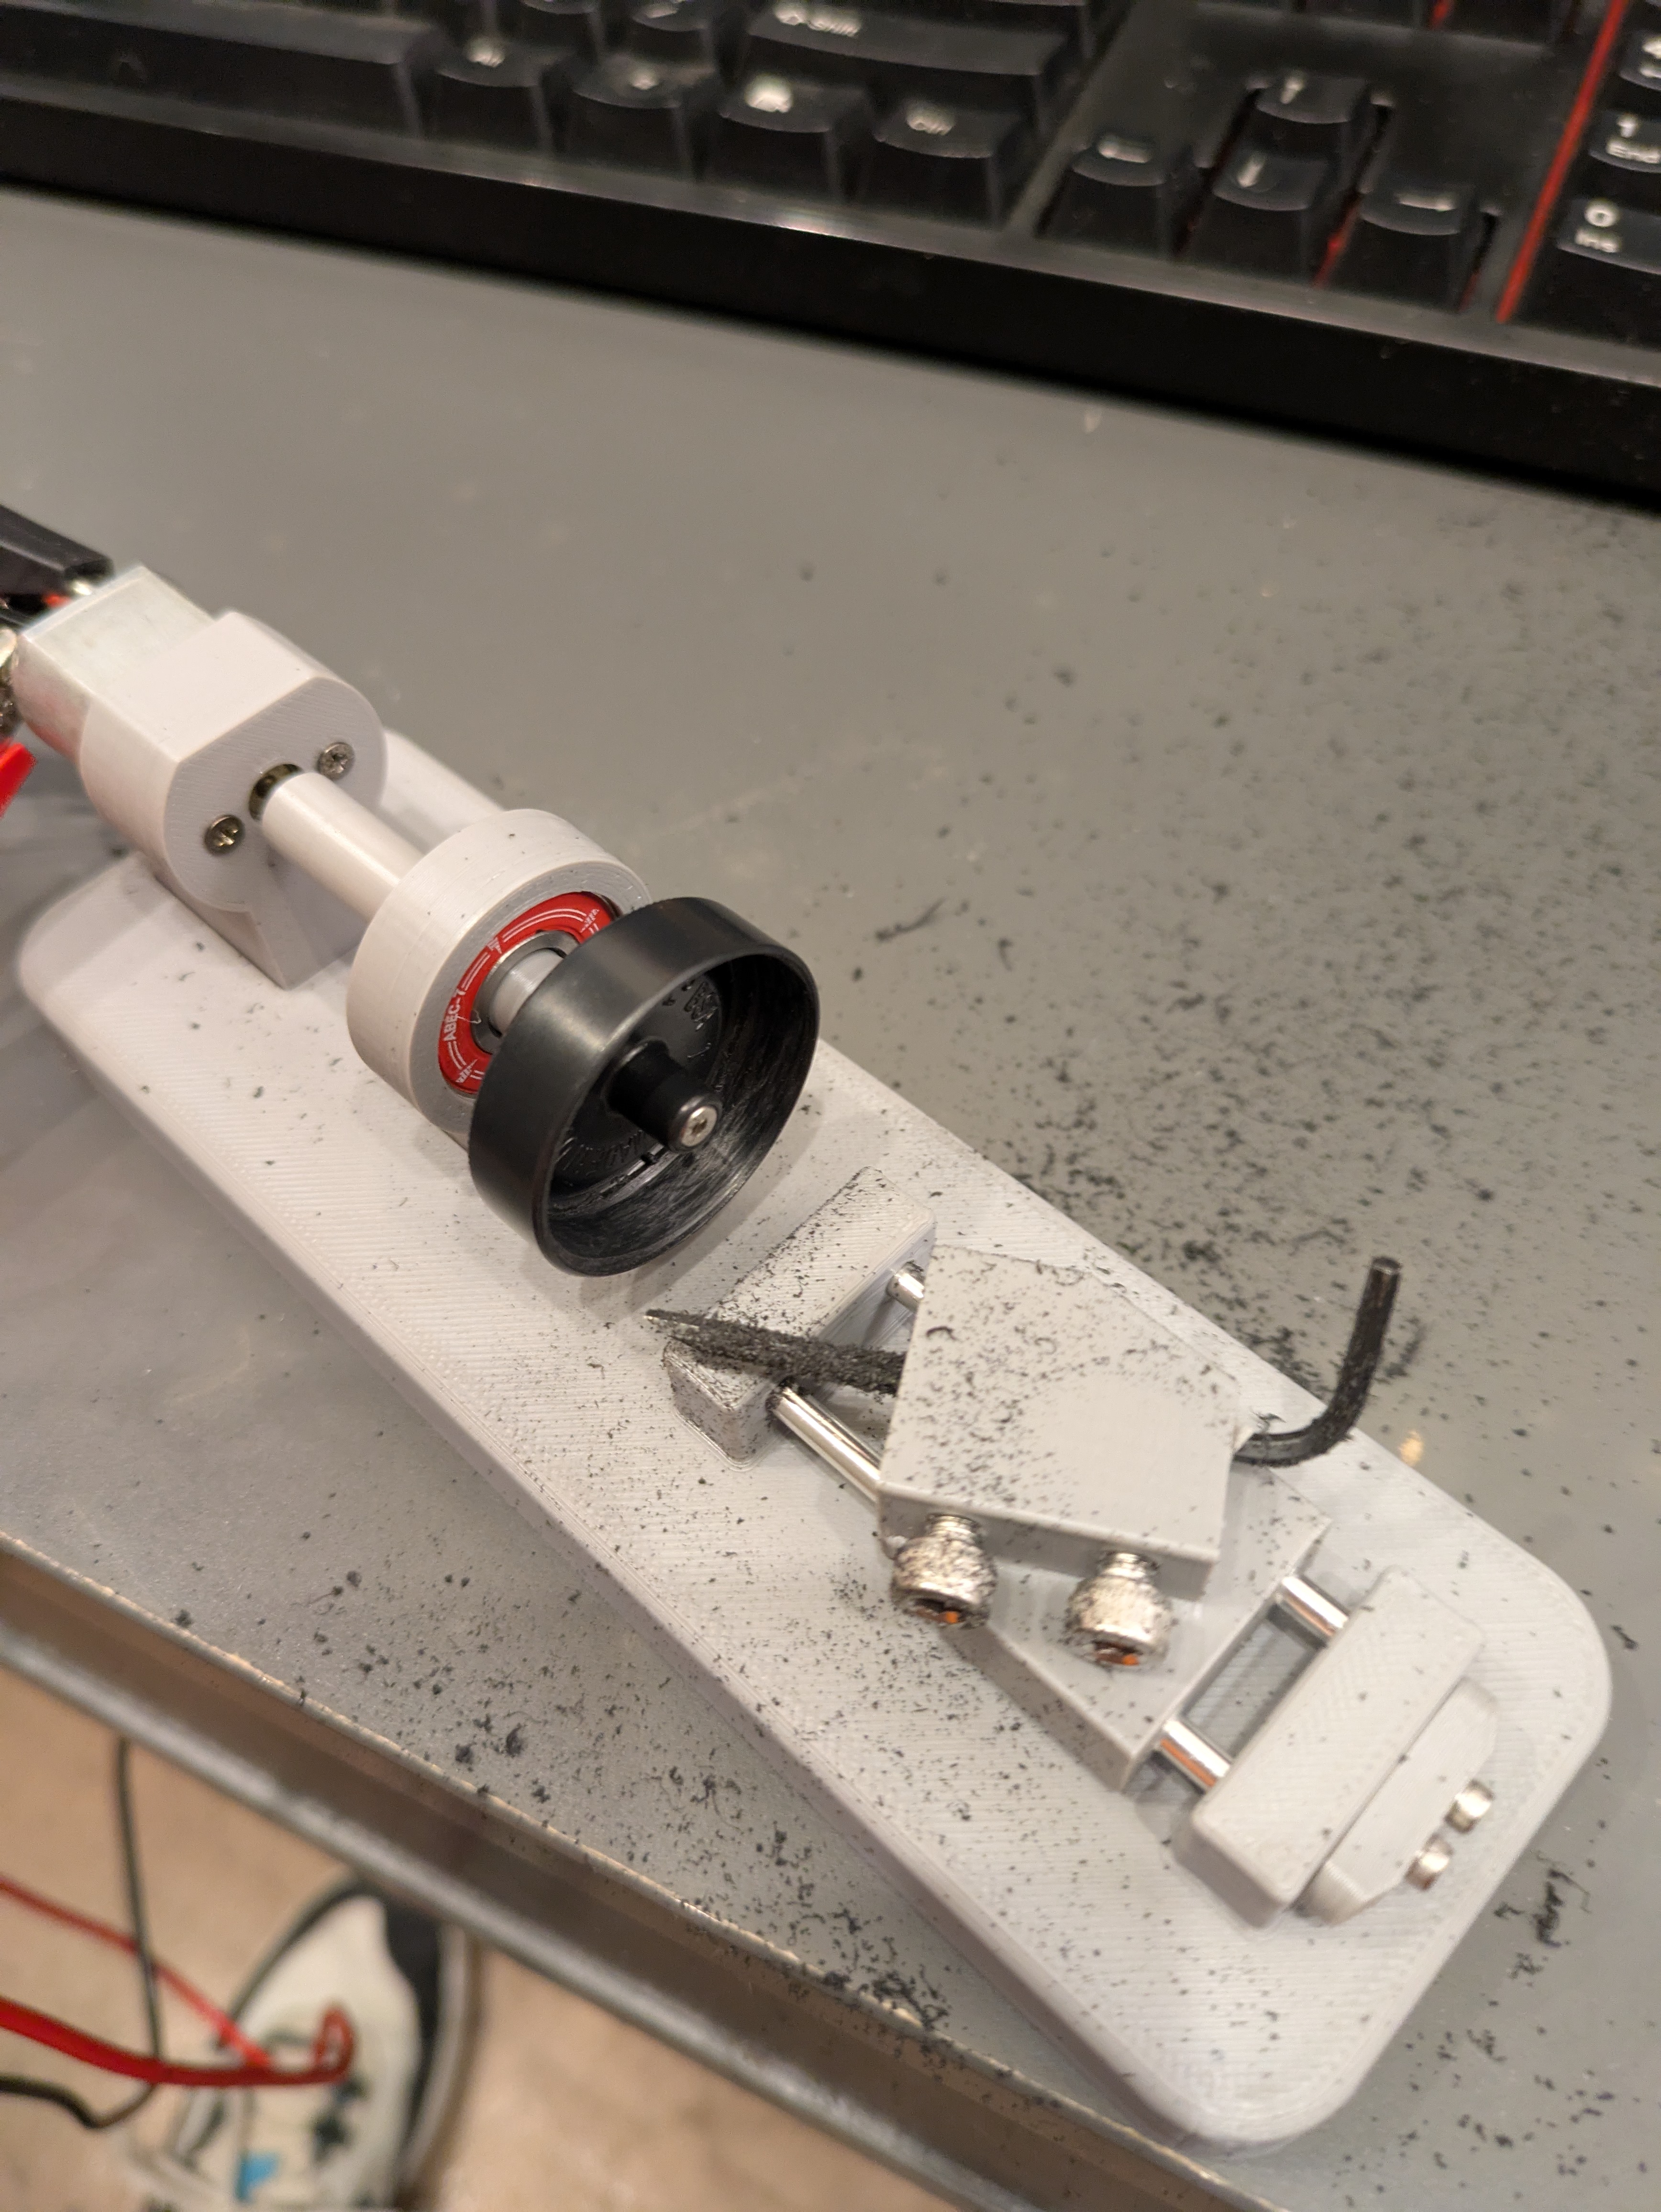
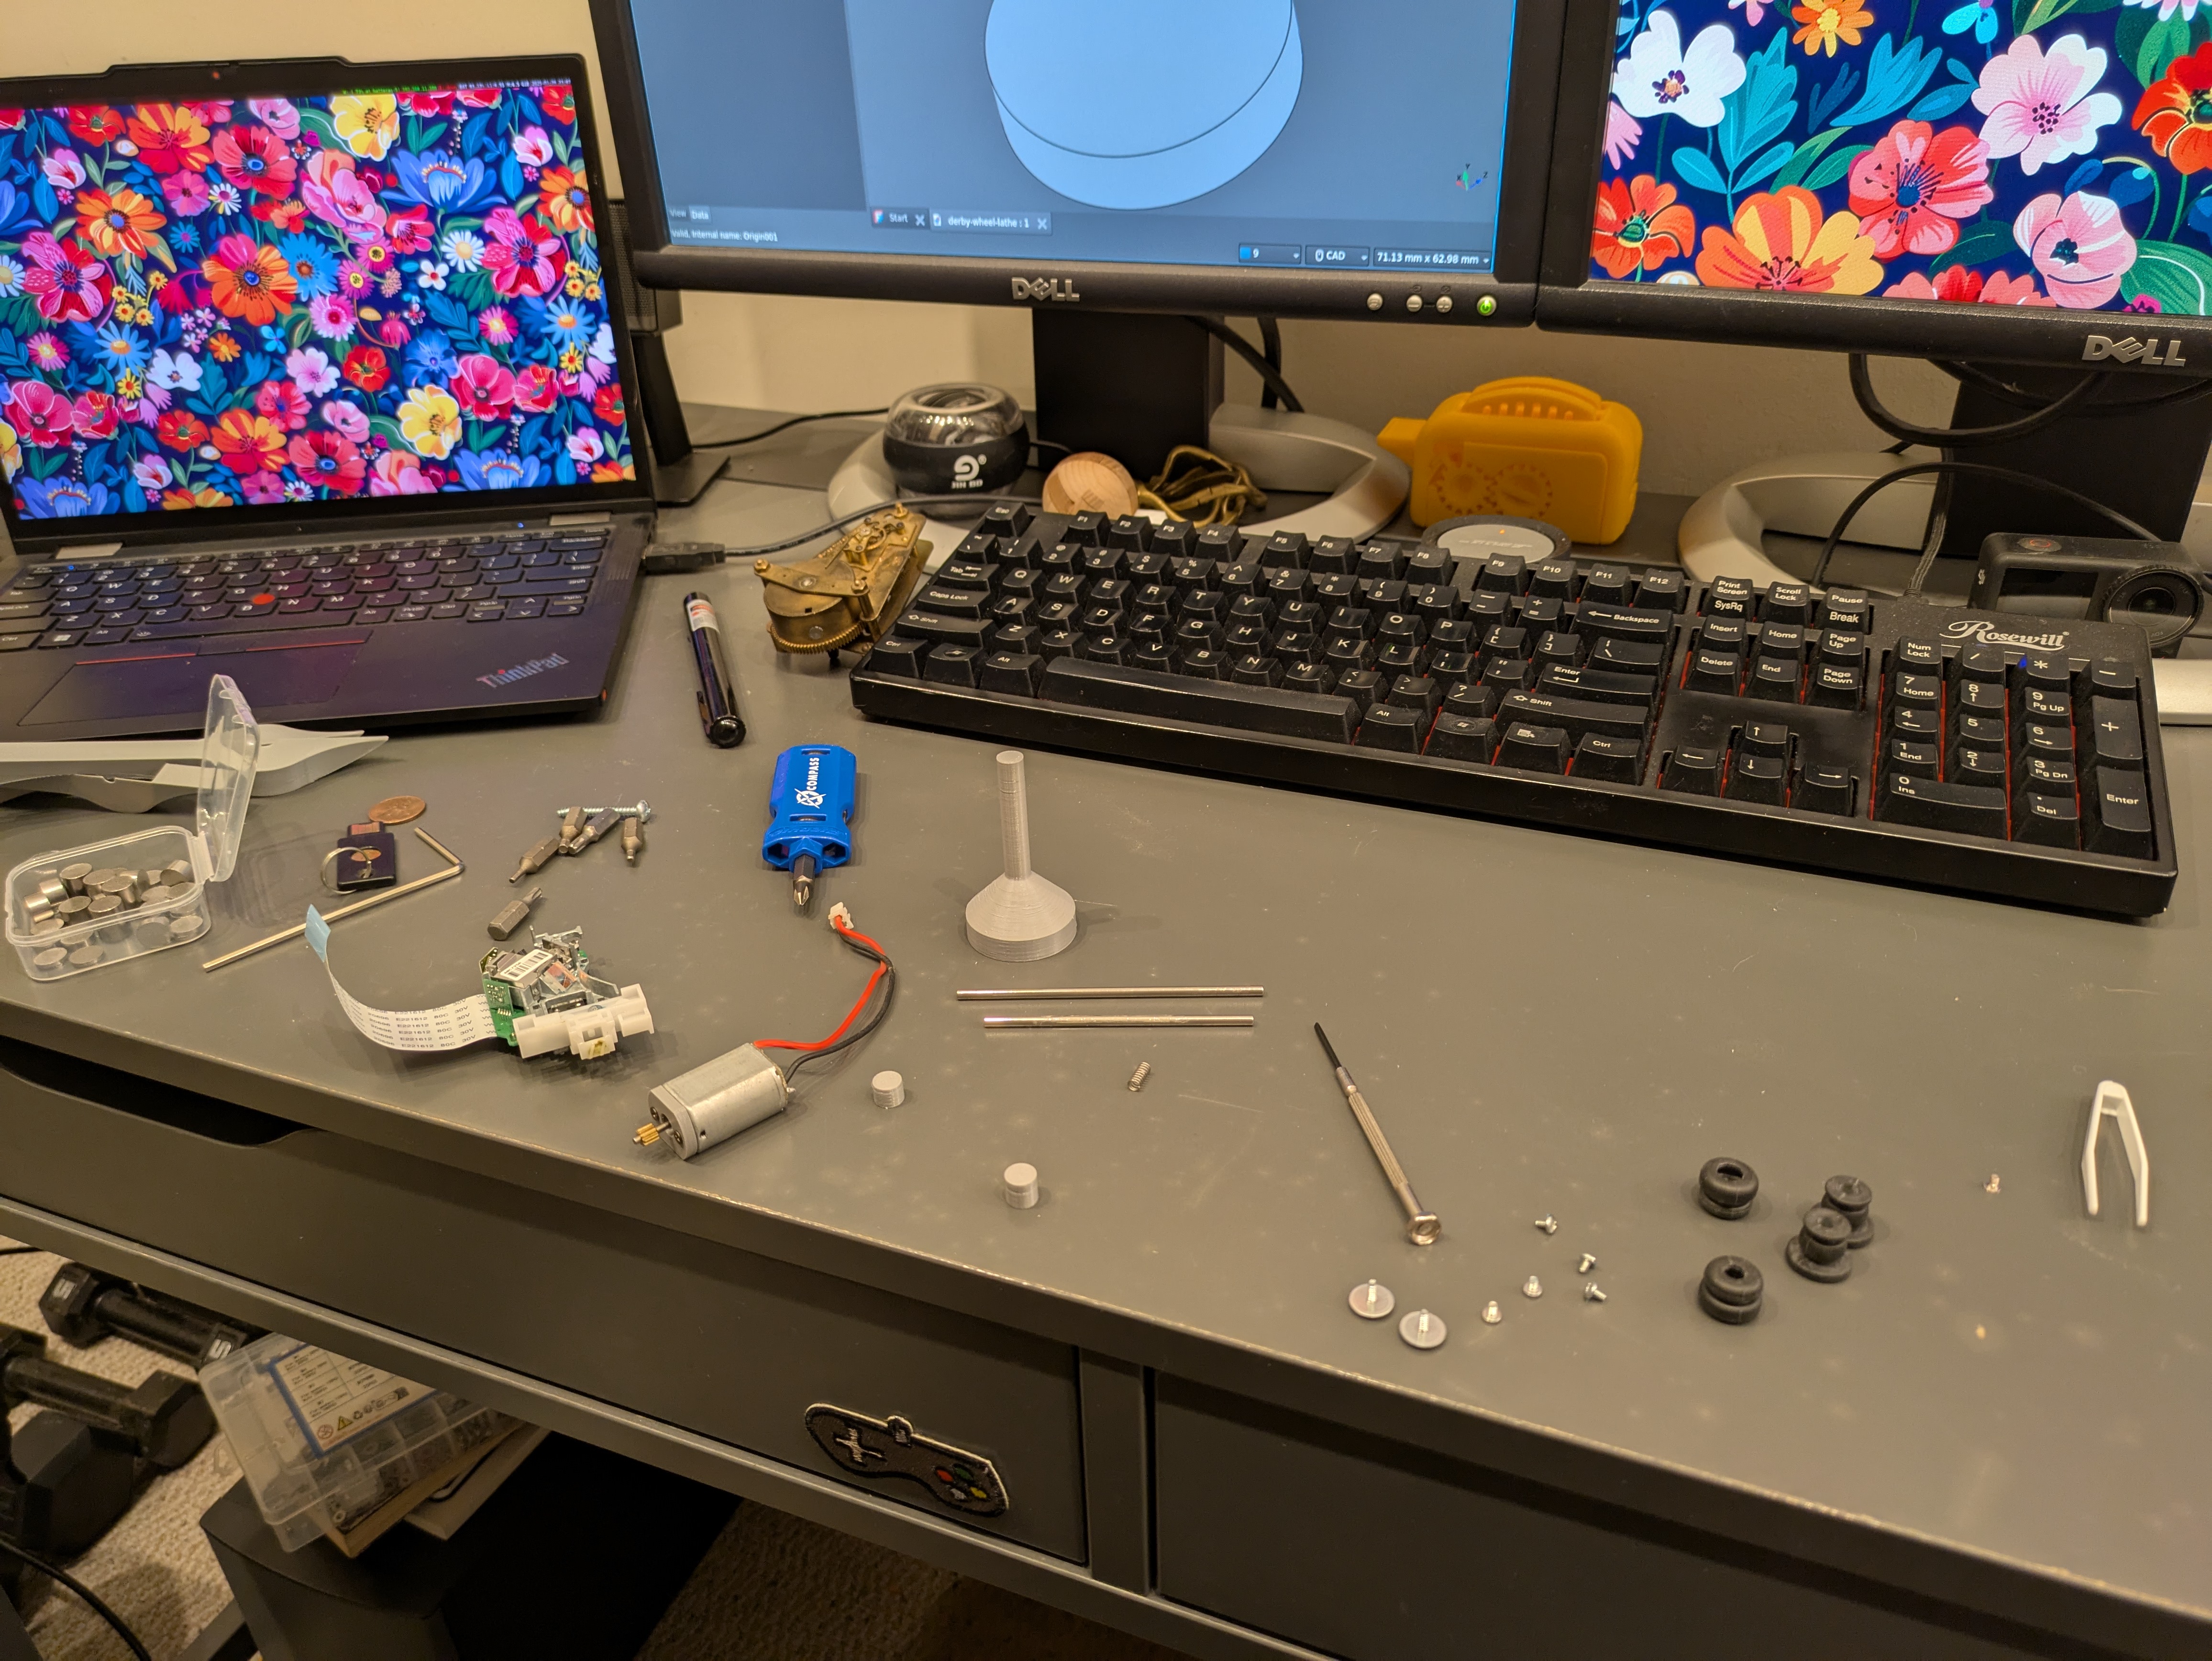
For this year’s Pinewood Derby, my son and I decided to pull out all the stops and use our 3D printer to great effect. I don’t want to spoil the surprise so you’ll have to scroll down to see how we did. First thing’s first, though, we need a lathe for our wheels. The rules state we can’t make the wheels thinner and the text must be readable on the inside as well as the outside of the wheels. However, it says nothing about trimming off material on the inside of the wheel as long as the rolling surface is untouched. So we designed this lathe using what I think was a motor from a toy helicopter.
Download the 7z bundle containing FreeCAD design file.
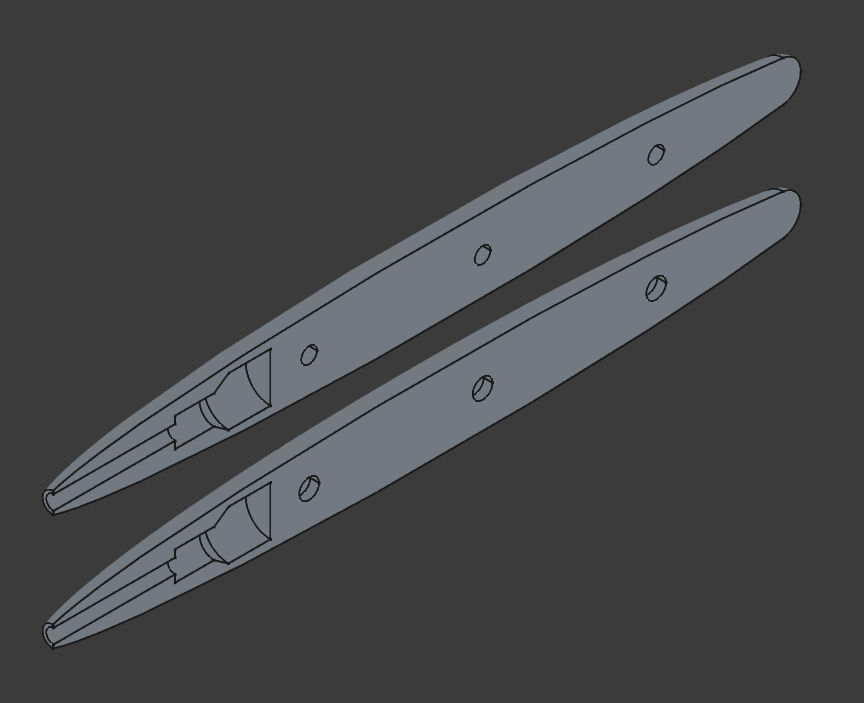
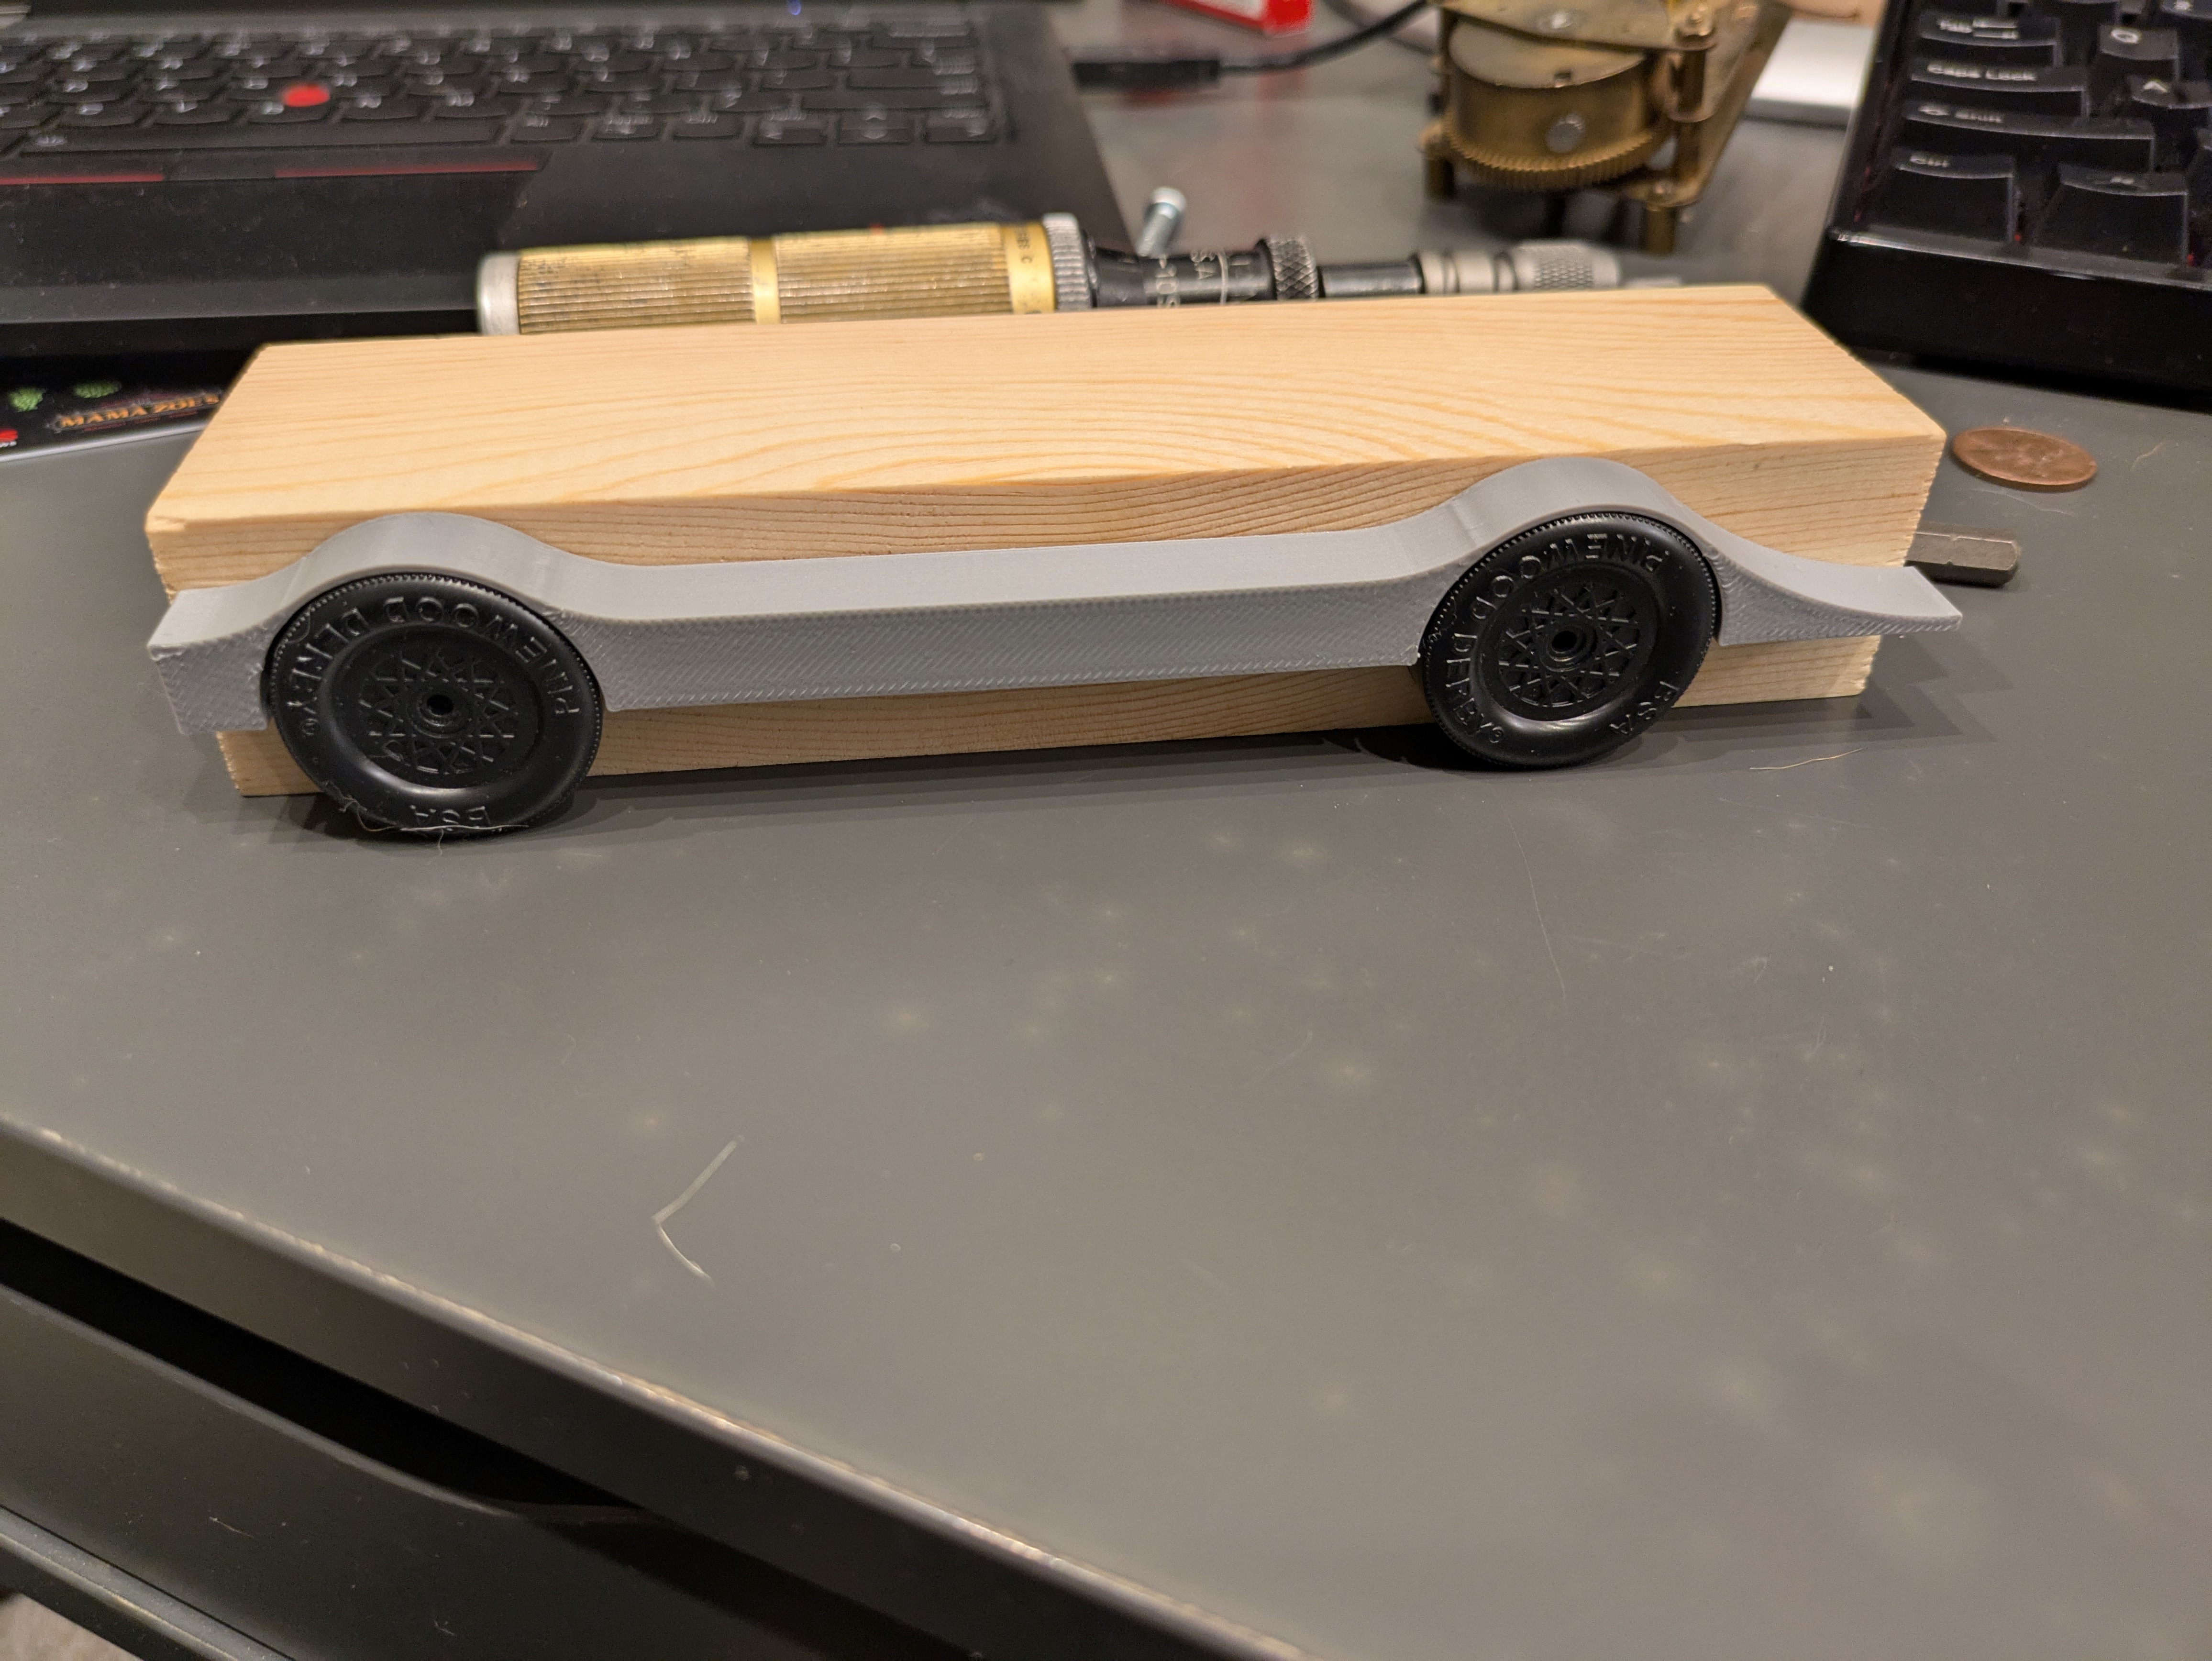
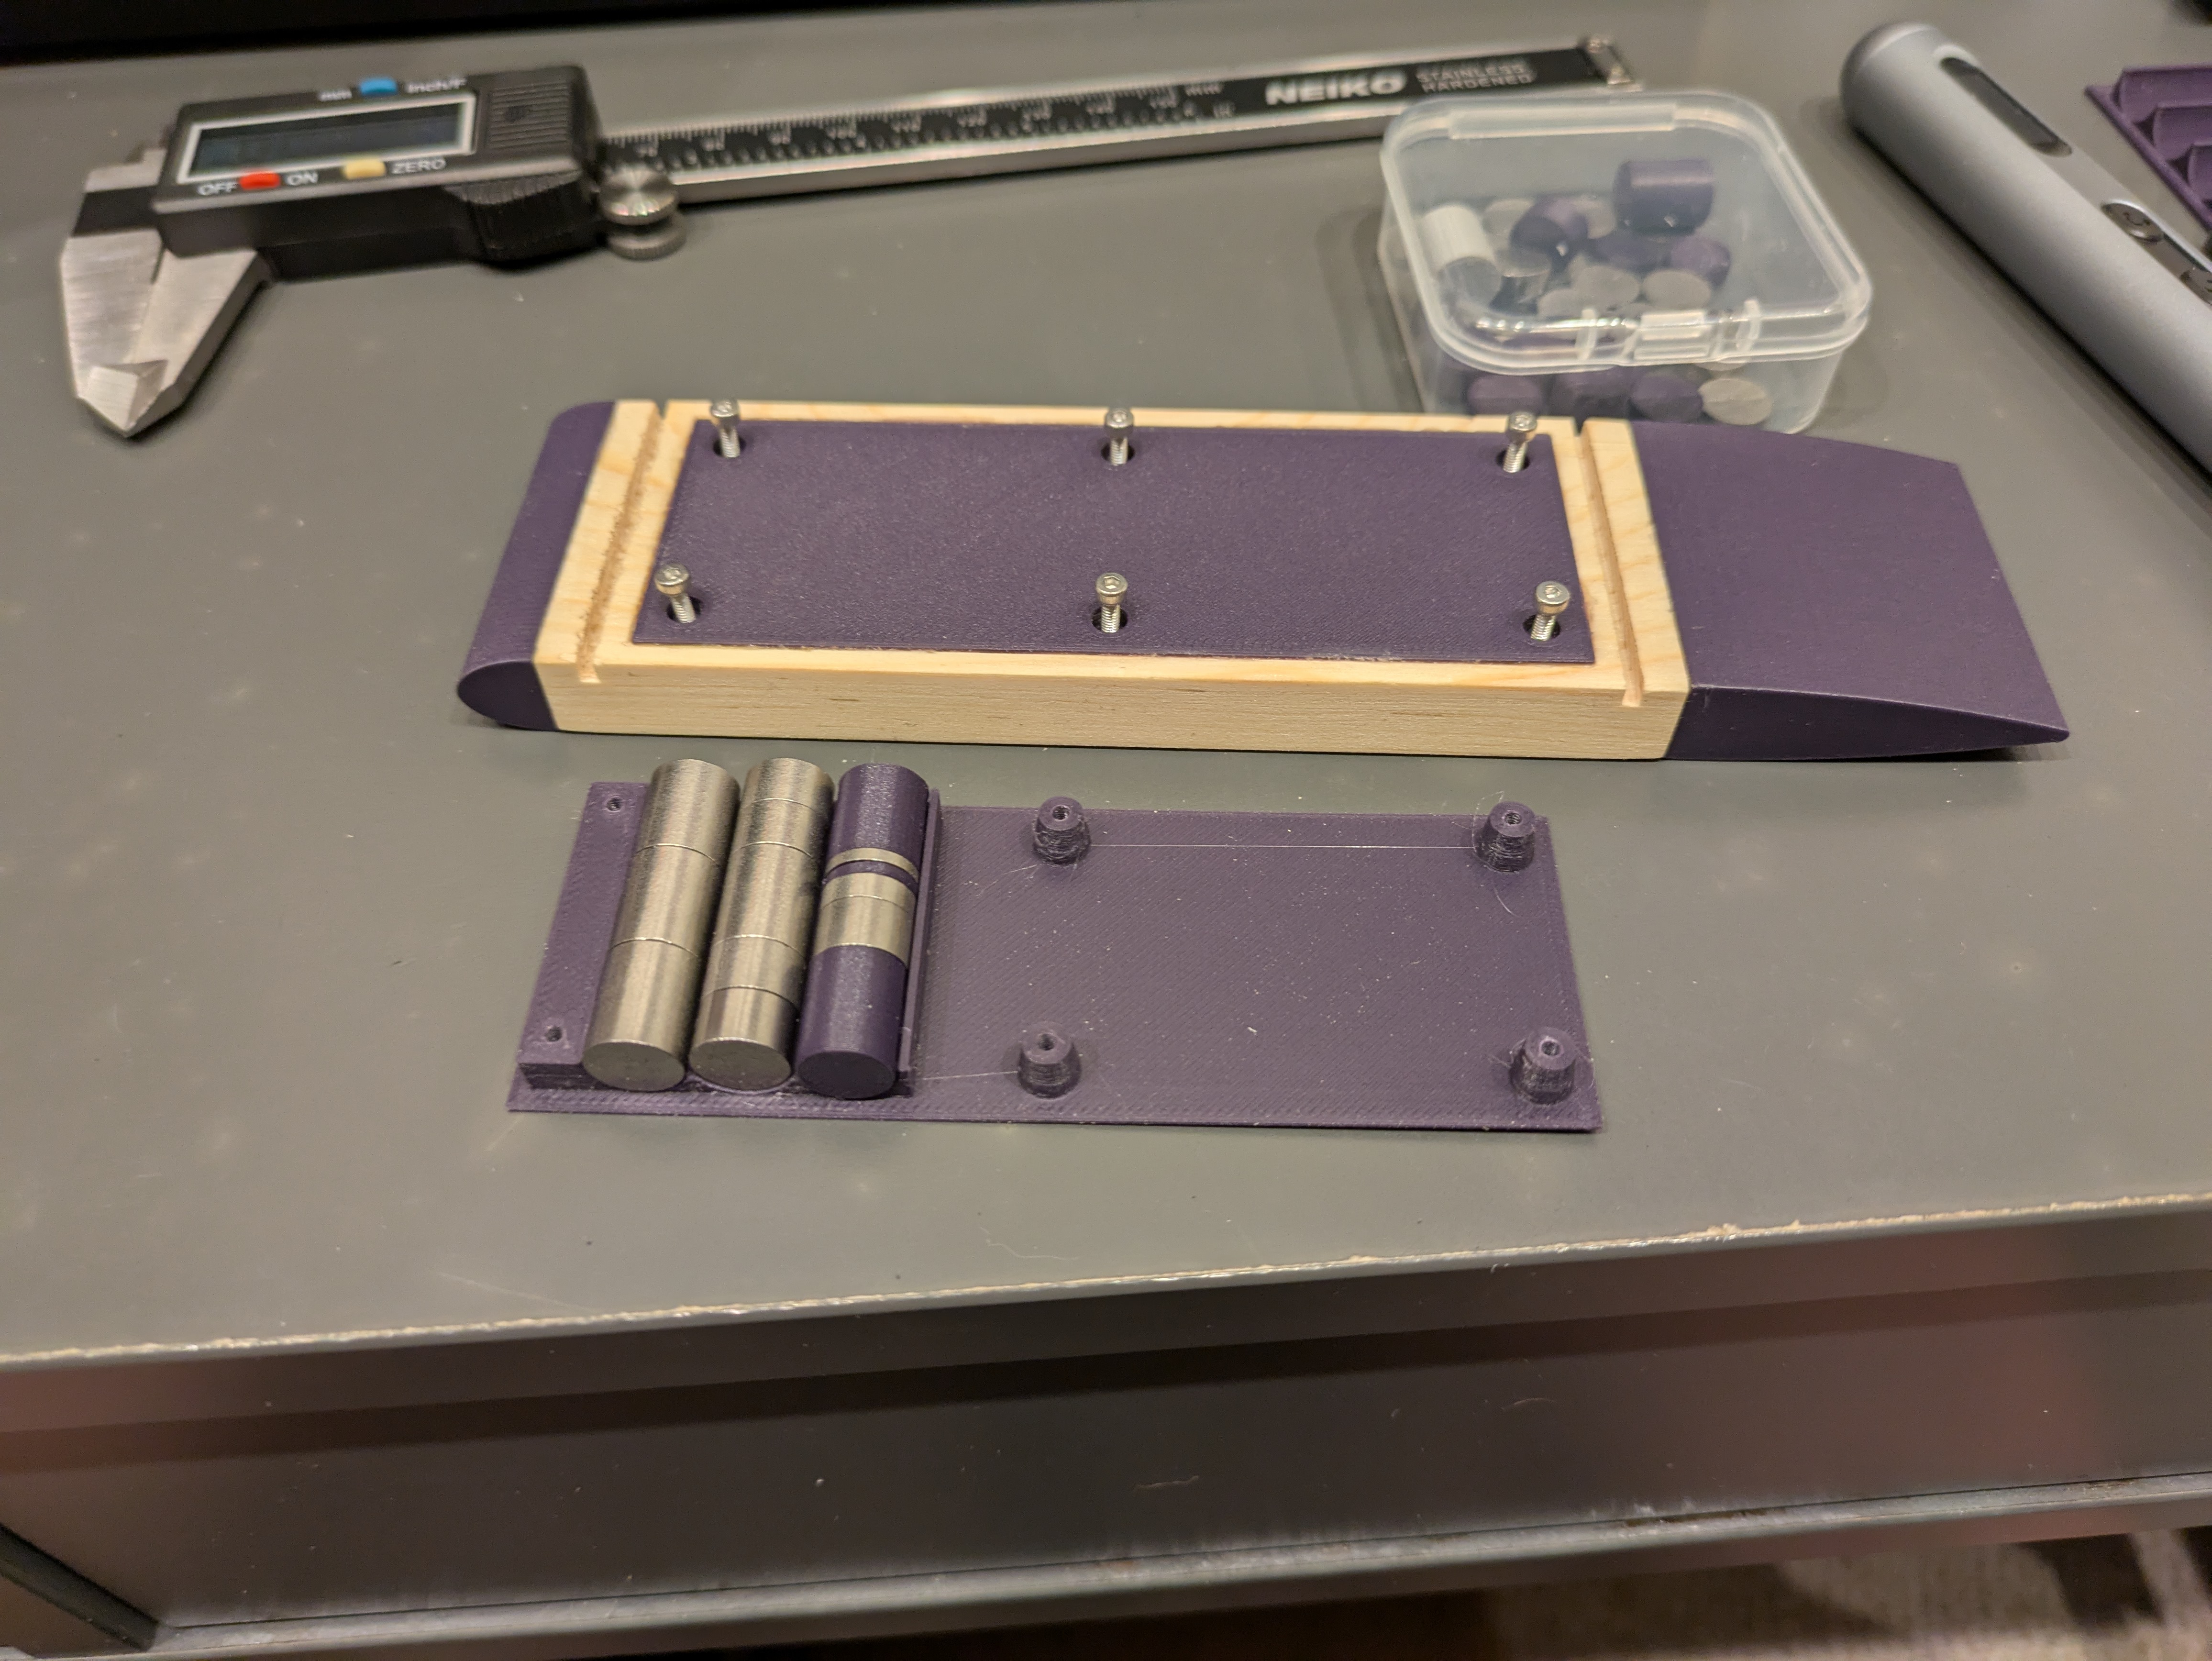
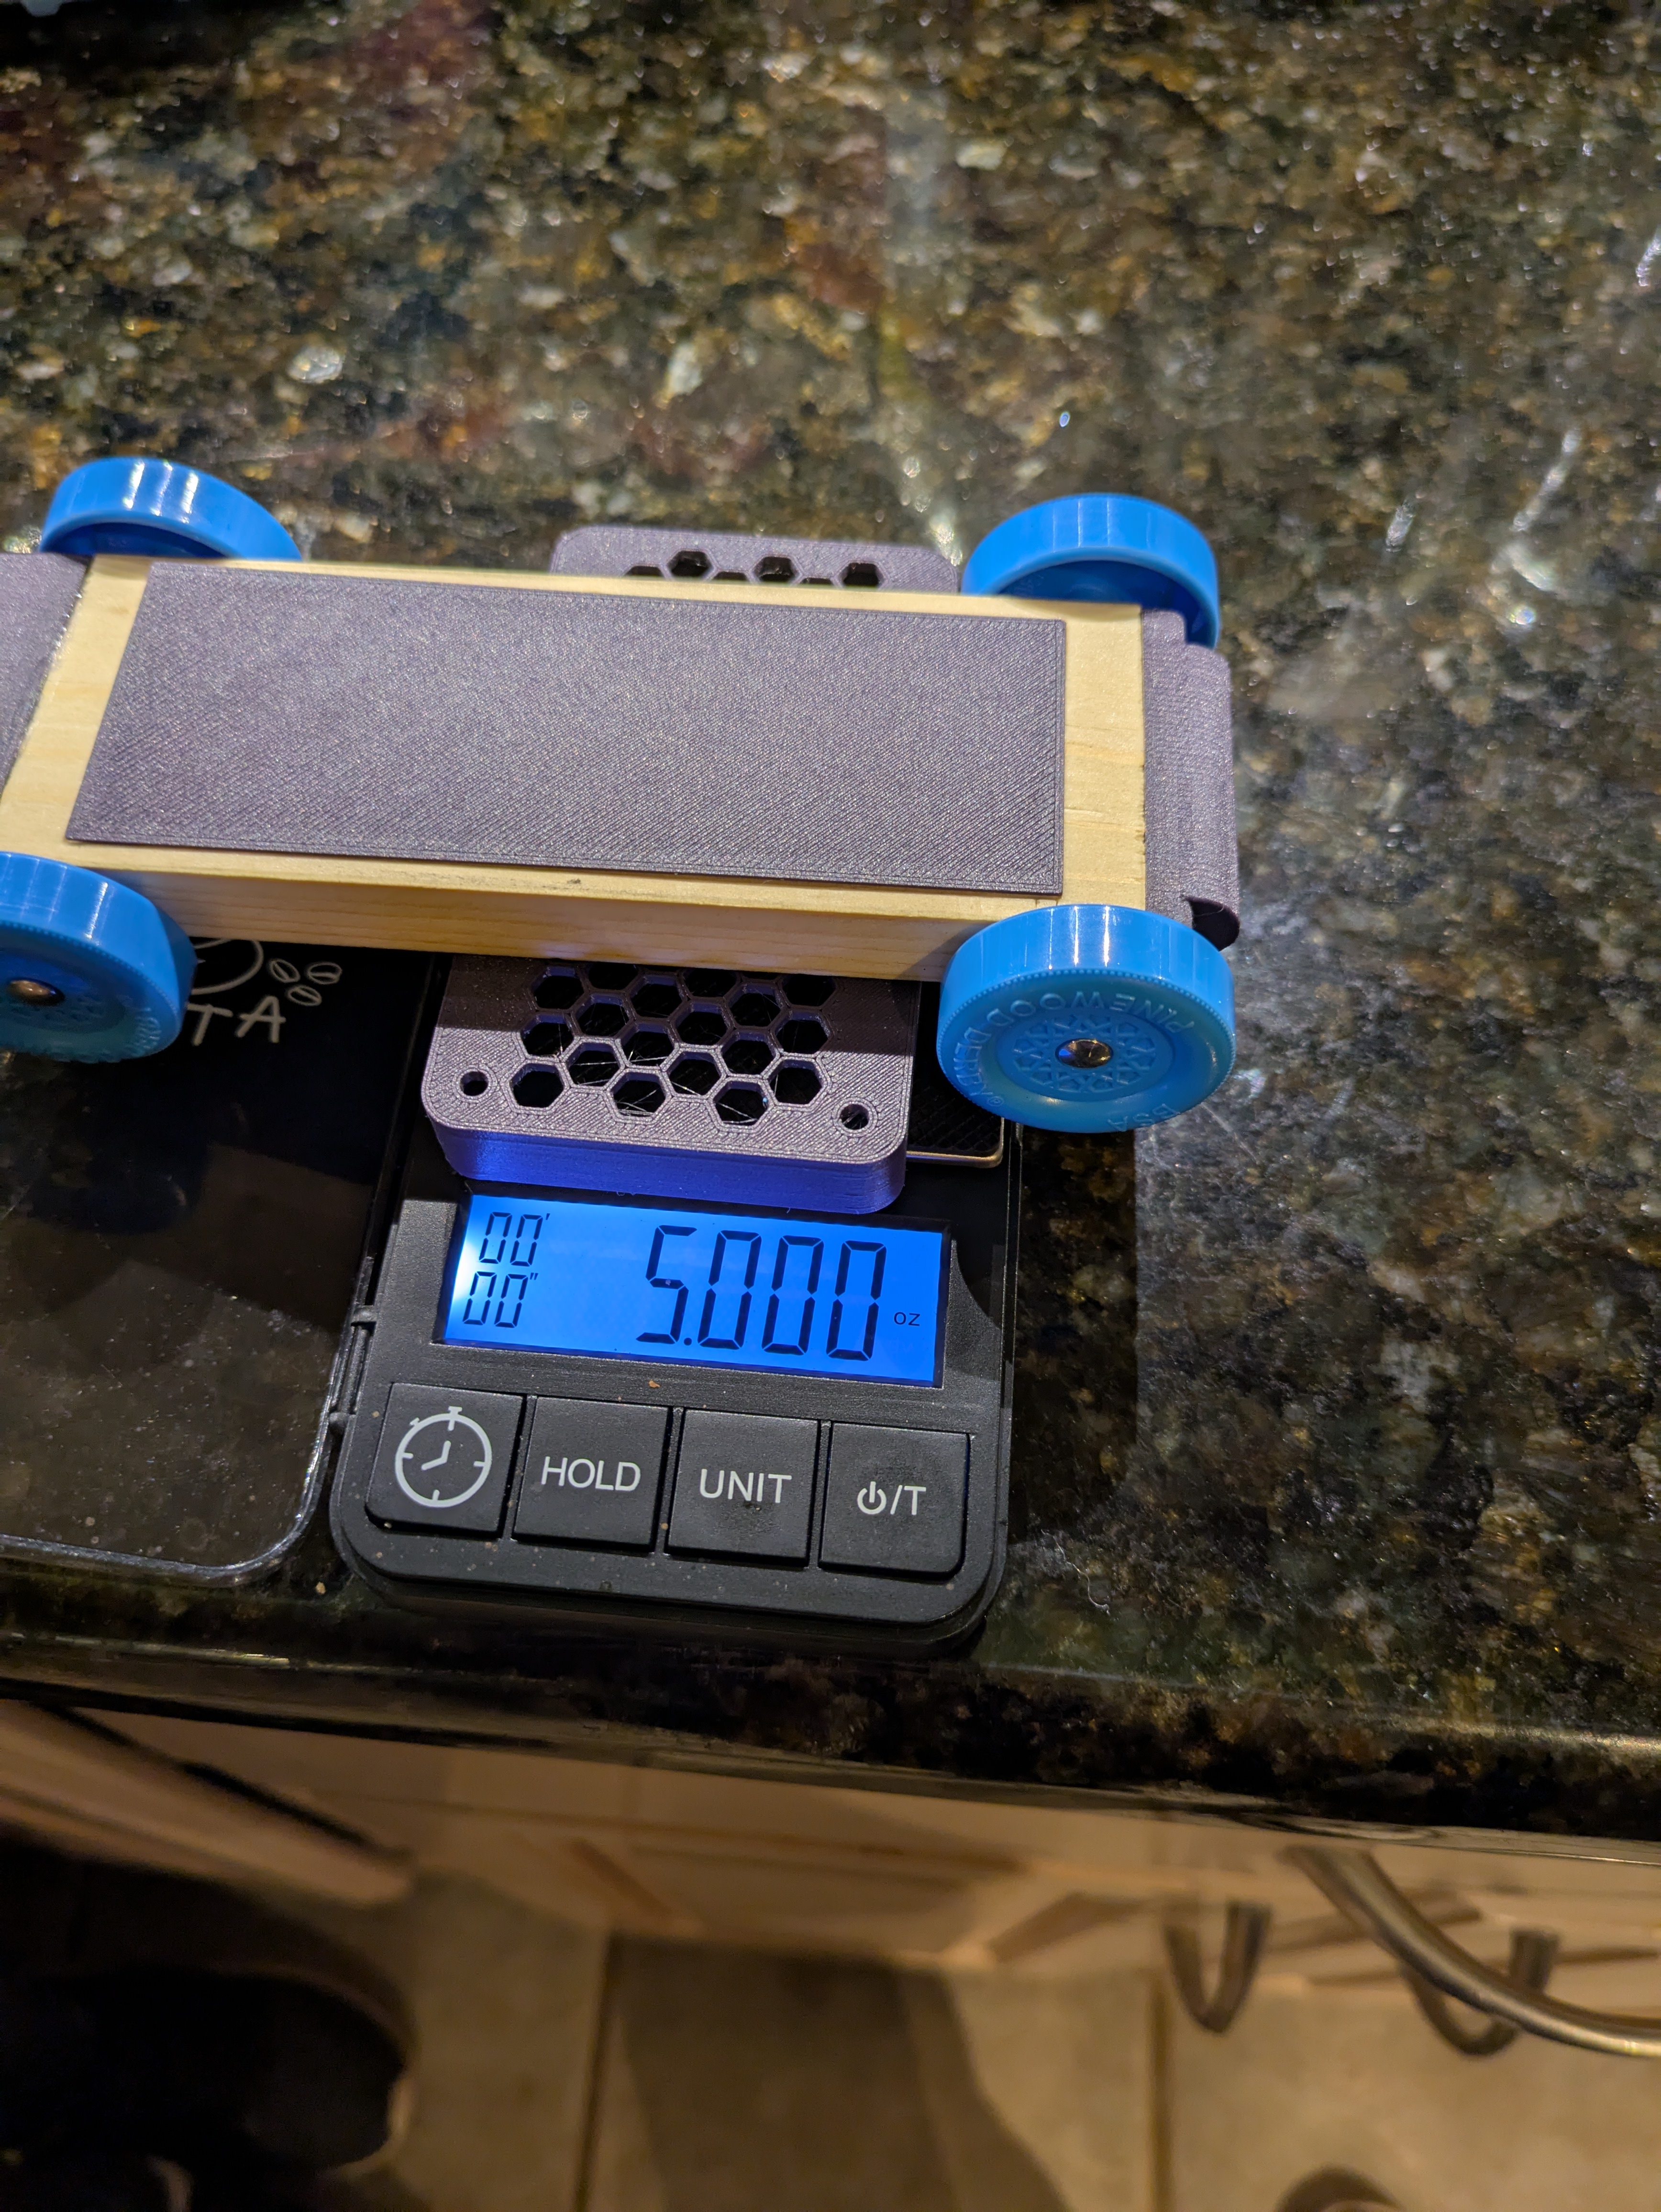
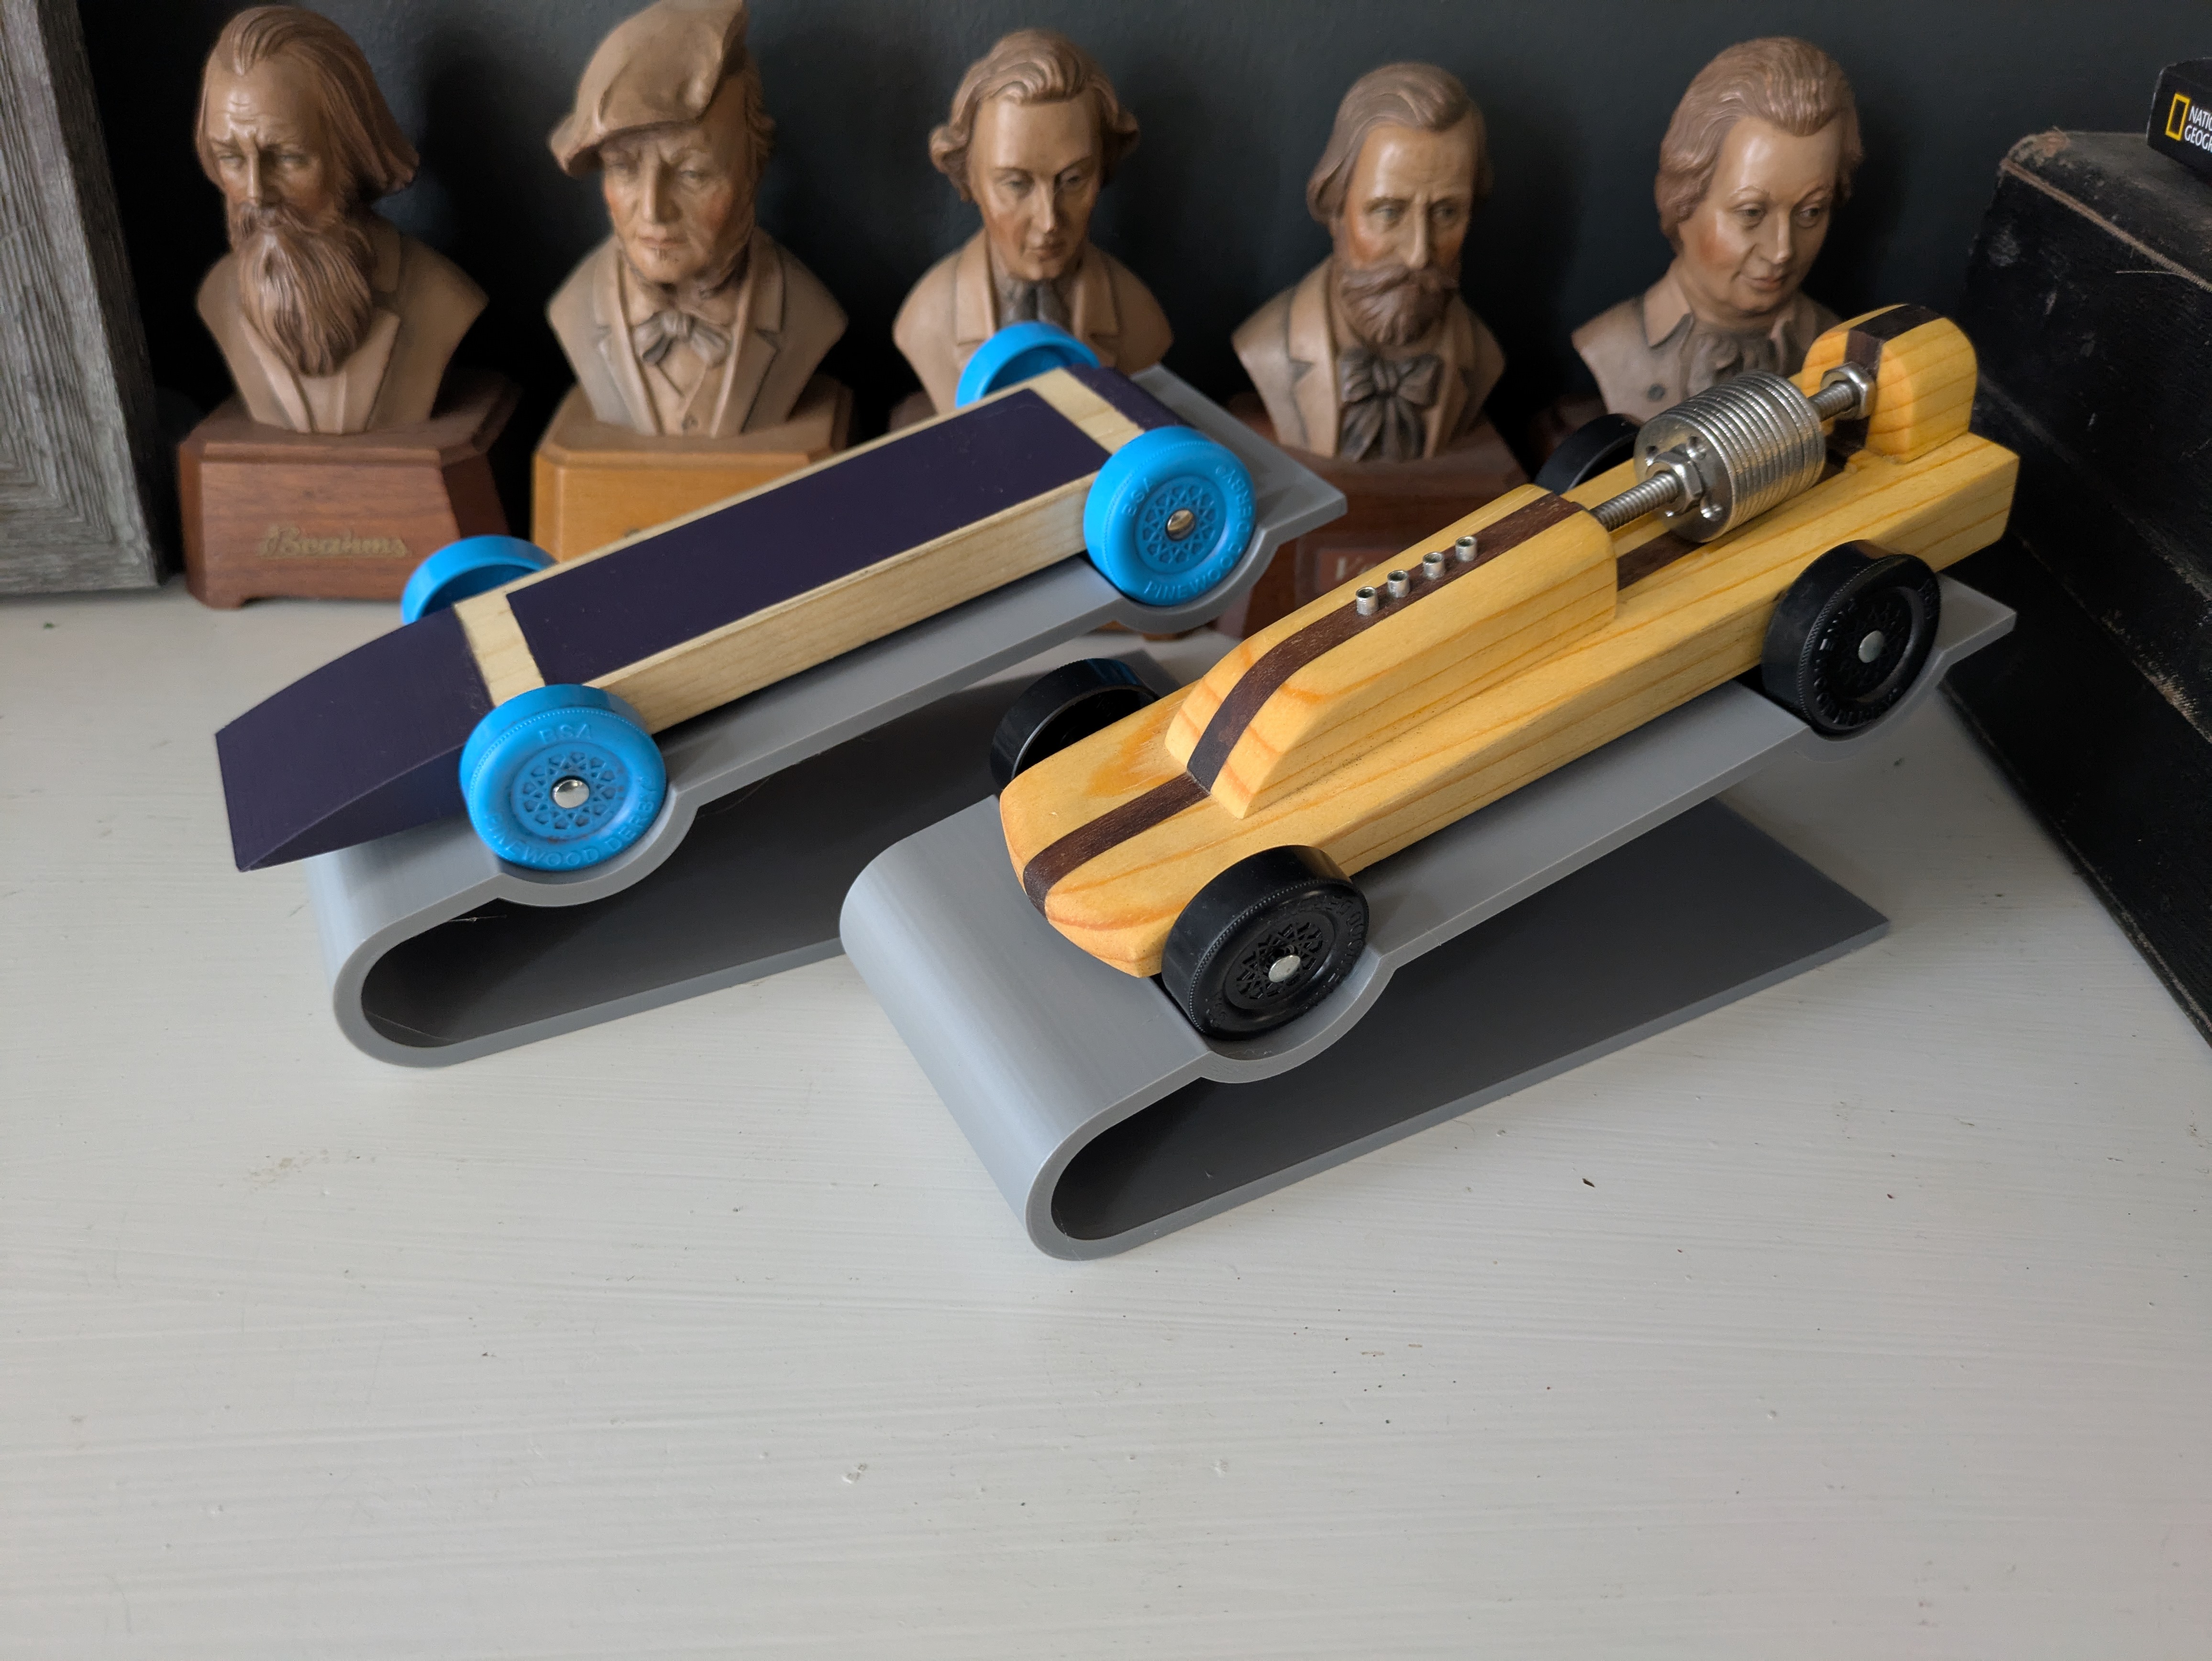
The Car
Now that we’ve trimmed our wheels up, we need to put weight in the most advantageous position on our car. Ideally, you concentrate as much mass as possible into a point right in front of the rear axle. This gives you the most potential energy possible when you reach the flat section of the track. The Pinewood Derby is all about converting potential energy into kinetic energy as efficiently as possible. Because the track flattens out at the end of the race, the positioning of the weight in the car really matters. If it’s concentrated all in the front of the car, you start with less potential energy at the beginning and the race will be lost. Too far back and you will pop a wheelie on the transition and lose all your speed.
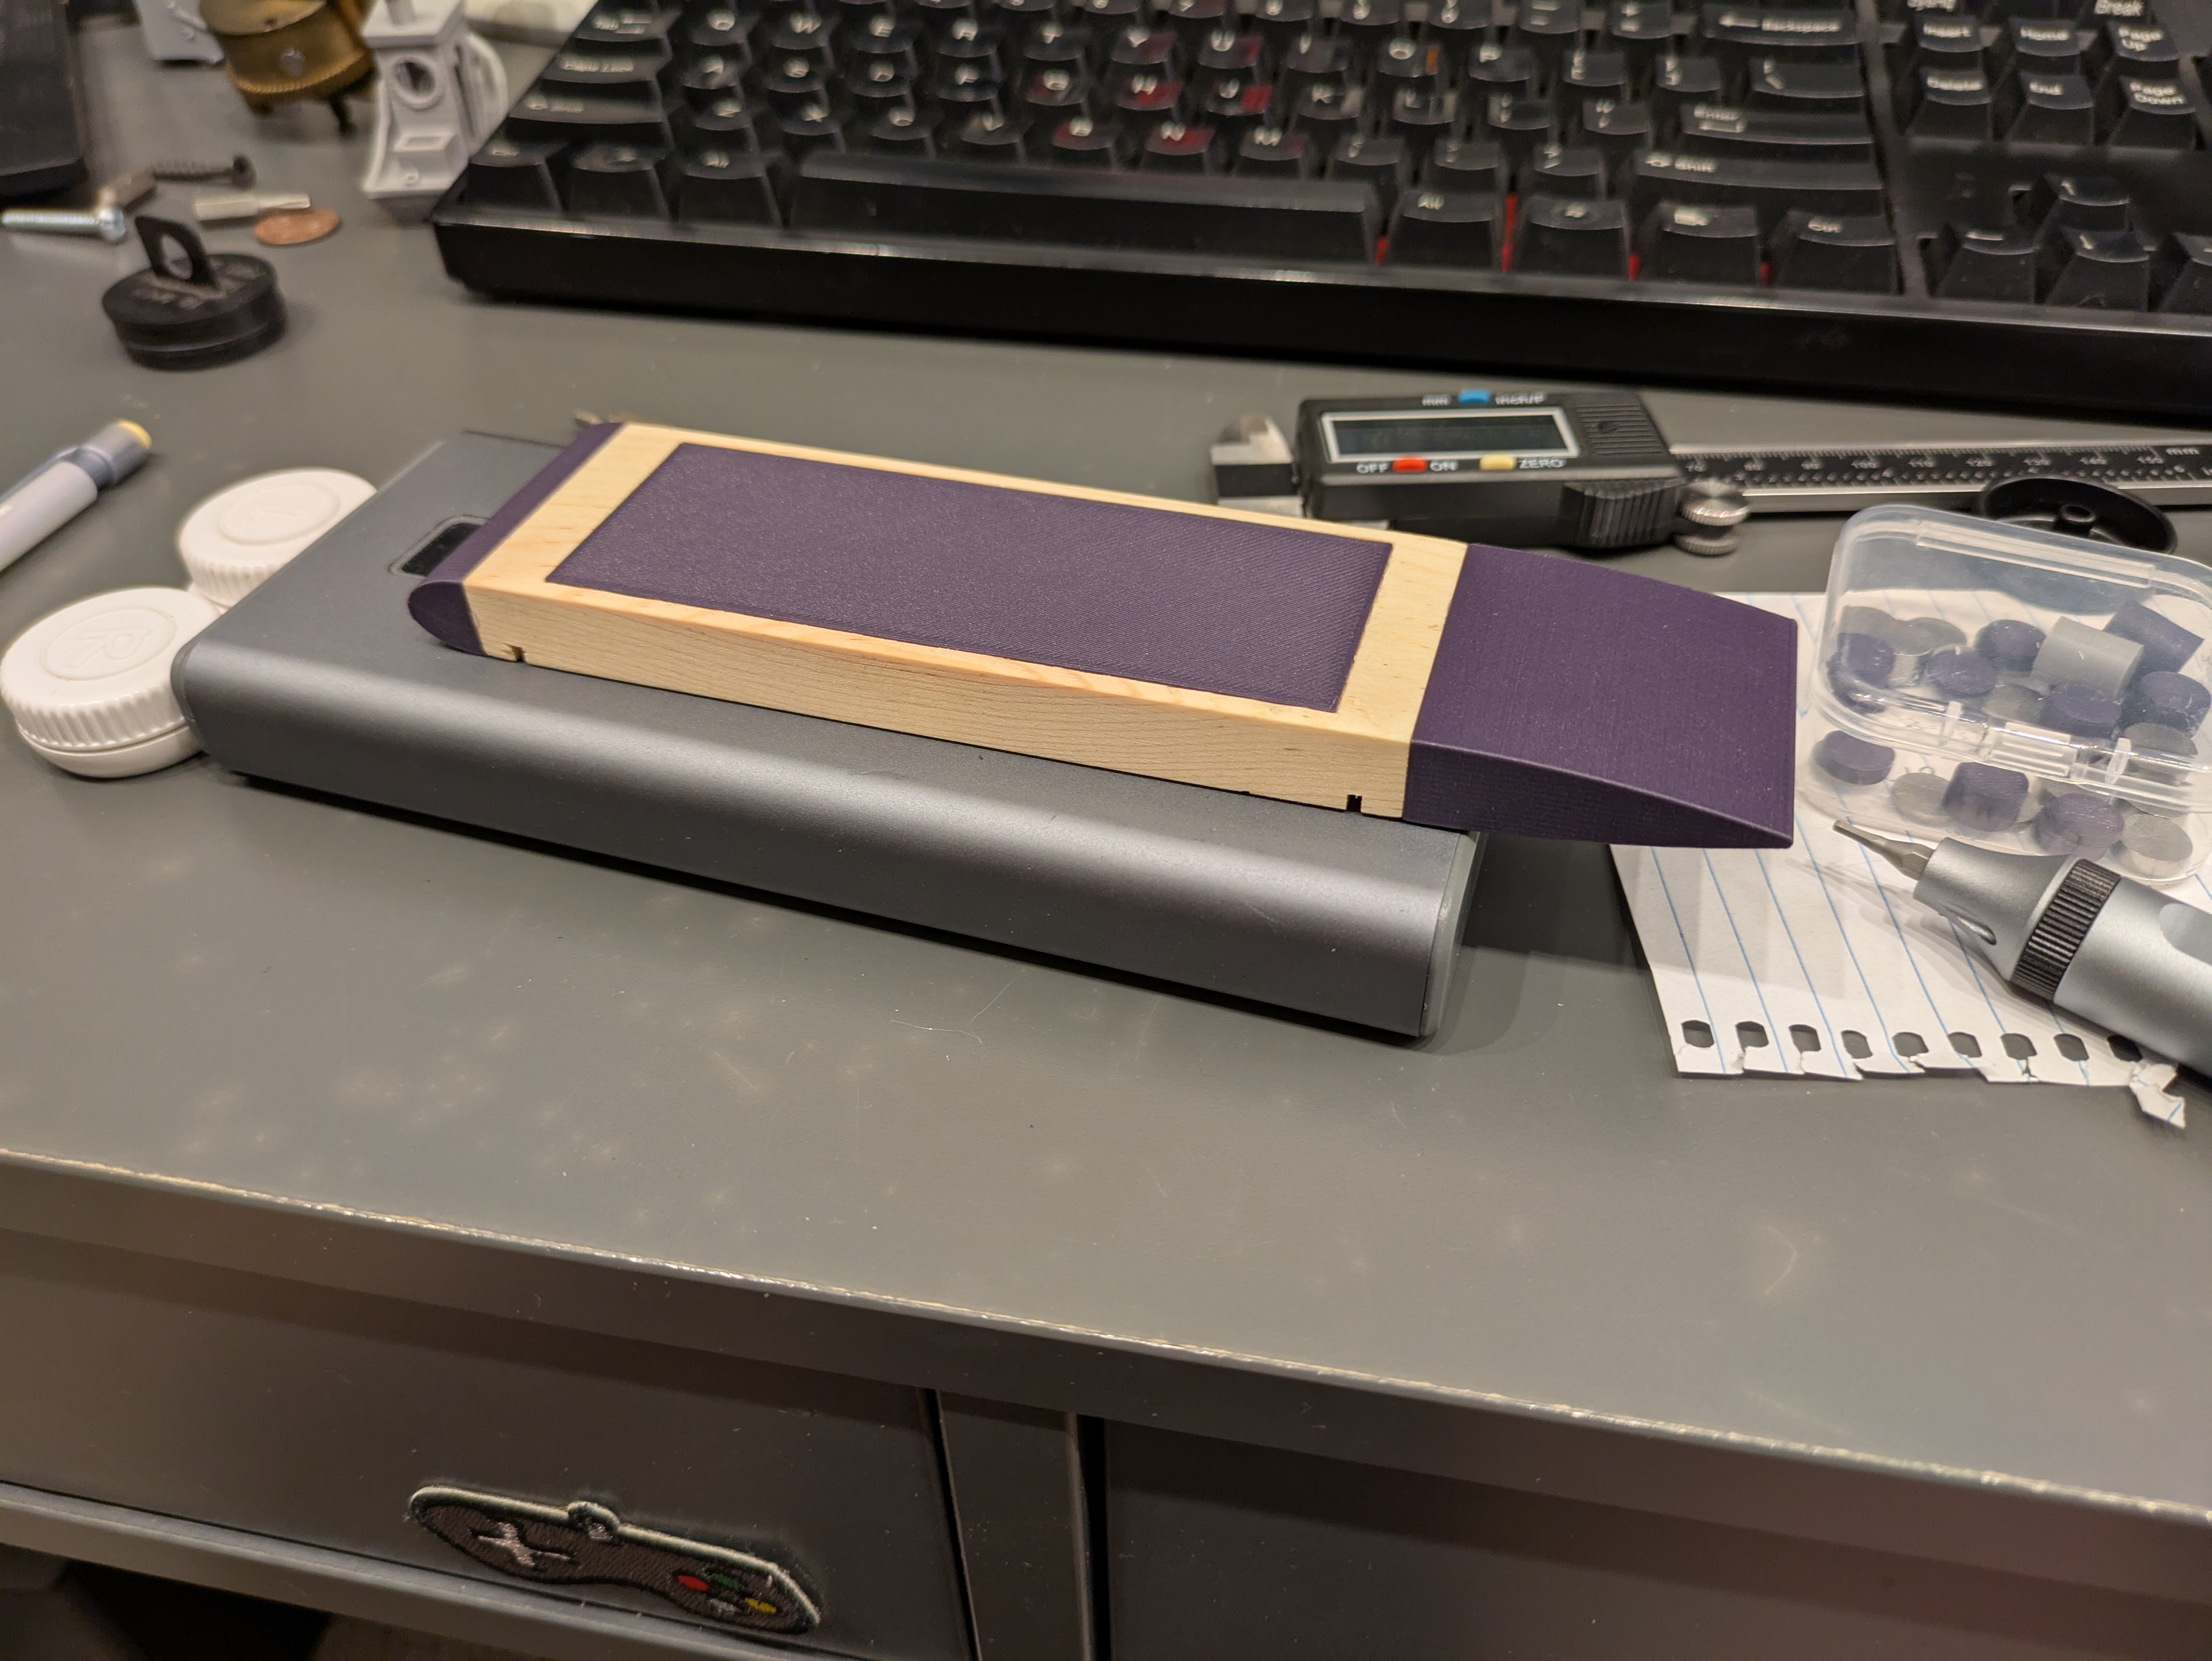
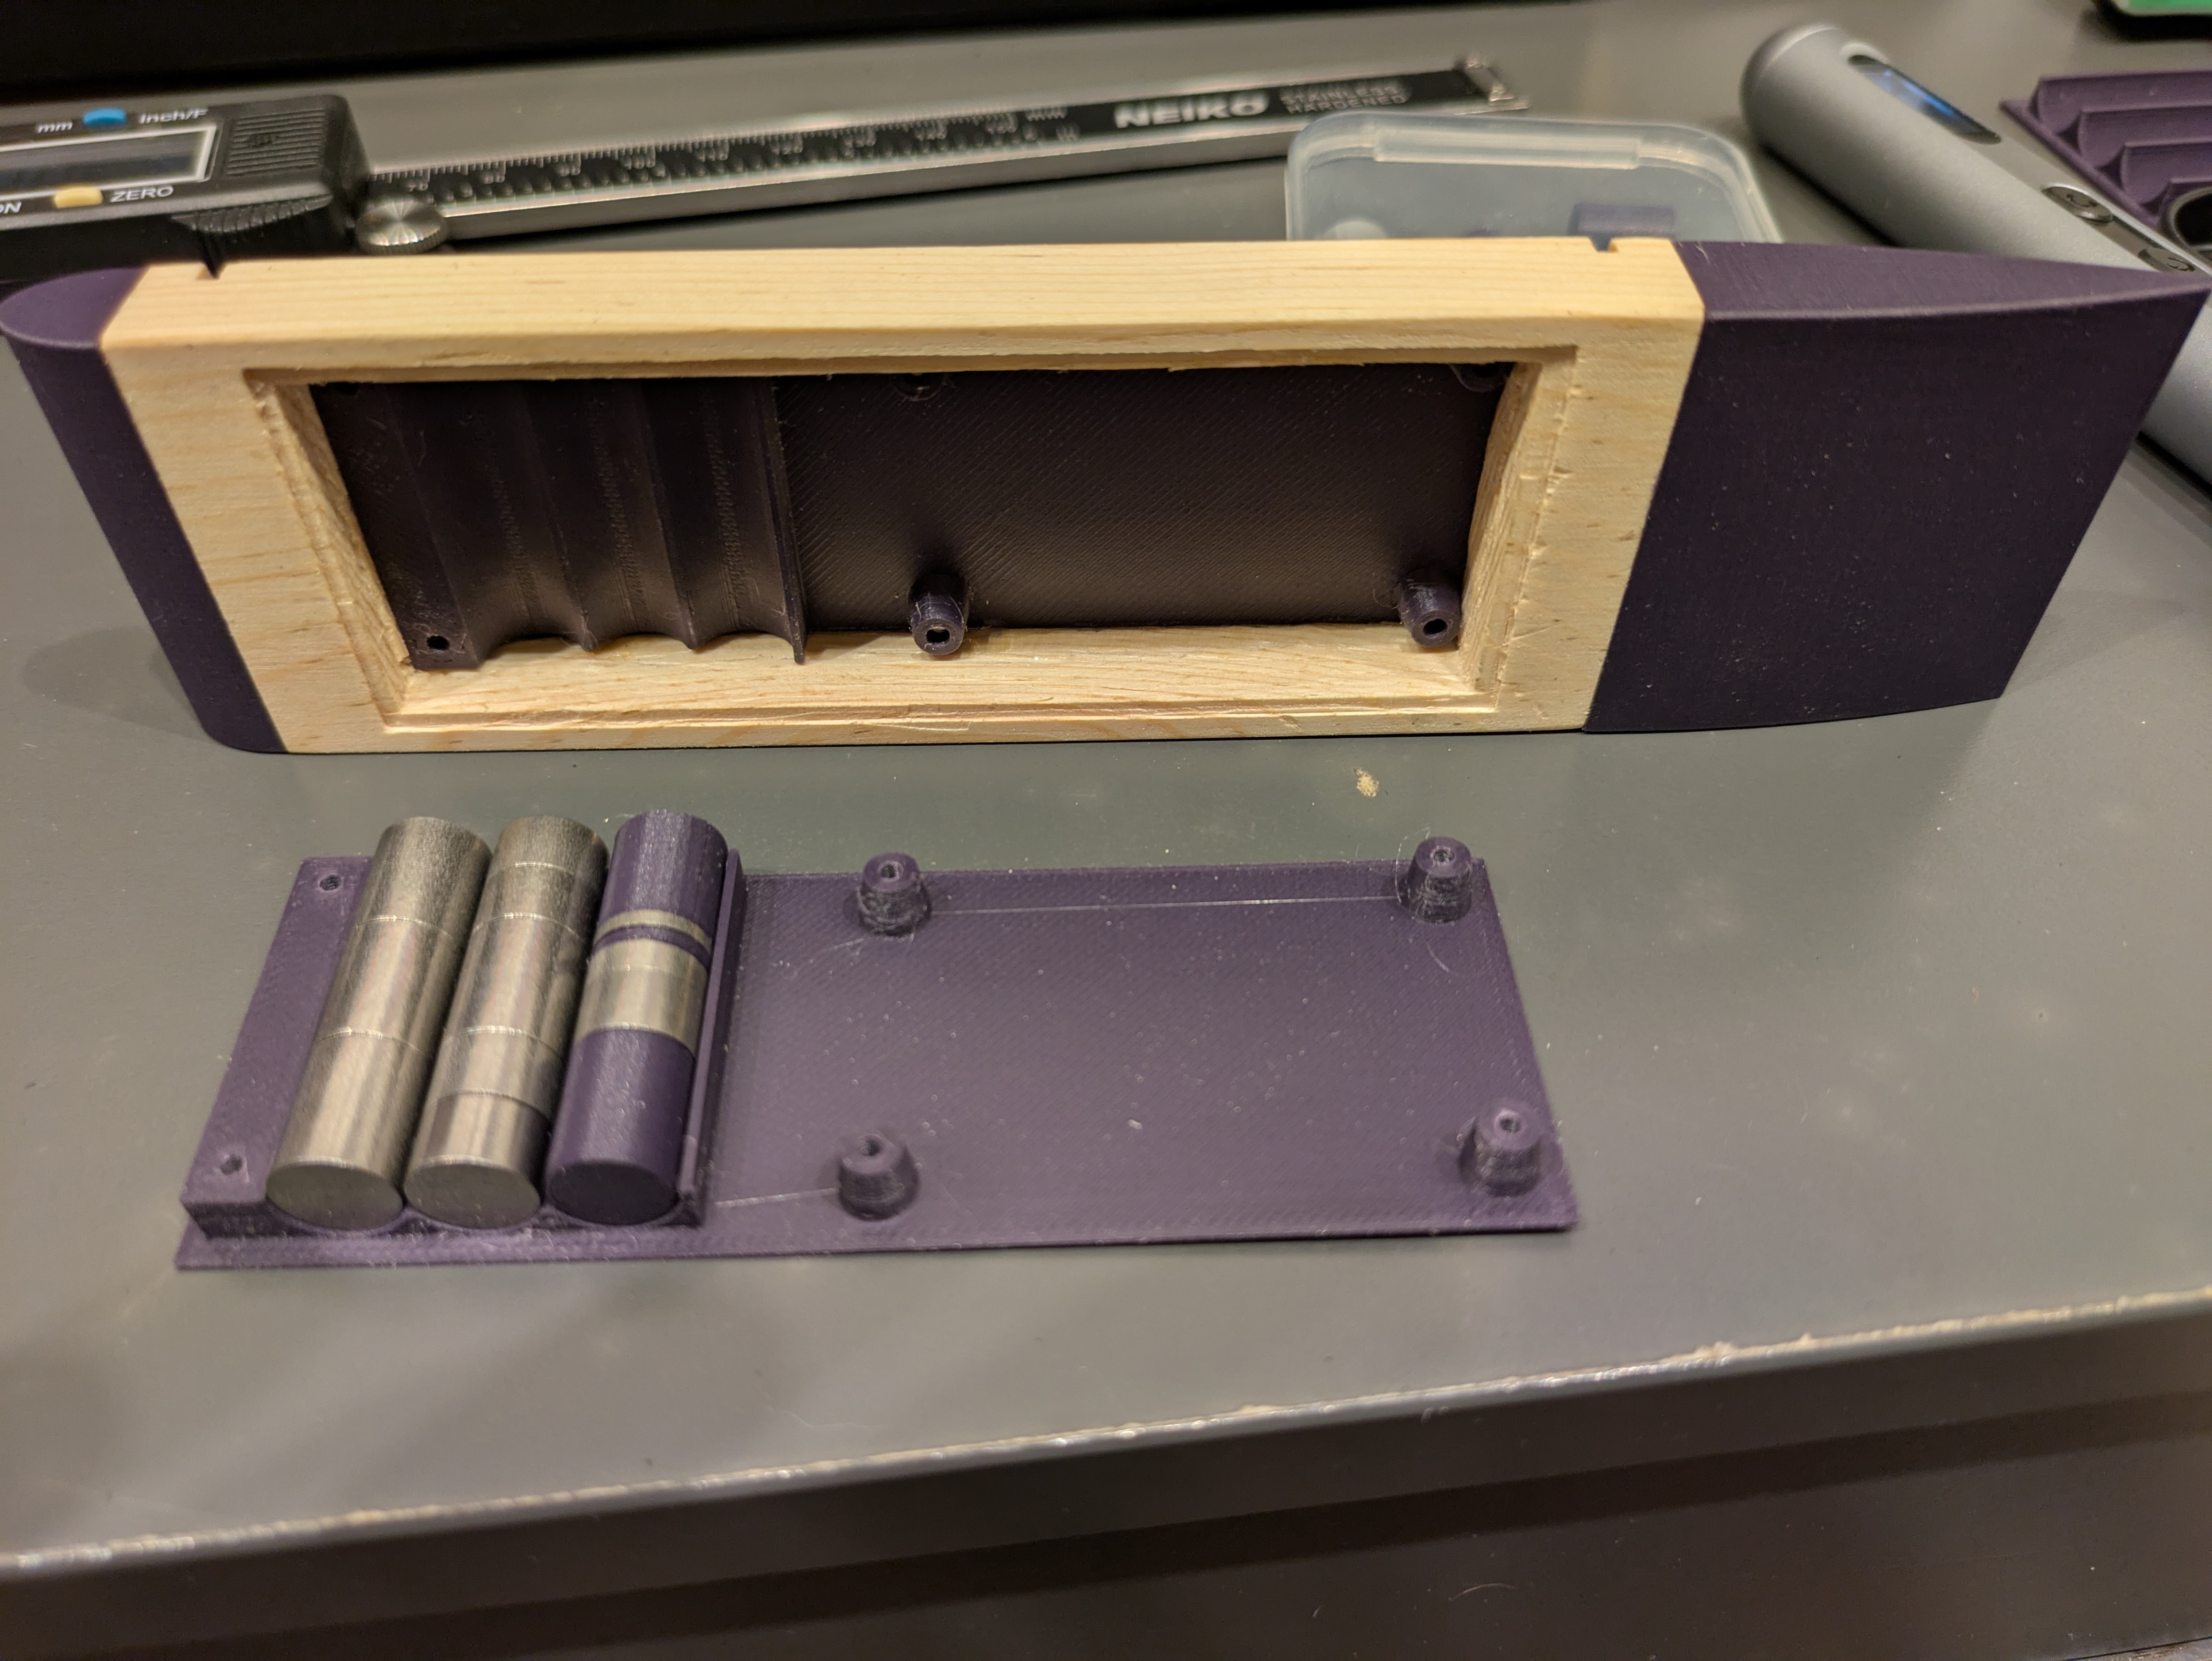
Our design relied on trimming as much of the original body away as possible, replacing it with a very thin piece of 3D printed plastic that will serve as the carriage for the tungsten weights. This way we end up with lots of weight concentrated right where we want it, but still follow the rules of the event (you must use the wood provided and you must install the axles in the slots provided). Here’s what we came up with in the end.
Download the 7z bundle containing FreeCAD design file.


3D Prints for the 3D Printer
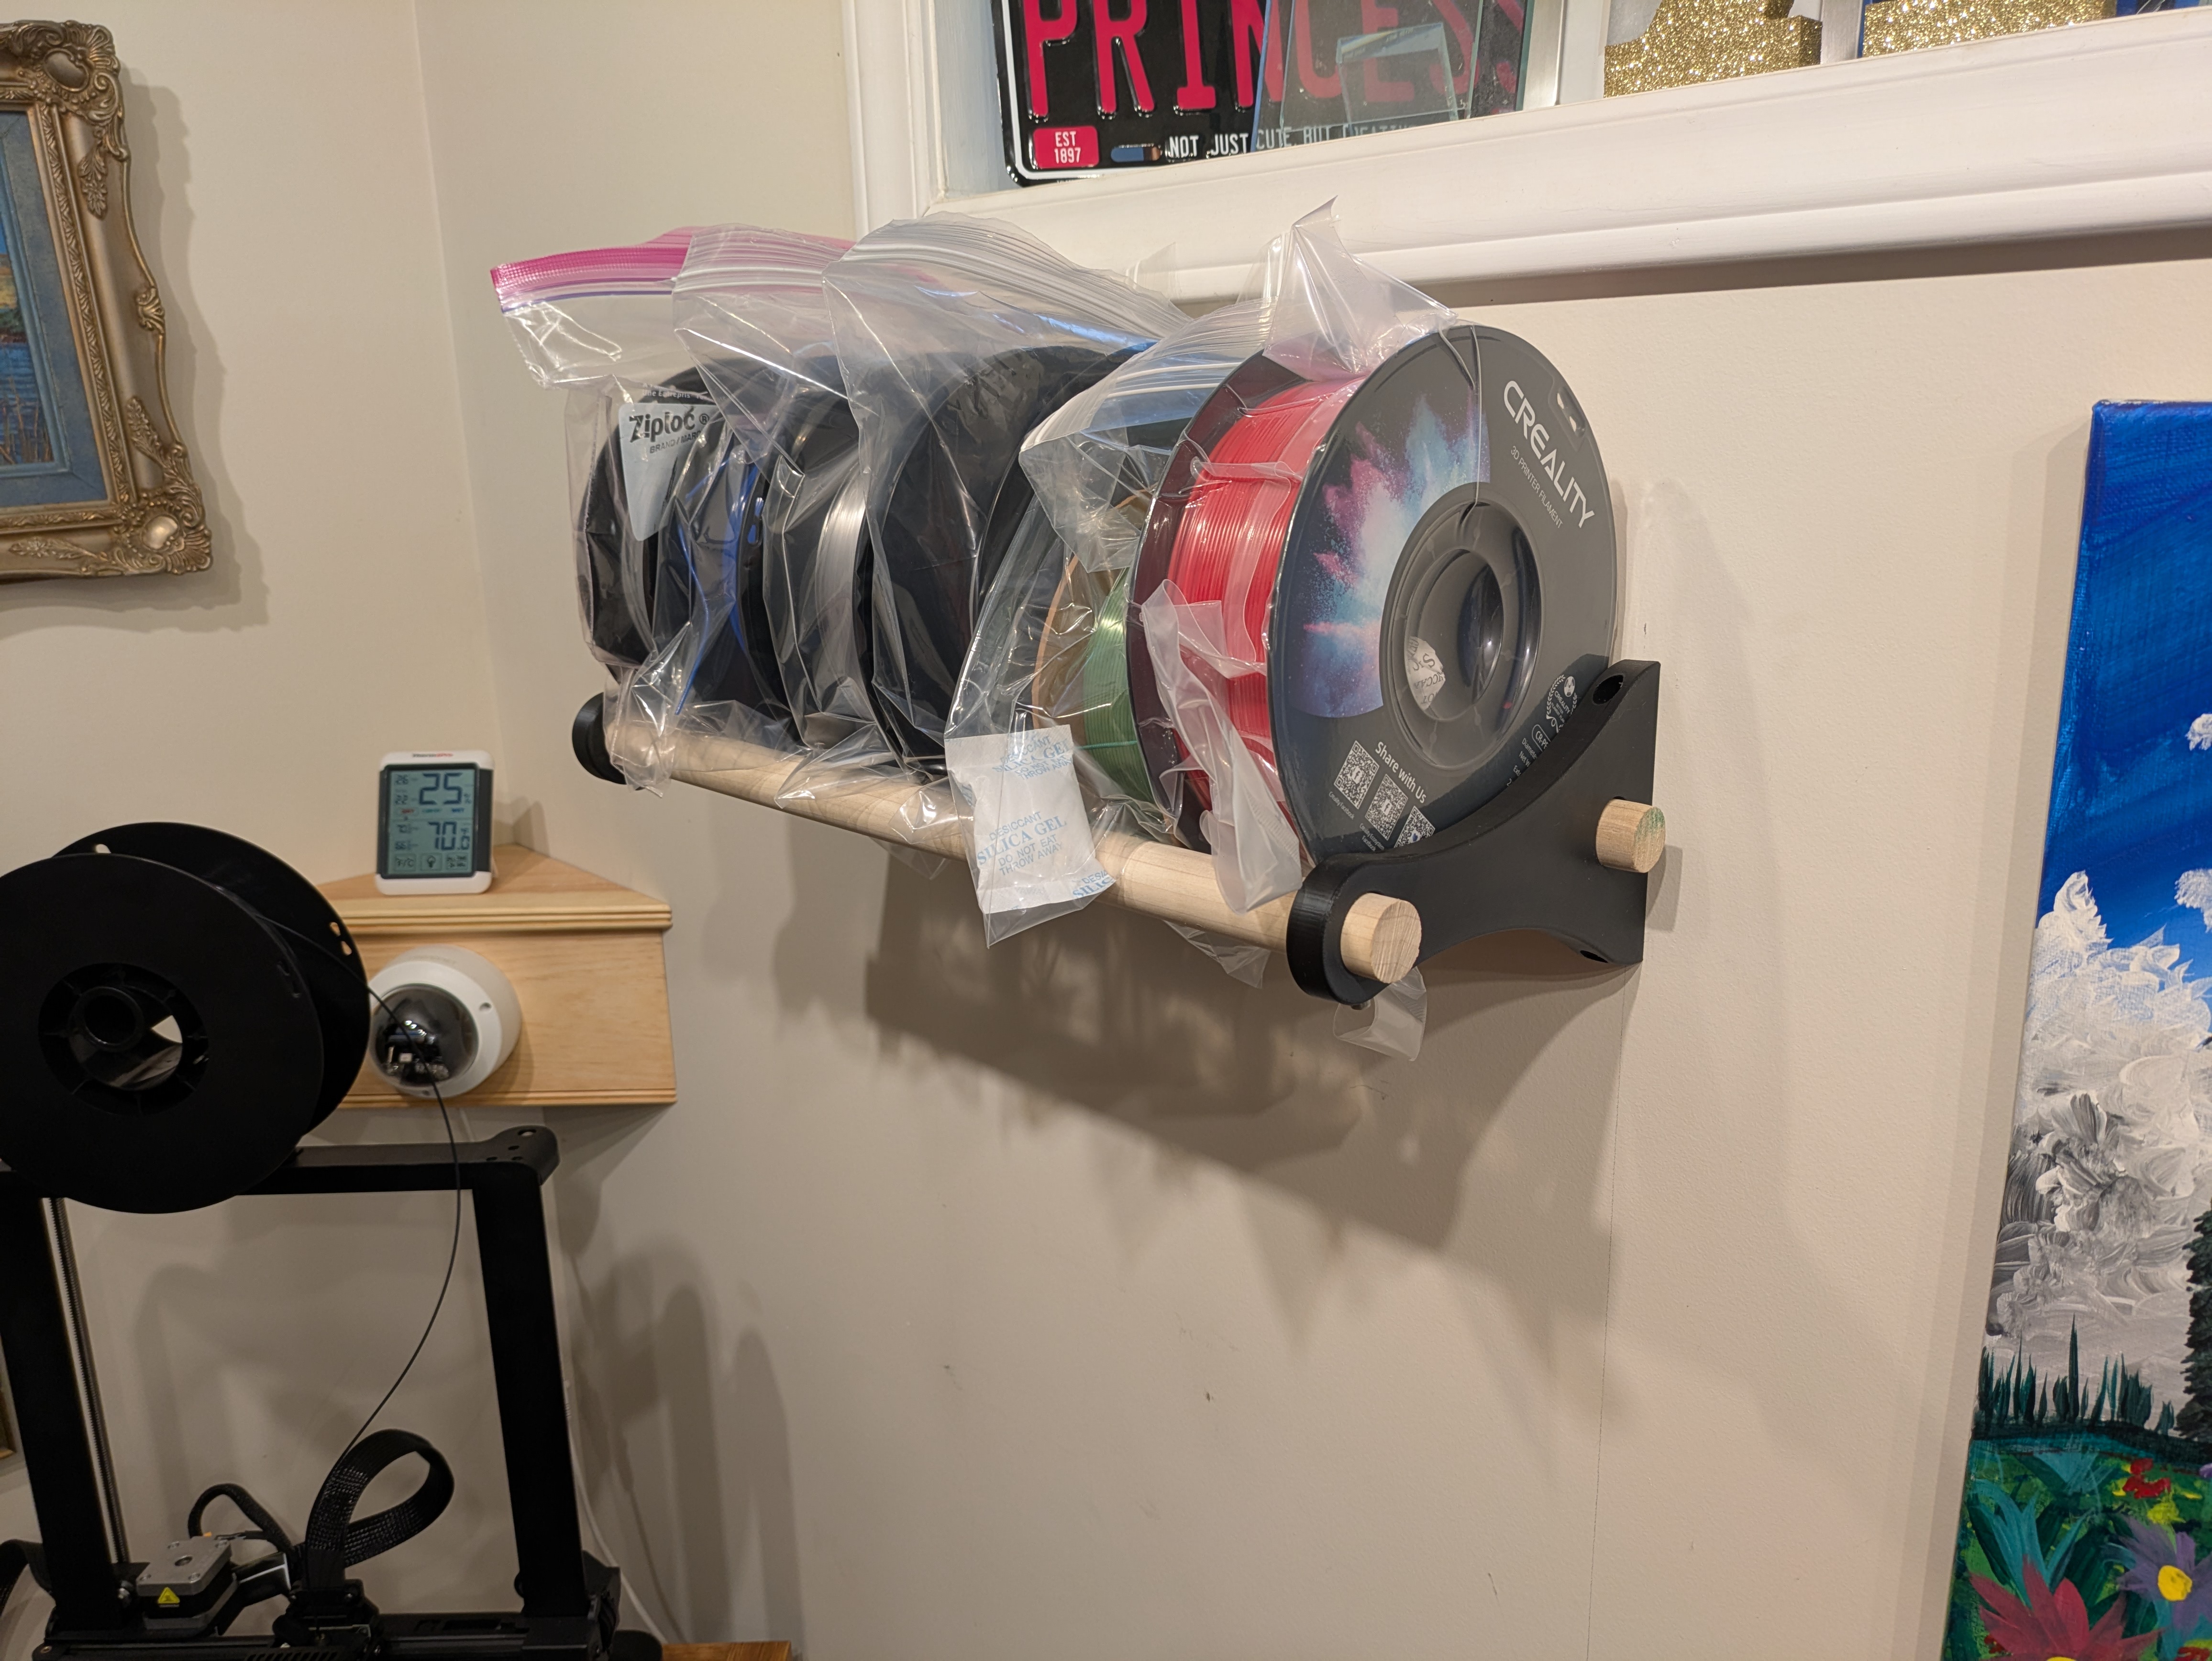
Filament Rack
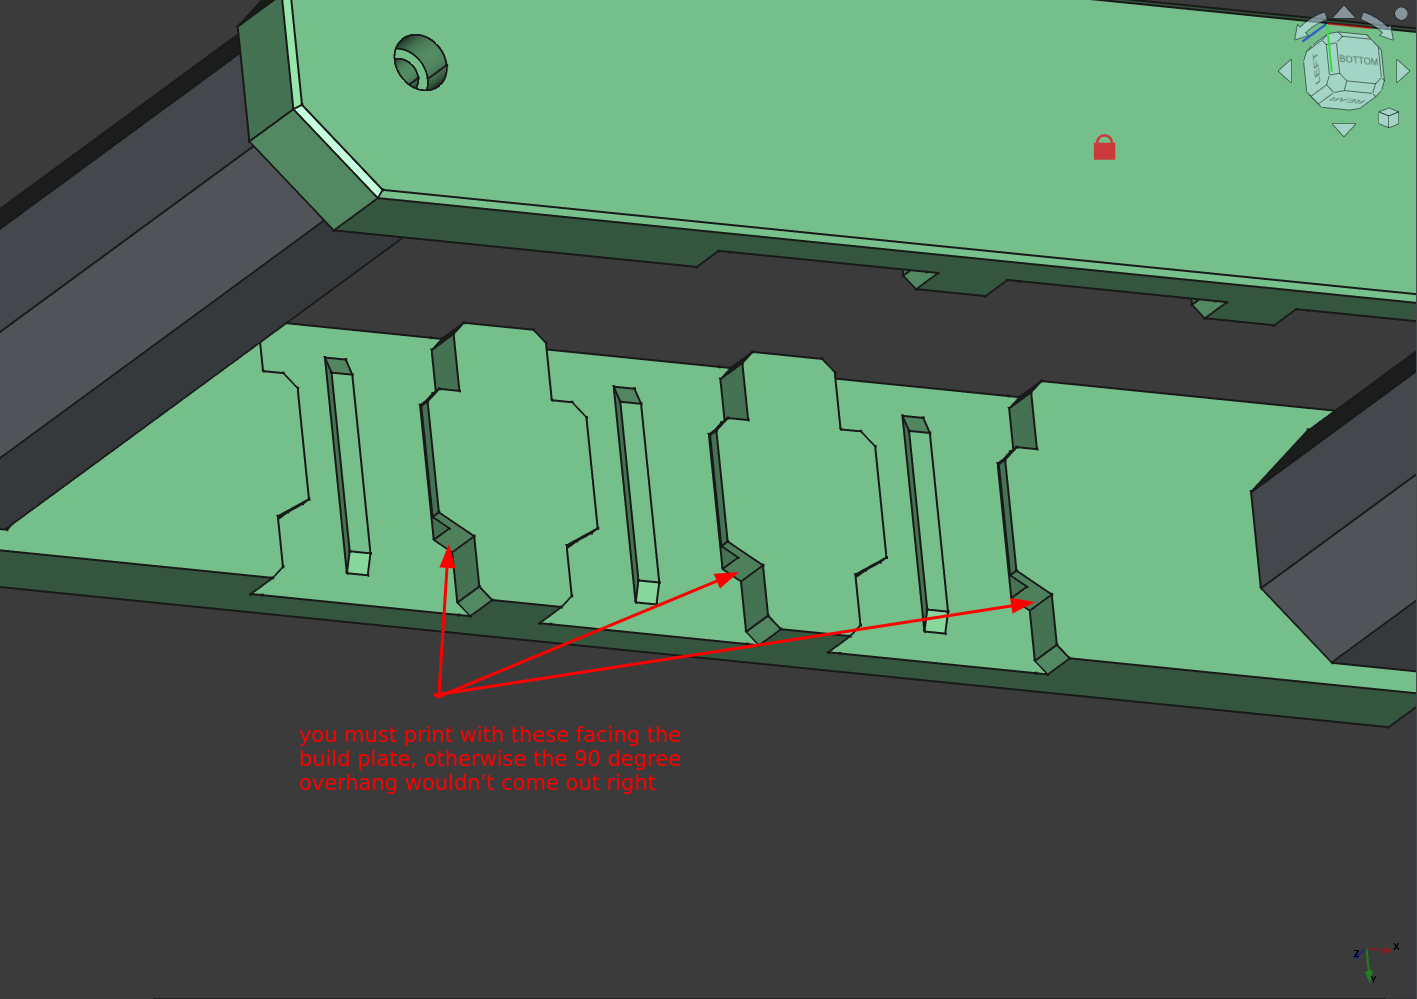
Naturally, one of the first things you will do with a 3D printer is print shit… for your 3D printer. You run the risk of this hobby becoming an infinite loop of printing things to make printing better, completely neglecting the fact that you could be printing things that are actually useful for real-world applications. I started down this rabbit hole with a simple rack for my filament collection. This design is a rip-off of other very similar designs I’ve seen, but it is my original work so I’m including it here.
Download the 7z bundle containing FreeCAD design files and STL objects.
Spooler
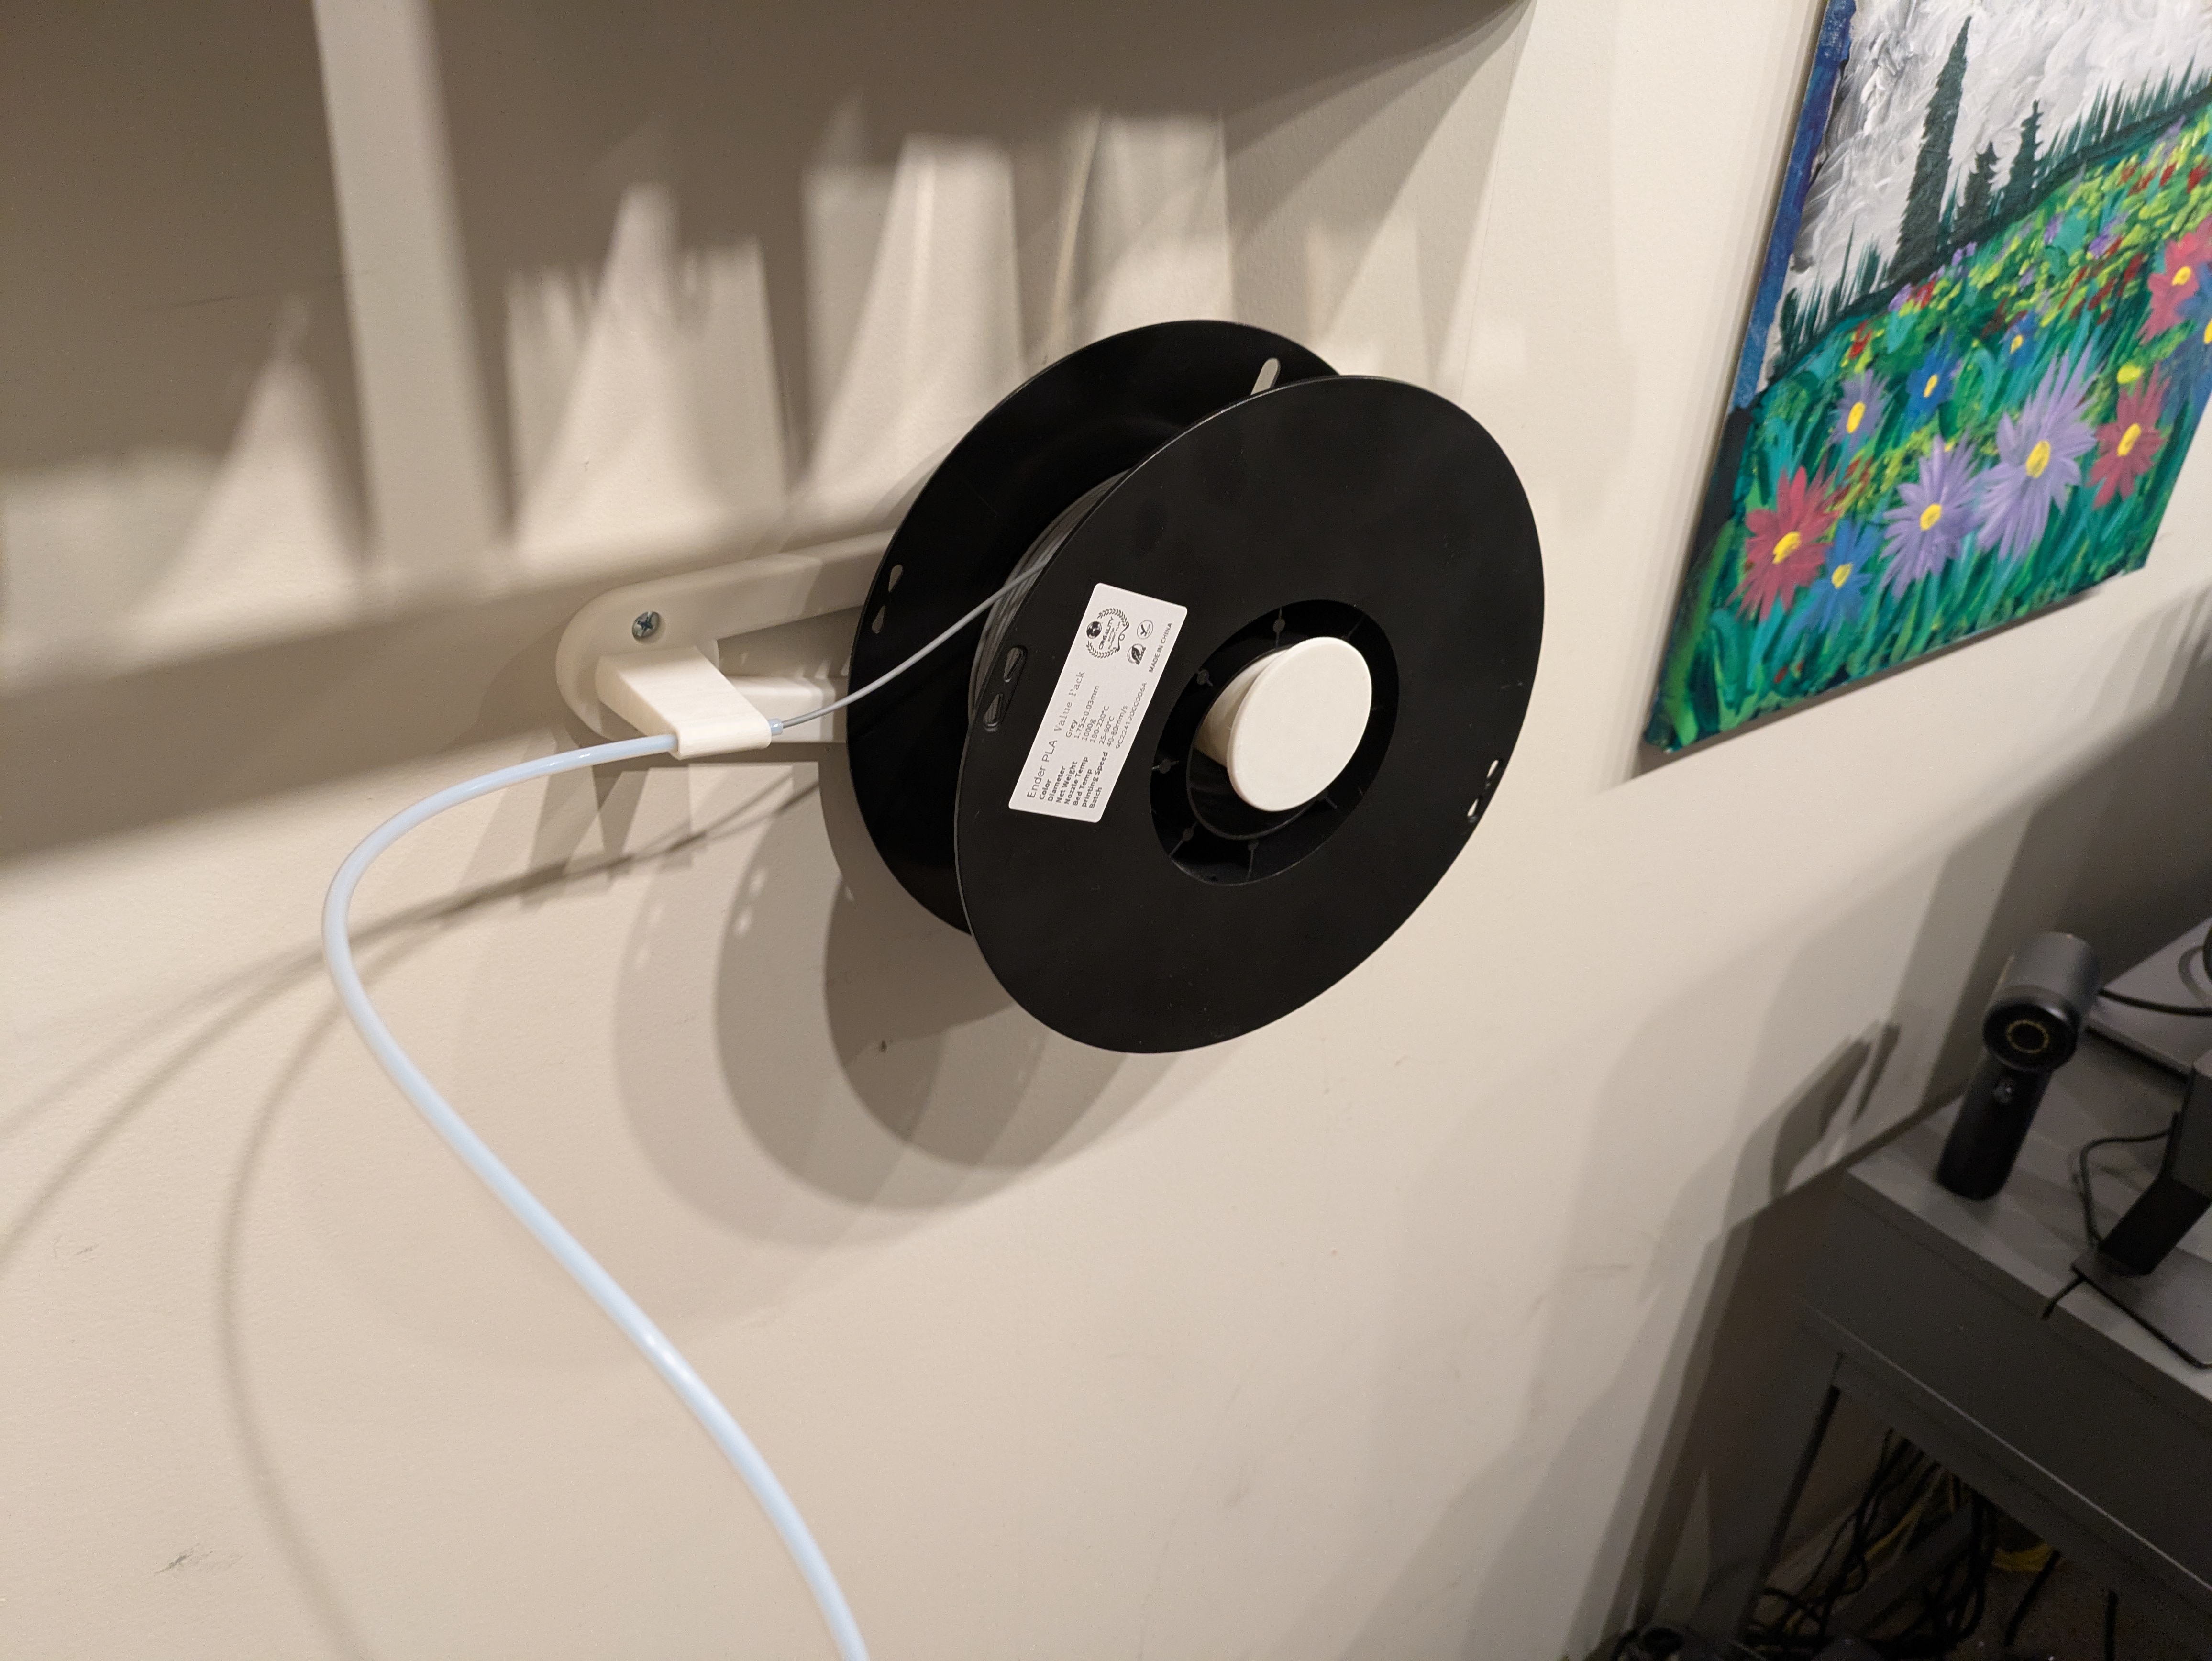
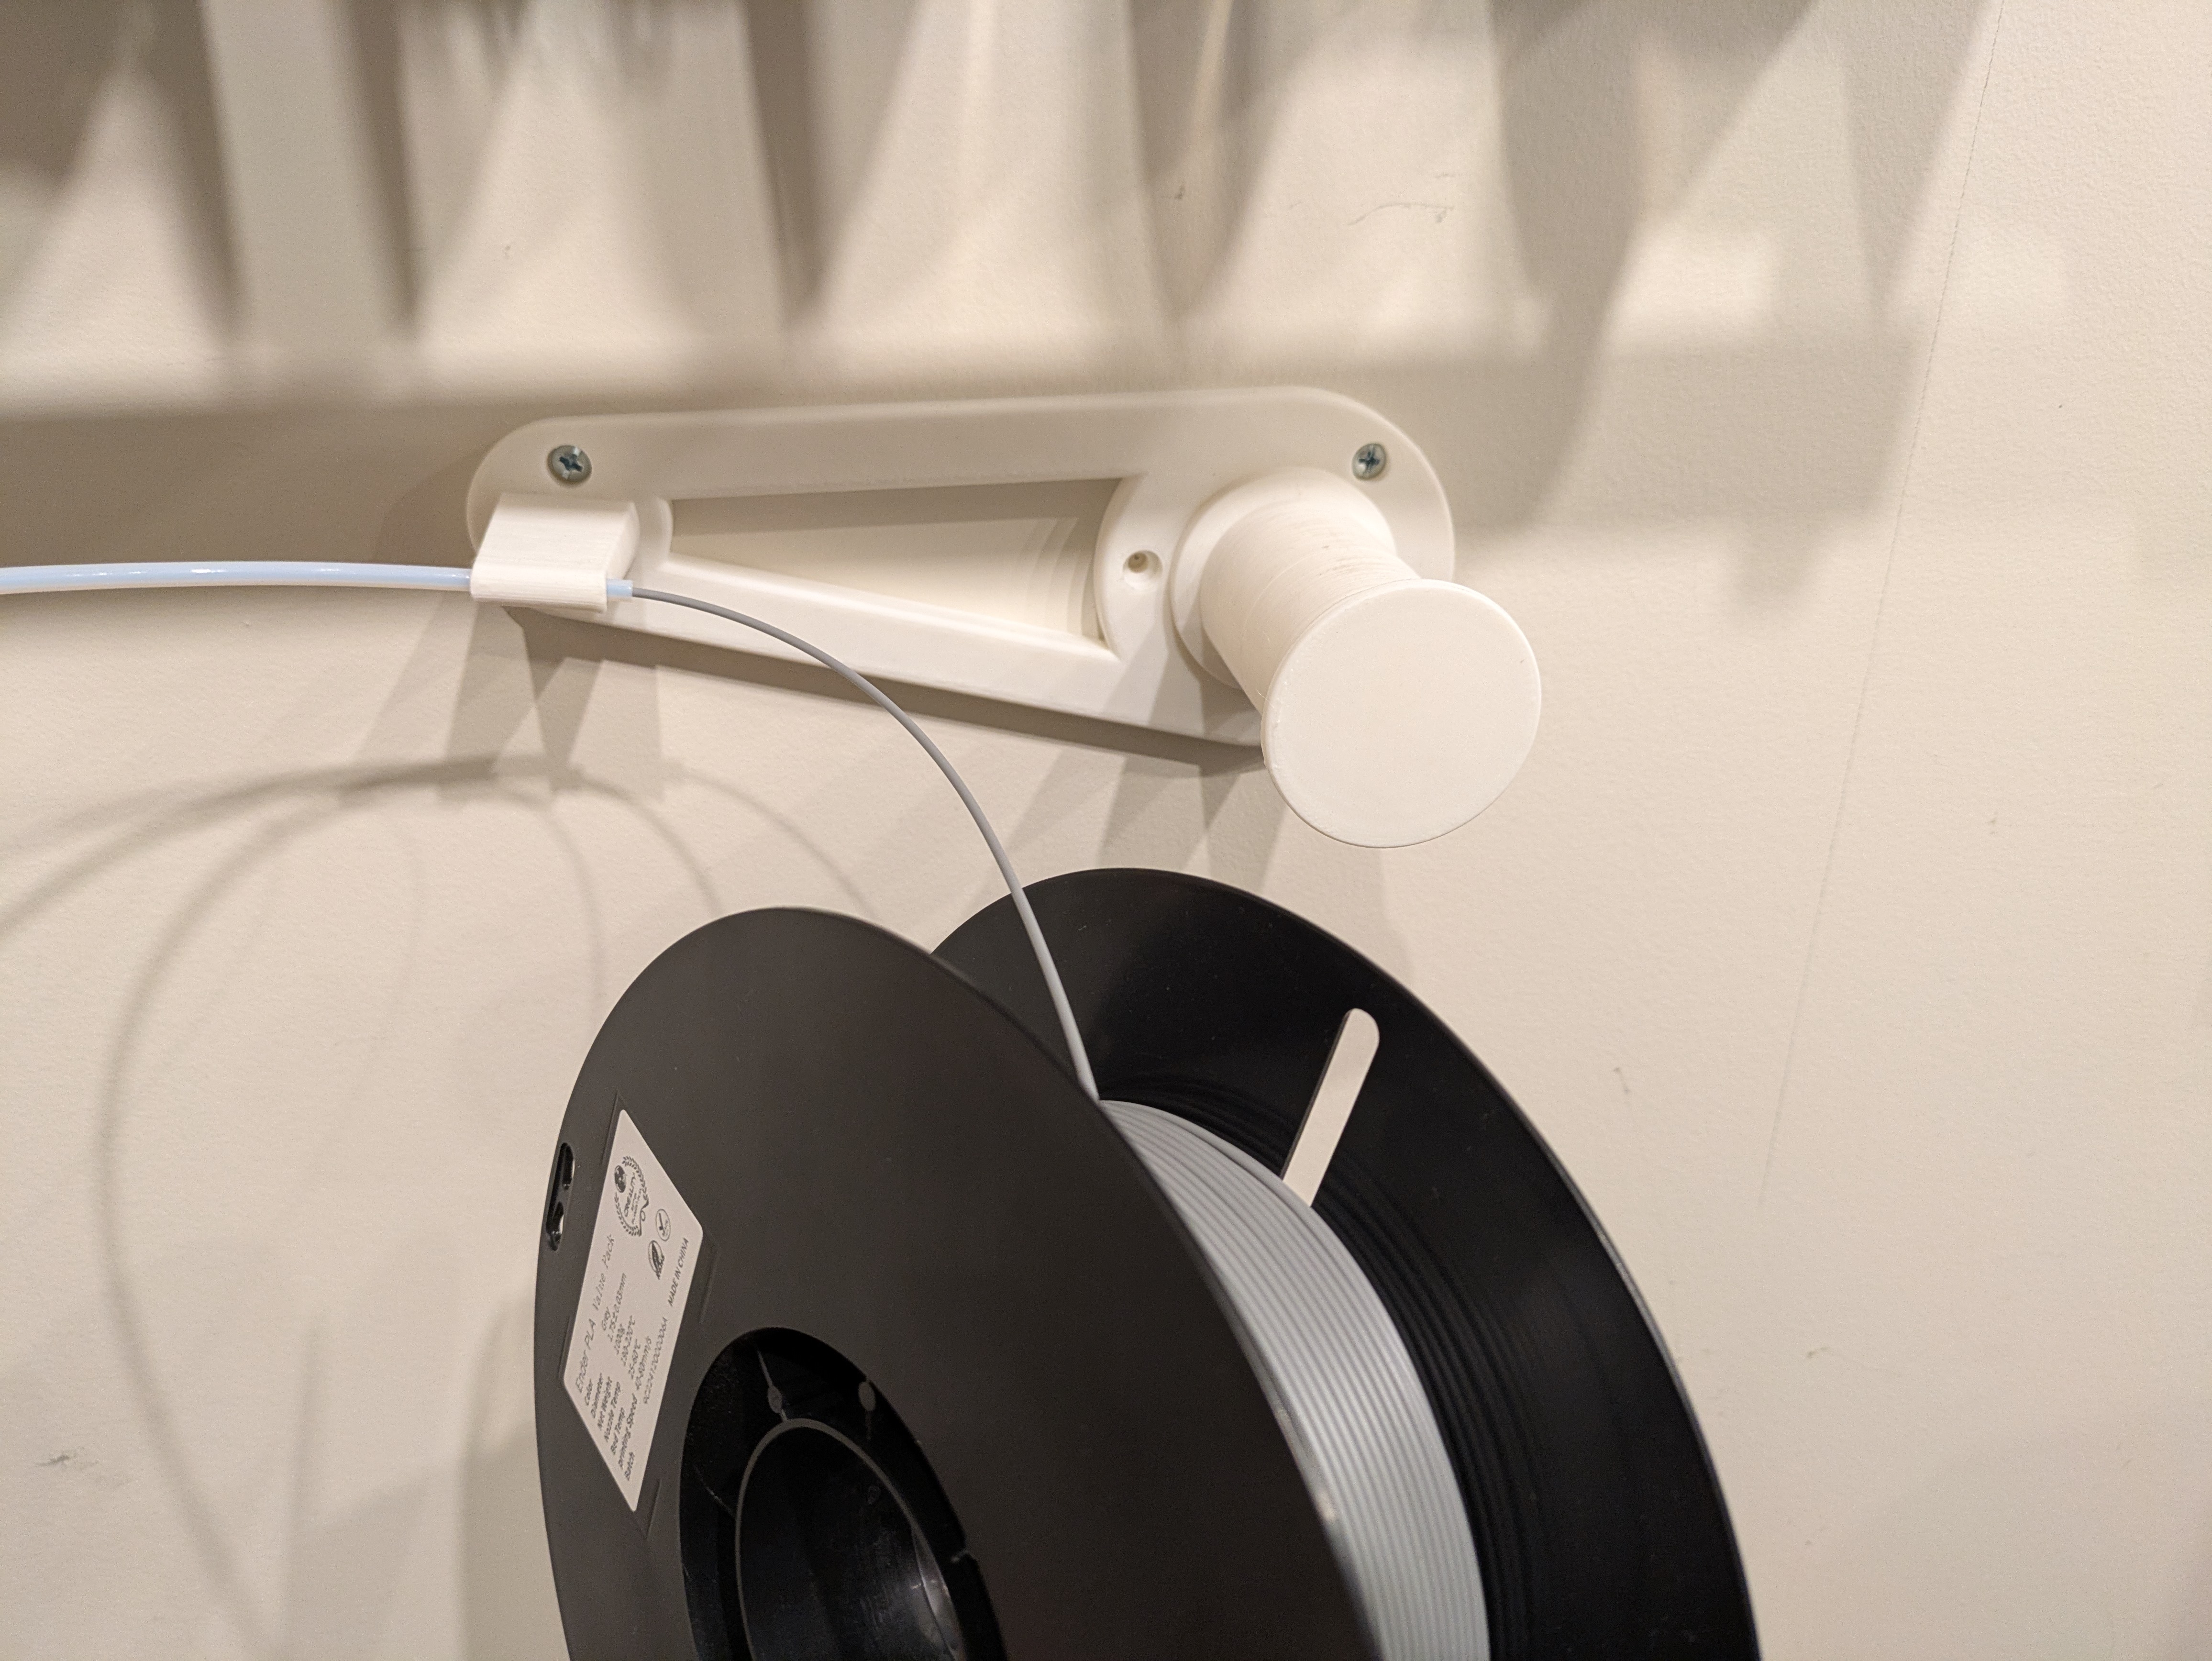
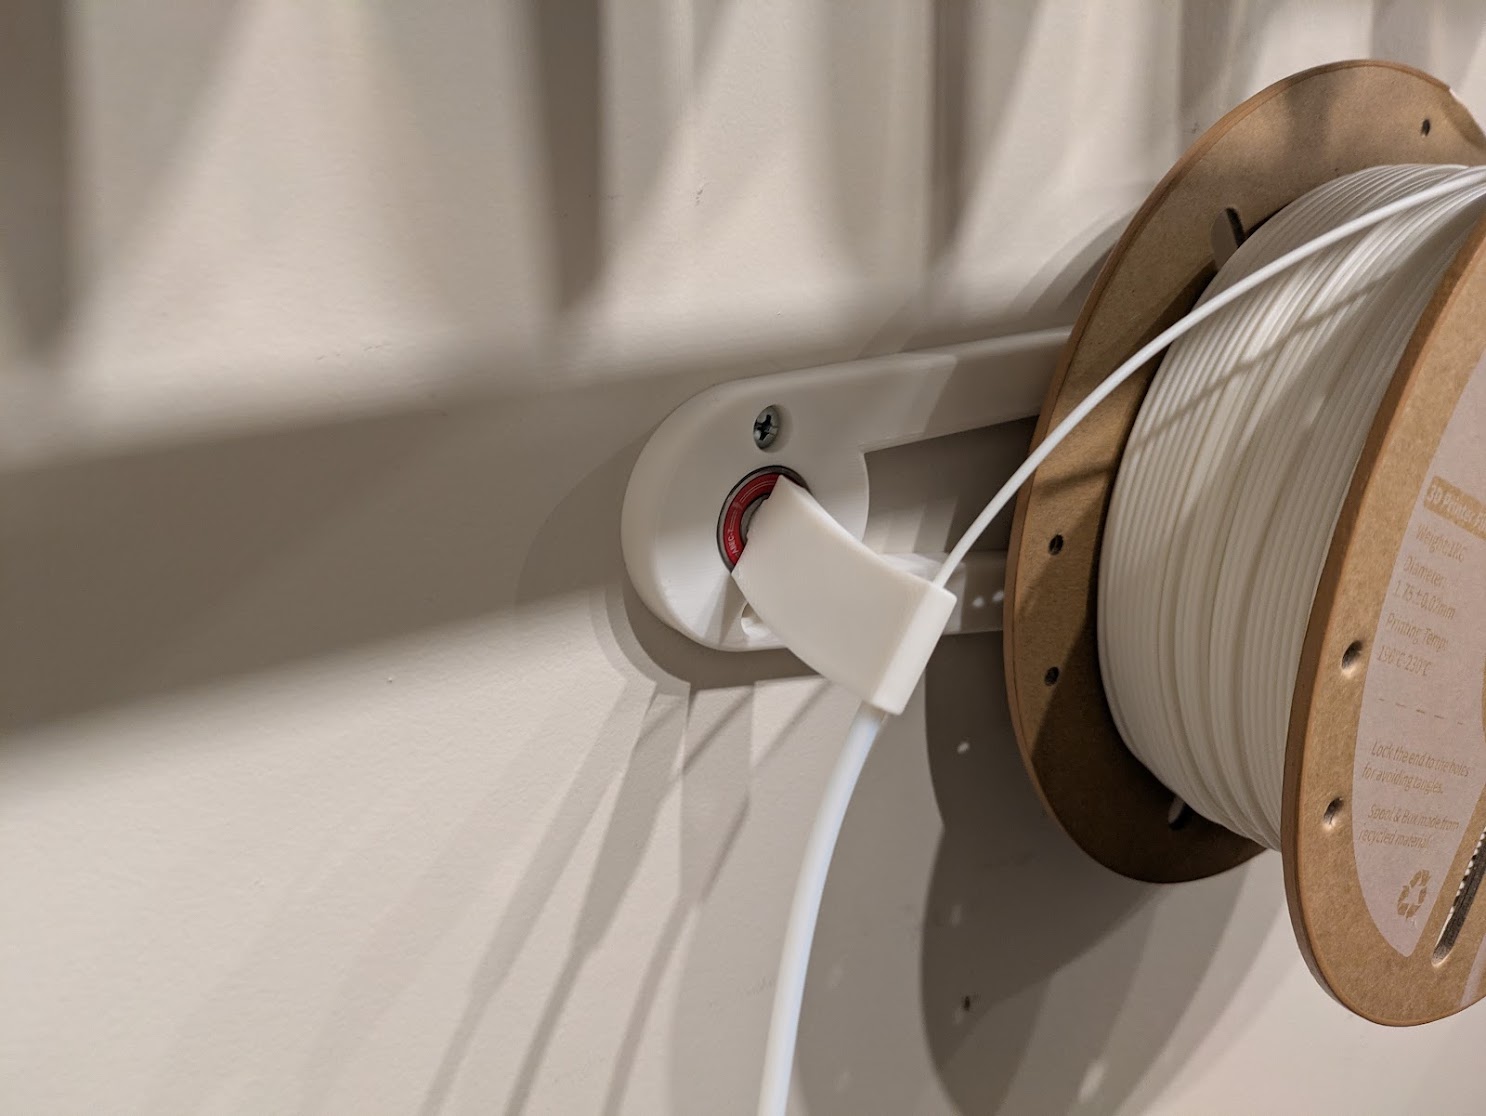
This one is probably my second favorite original design after the laptop mount. My Creality bed slinger likes to shake and wobble, a lot. I overbuilt a big heavy table to help reduce this movement. Another culprit and something that’s always bugged me about the design is the fact that the filament spool sits on top of the gantry. The gantry, ideally, will not move at all relative to the bed surface of the printer. Any flex or movement can translate into wobbly lines on prints, and other errors. Having a spool flopping around on top of the gantry can’t possibly be a good thing, so why not move it? I’ve seen some designs where it’s attached to the body of the printer, but I don’t have a ton of room in my setup to do that. I also don’t want to tap holes in the frame of my printer (not for this anyway), so I decided to use a reverse bowden tube design with a wall-mounted spooler. Here is the result.
Download the 7z bundle containing FreeCAD design files and STL objects.
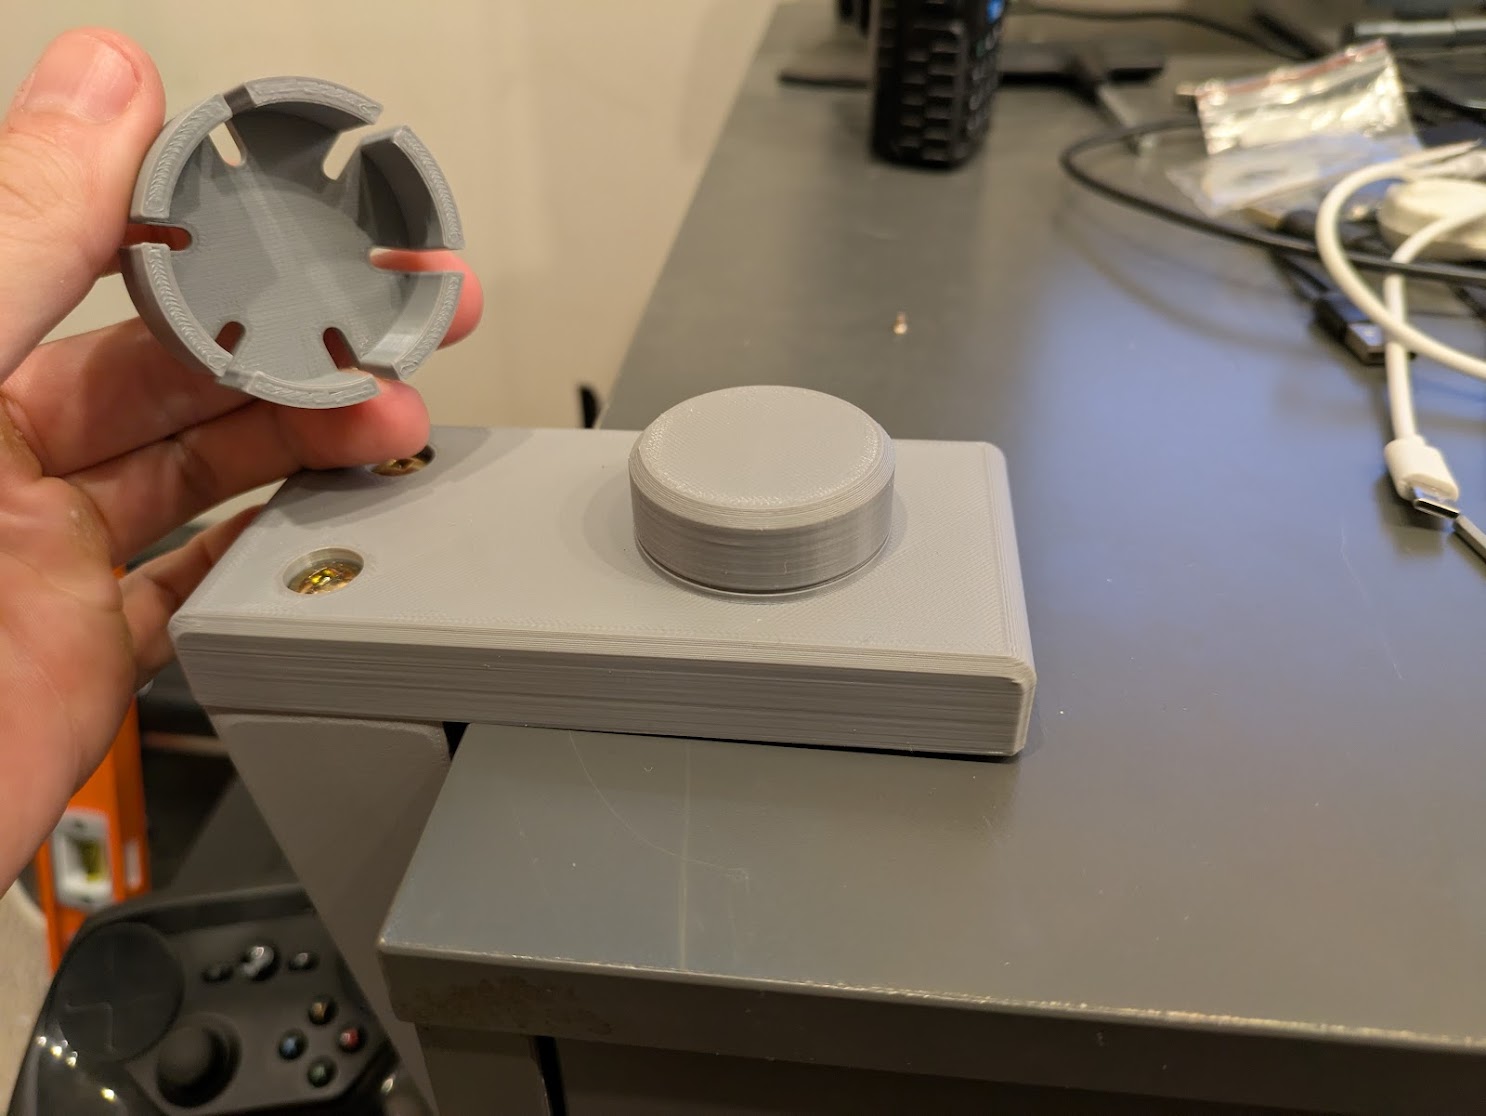
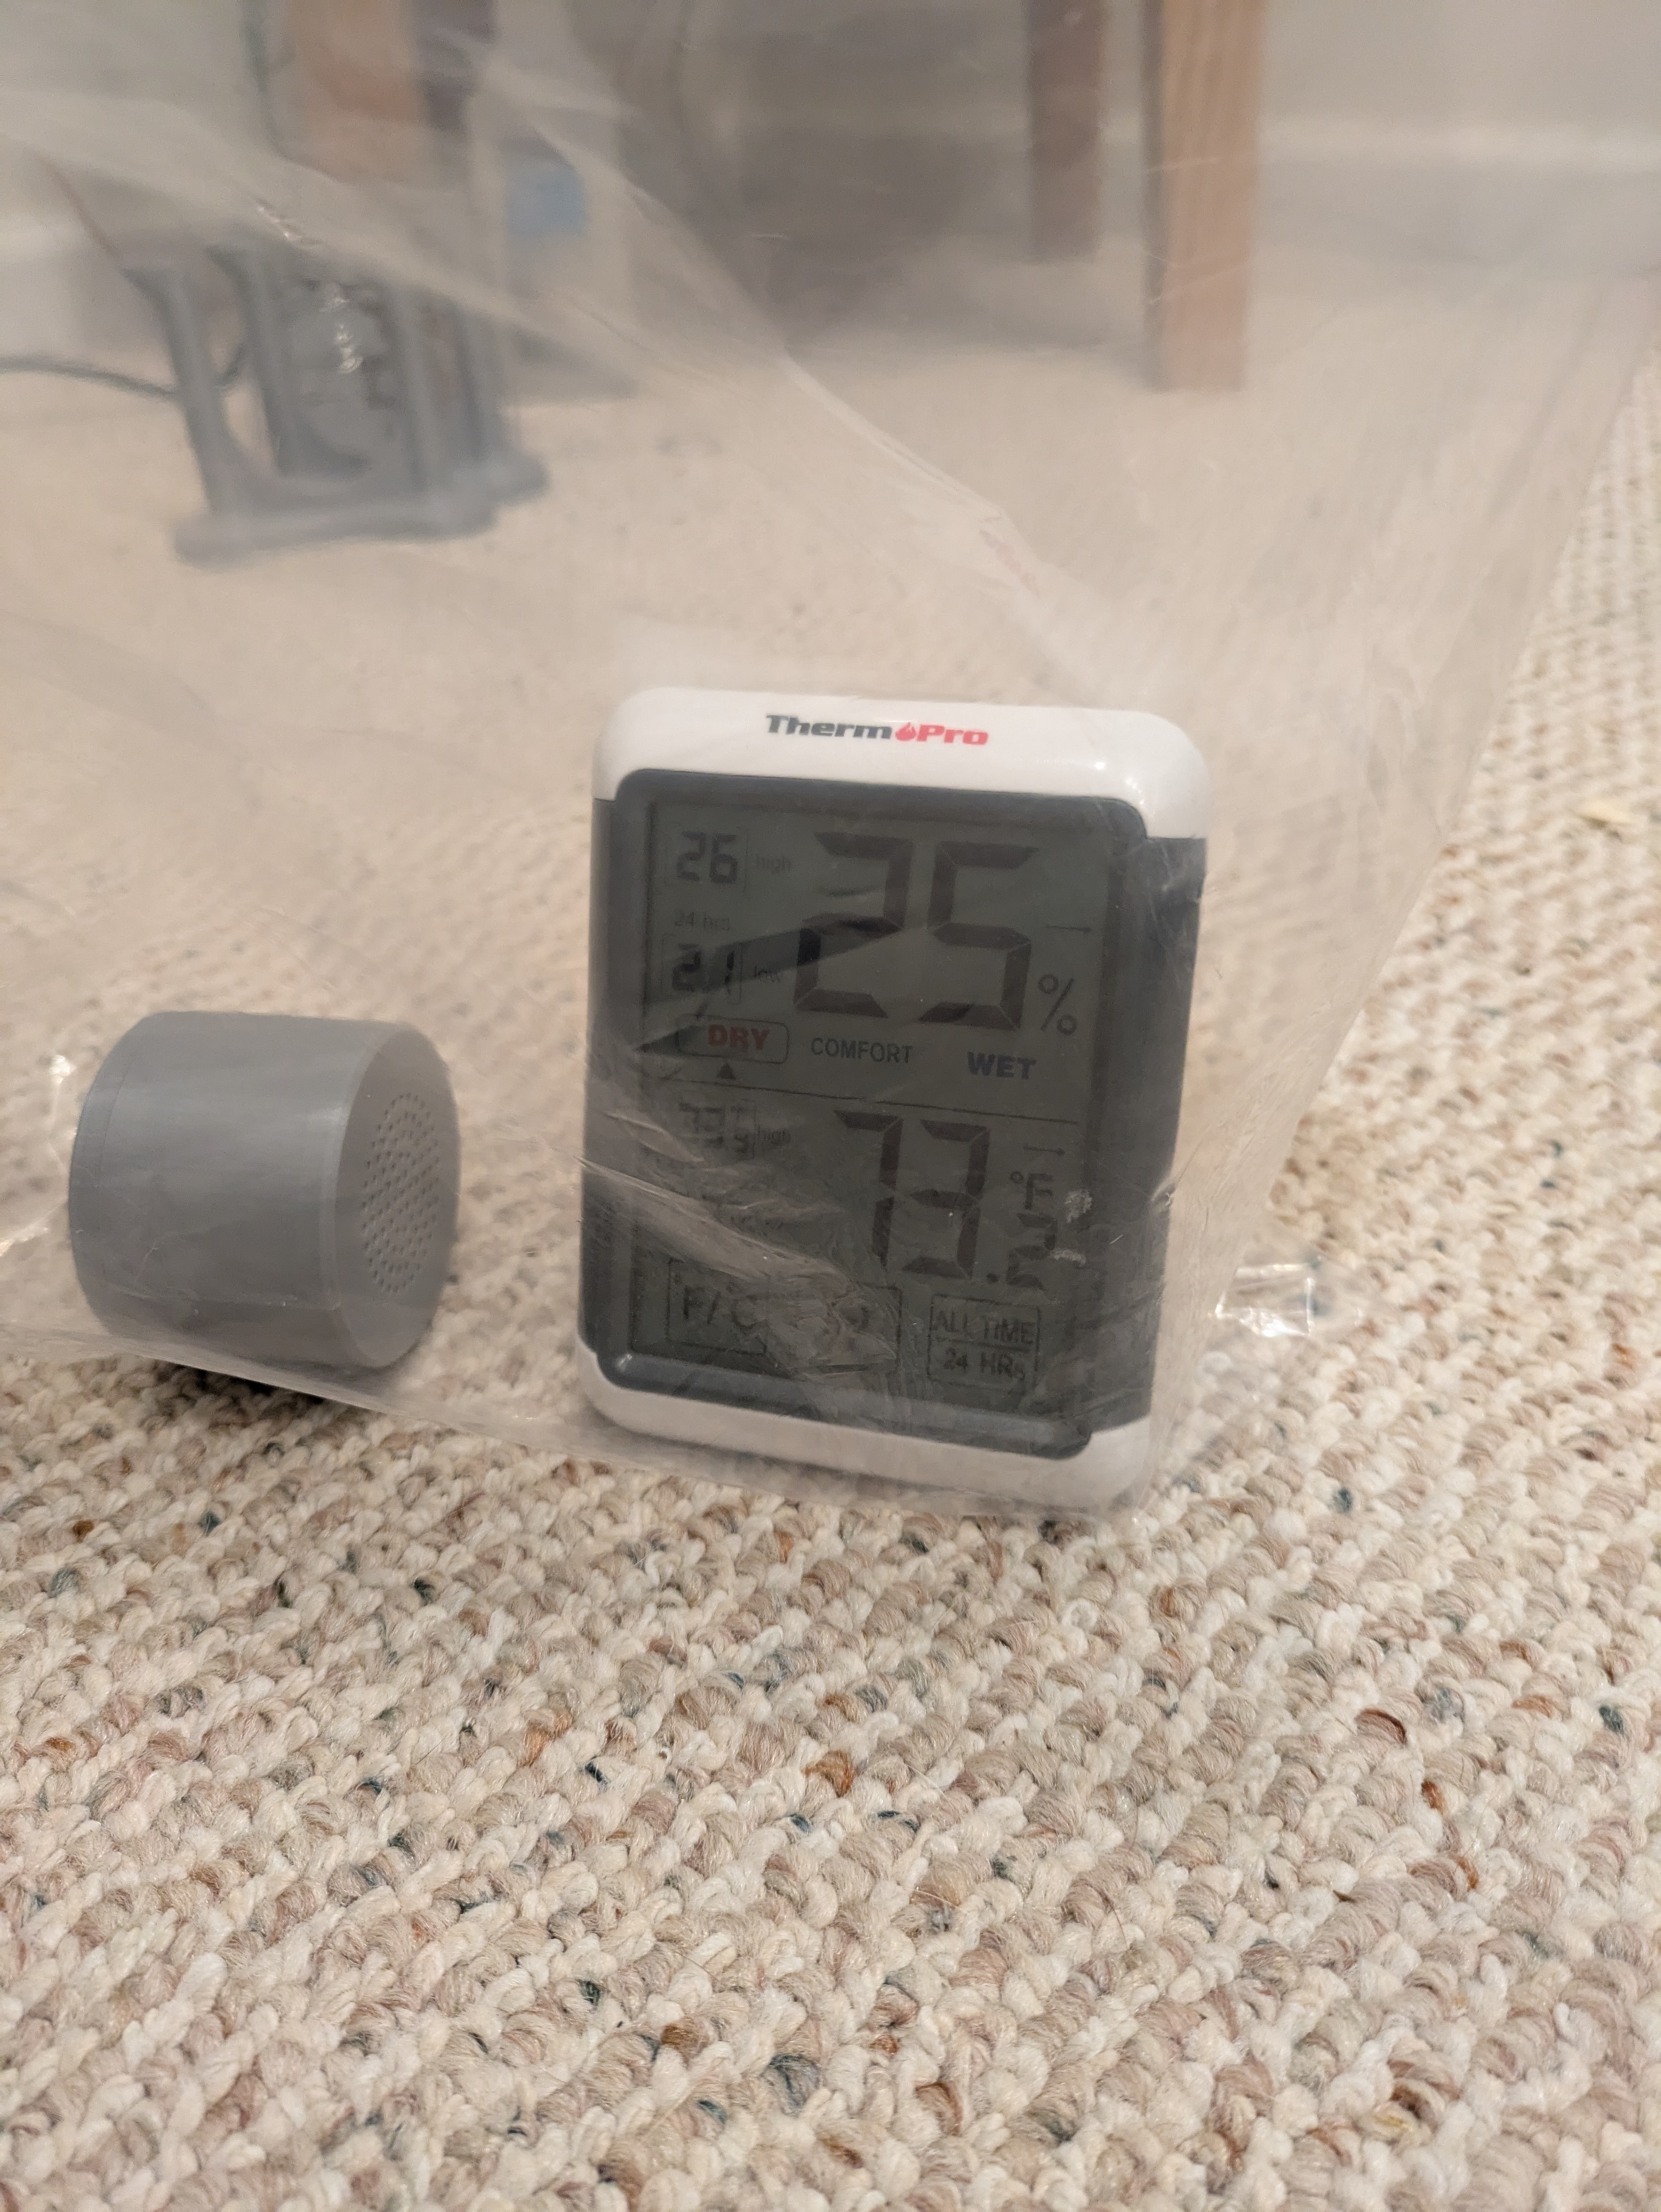
Desiccant Container
3D printing filament acts like a sponge, which is weird to think about since I always just assumed plastic is completely impermeable to water. That’s not the case, though. In fact, some filaments like nylon and ABS are extremely hygroscopic and need to be kept in a dry box the entire time or they will bubble and sputter when being printed. This leads to terrible print quality in the end. PLA and PETG, what I use for all my prints, are much less hygroscopic, but still need to be kept dry. I decided to create some of these little dehydrator containers for the job. You can fill them with silica gel or DampRid and put them in the bag with your spools to keep the moisture content as low as possible.
Also, who here thinks the word desiccant should not be spelled this way? Since when do we duplicate ‘c’, but not ’s’?
Download the 7z bundle containing FreeCAD design files and STL objects.
Bike Stuff
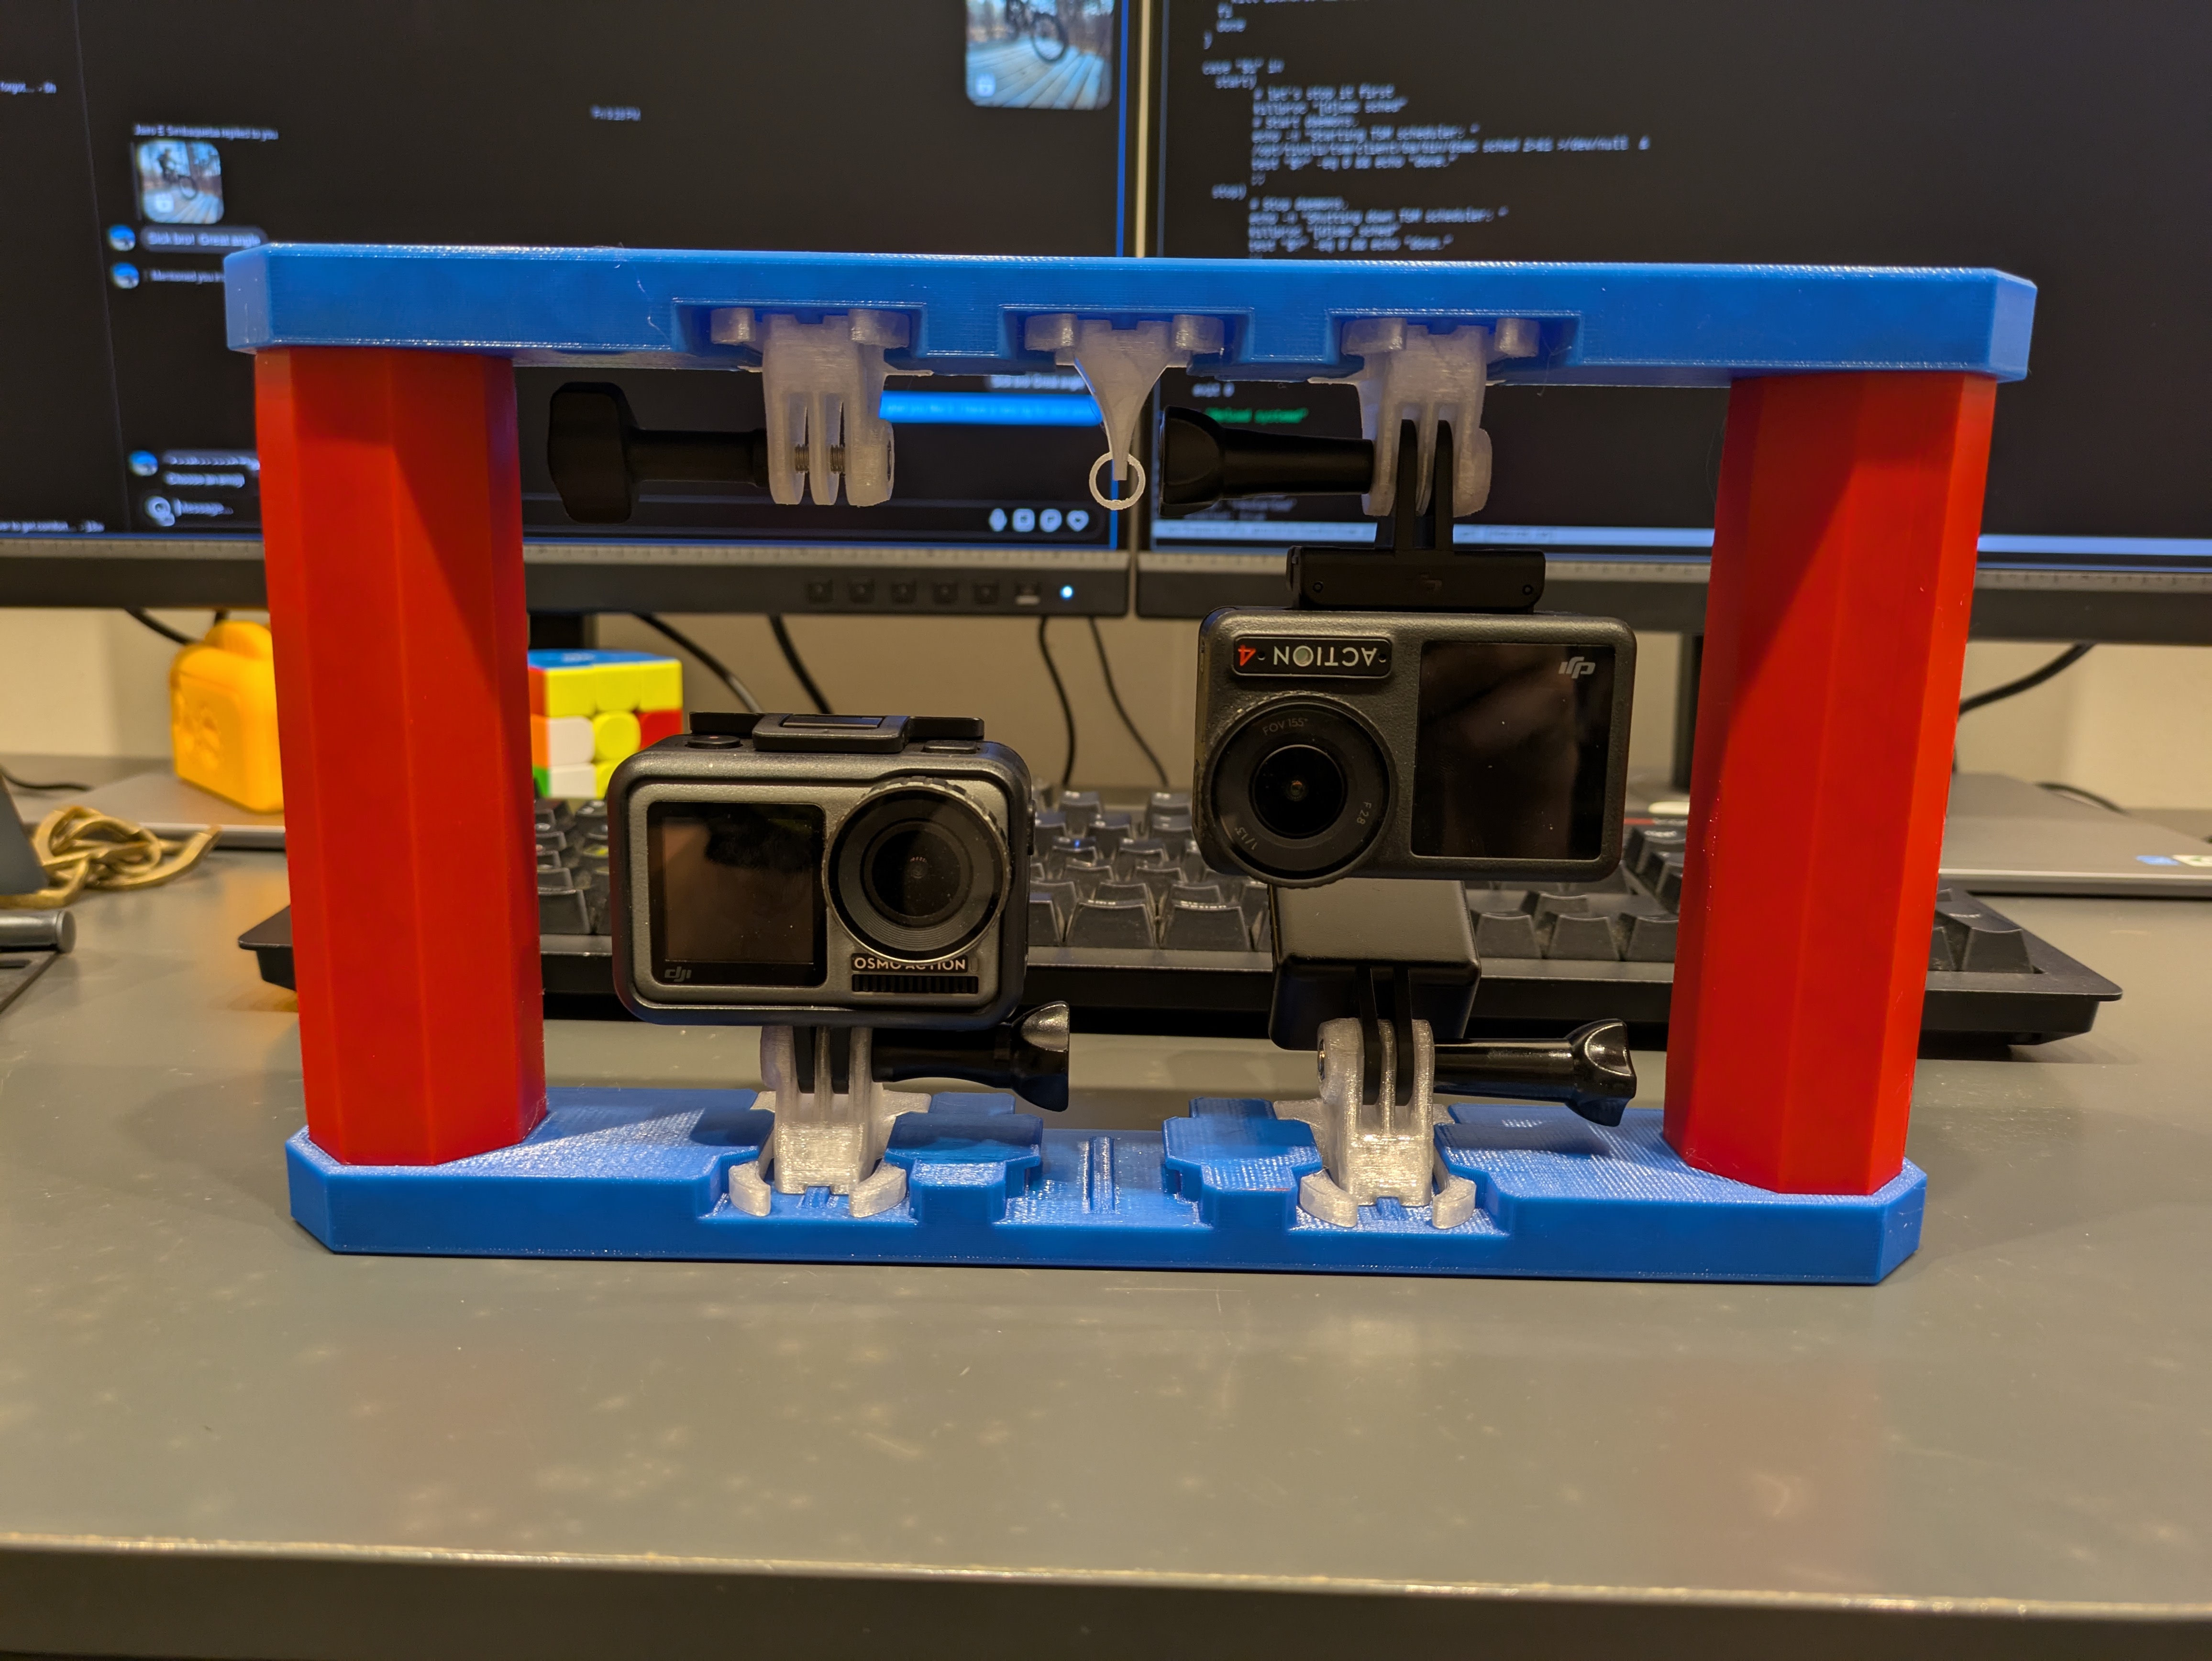
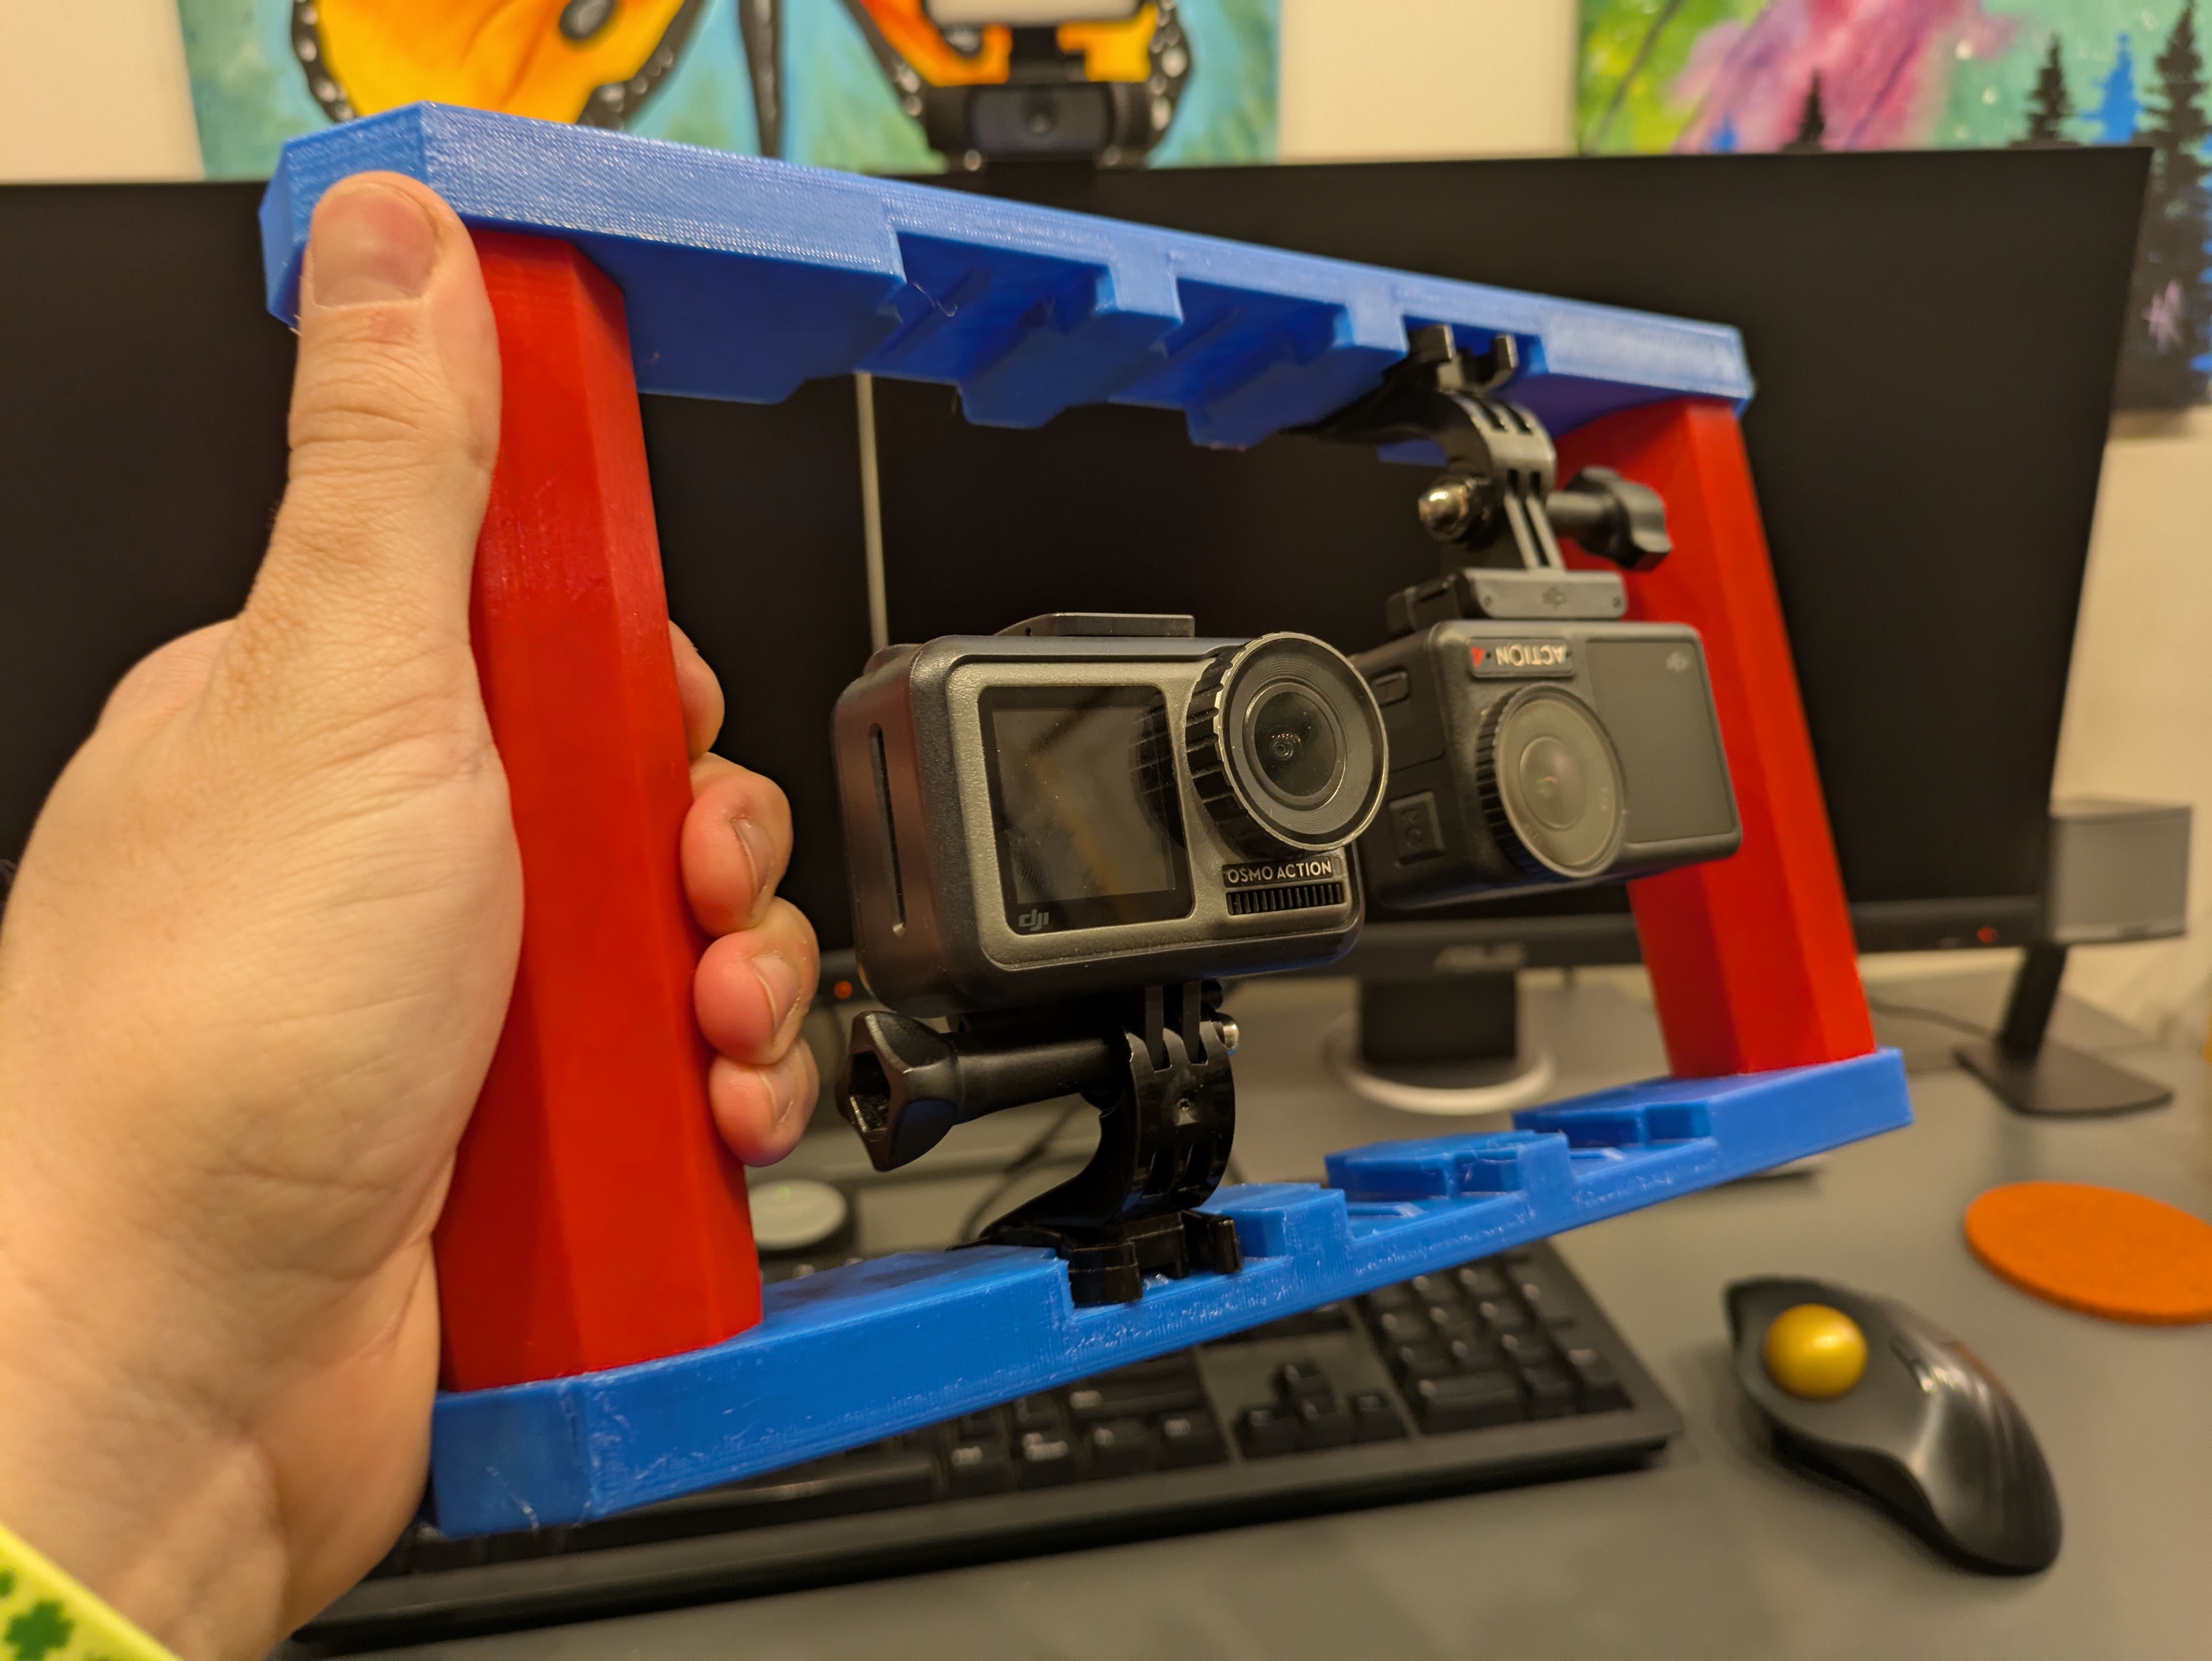
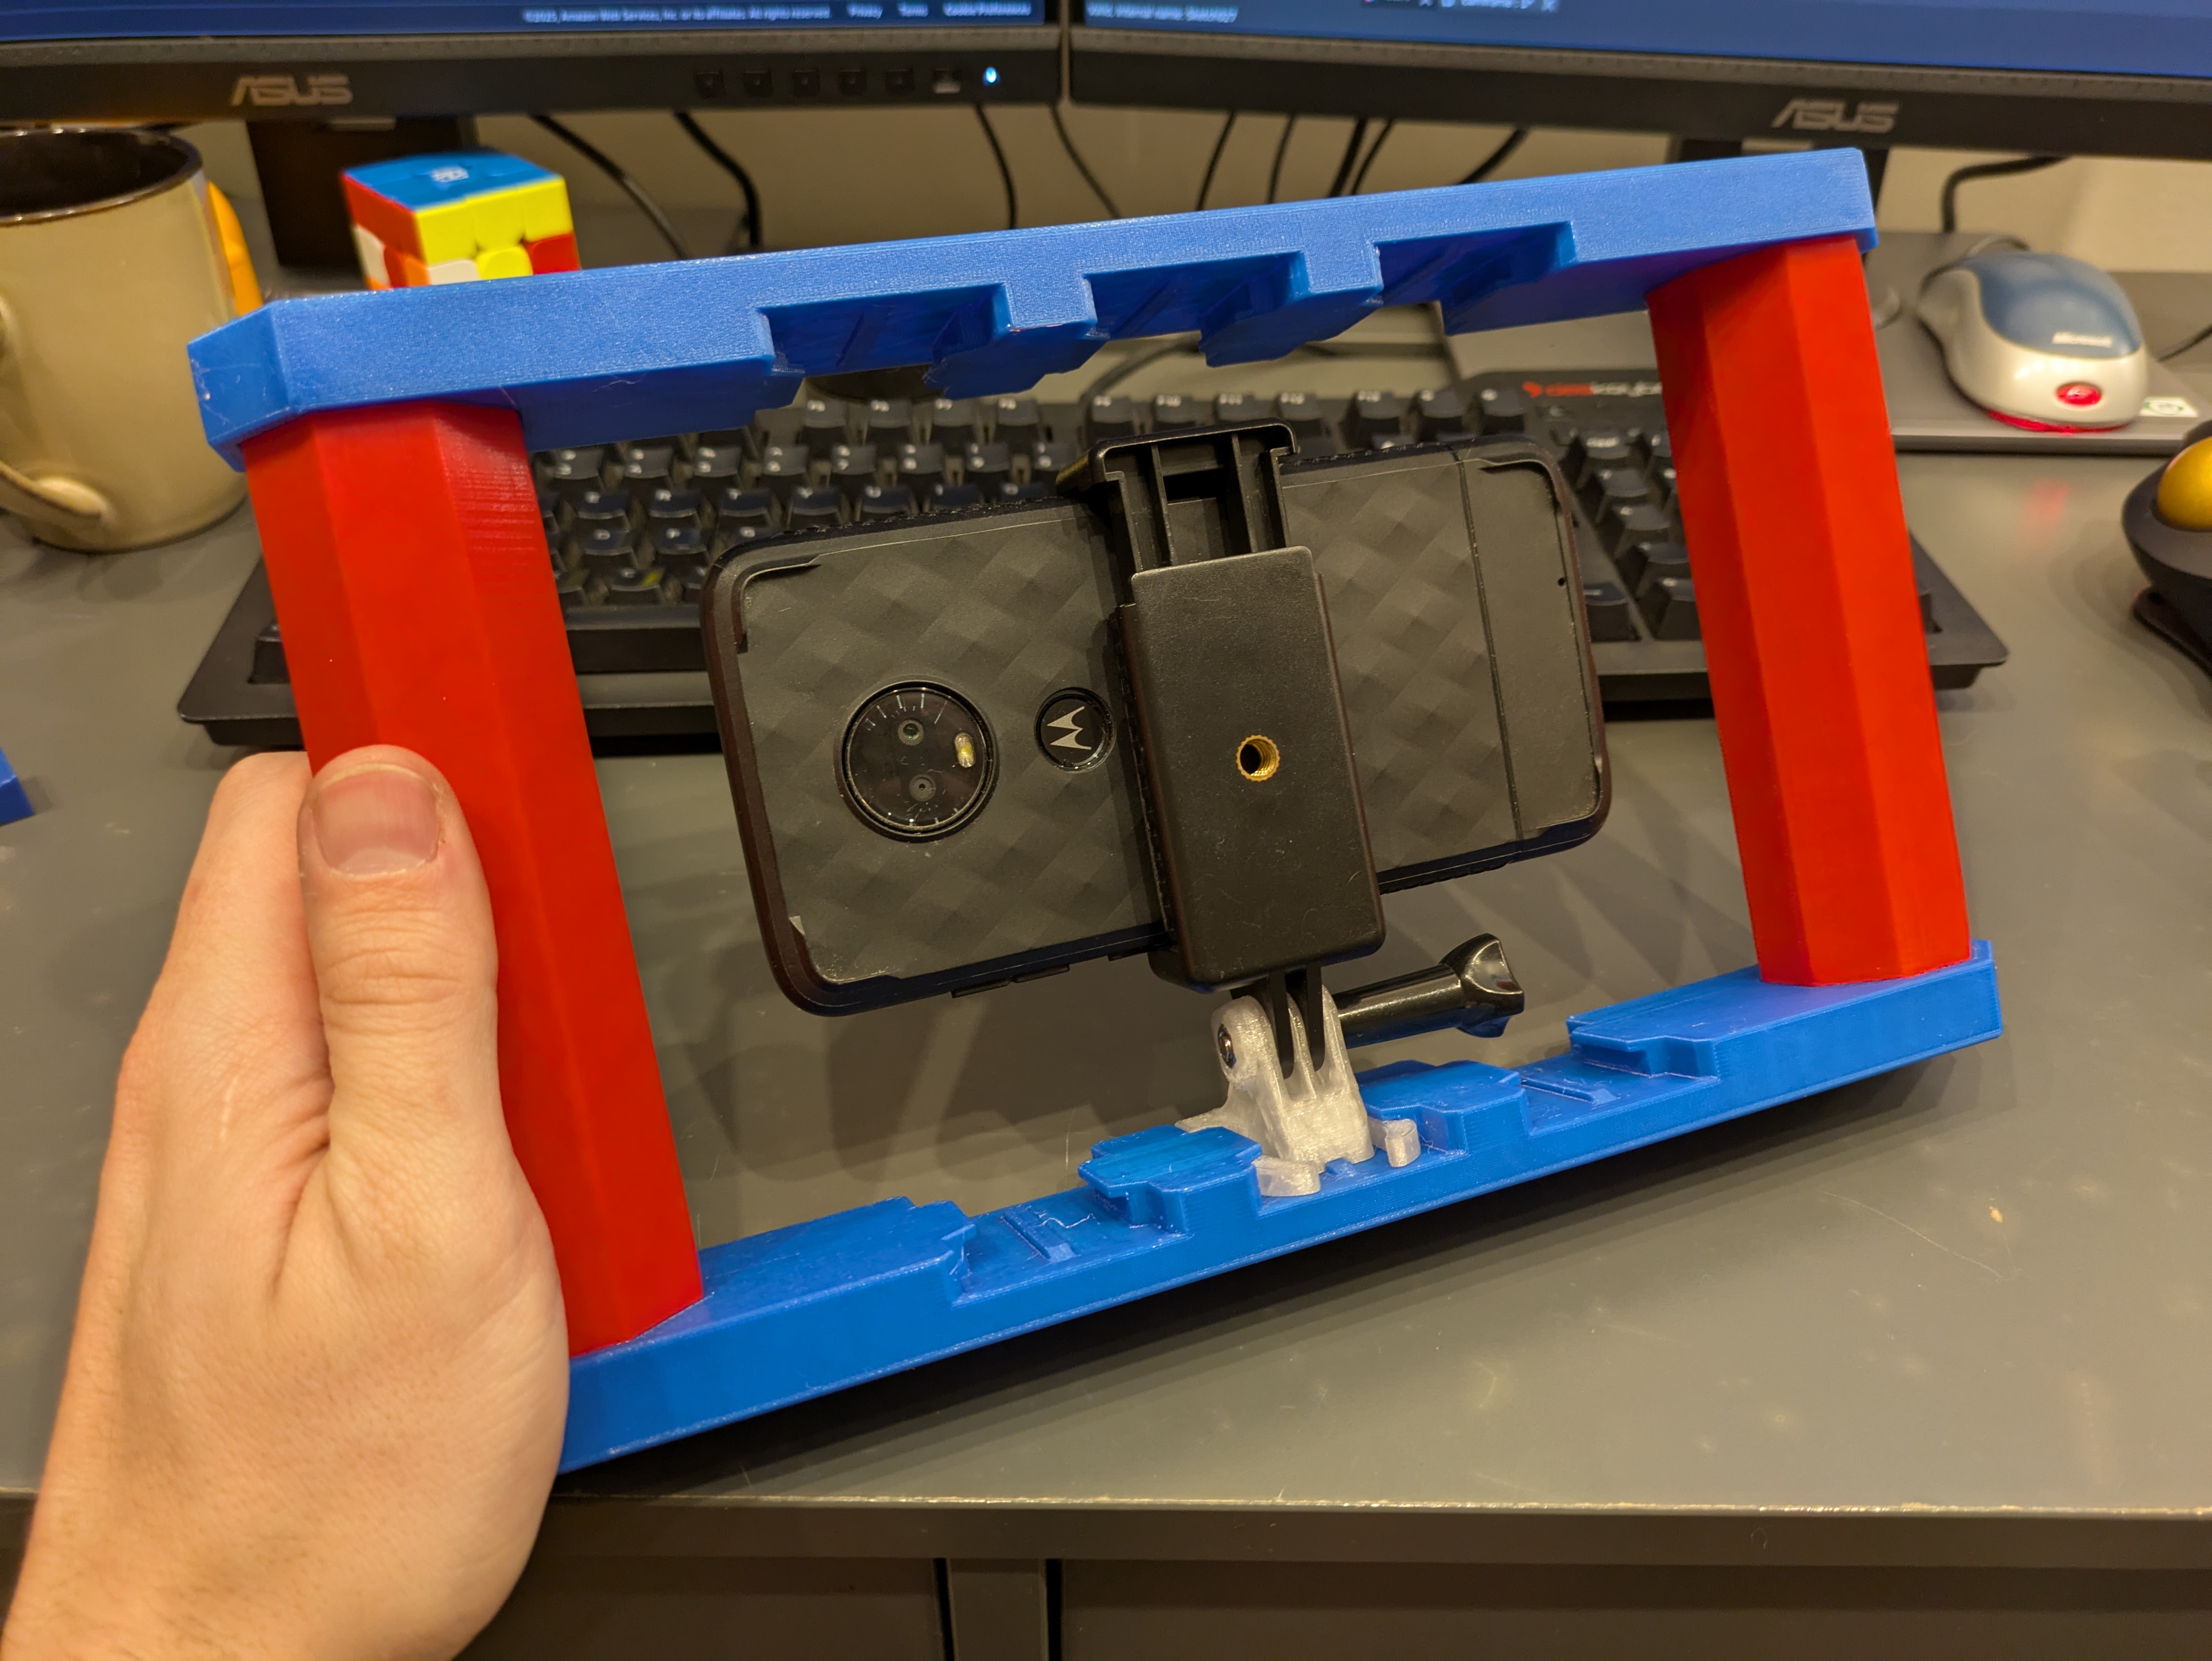
Camera Frame
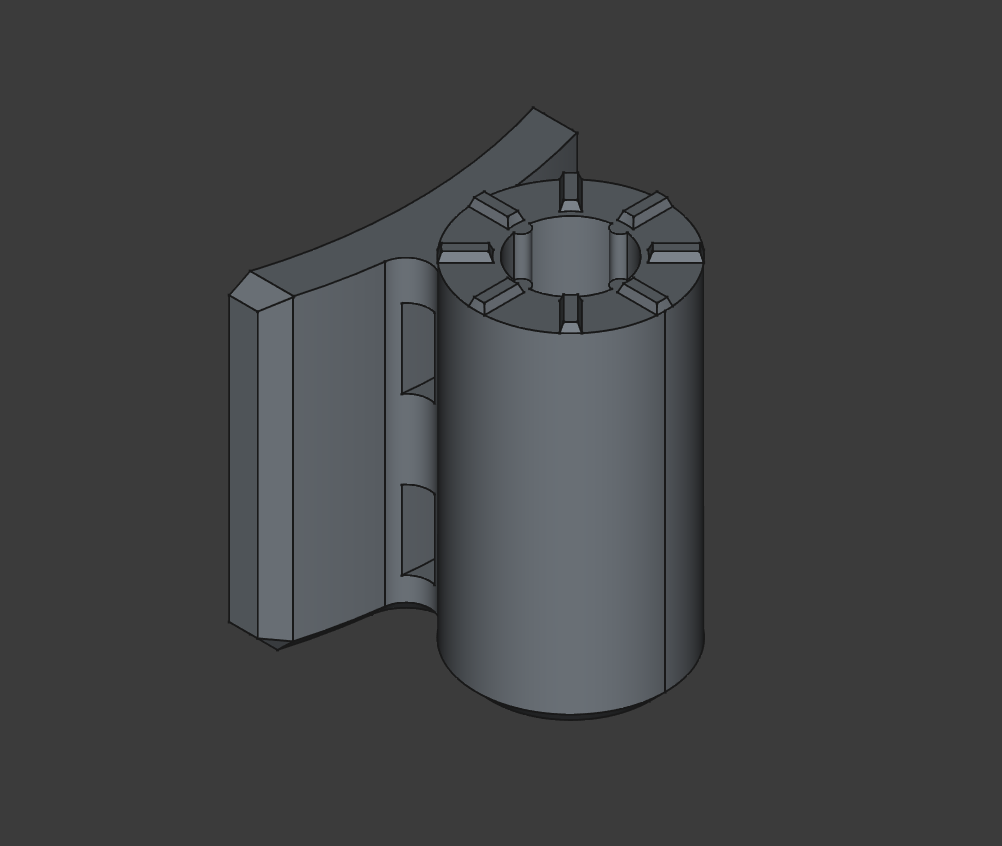
I’m including this one here because I almost exclusively use my action cameras when I’m biking. I wanted a way to hold my cameras steady for external shots (i.e. not P.O.V. helmet mounted), so I came up with this design. I really like the way this came out, although I did essentially have to completely redesign the GoPro “shoe” mounts to work with my print orientation, and by extension these pieces only work with my camera frame. You can use GoPro mounts with it, but they’re just a little too loose for my liking.
Download the 7z bundle containing FreeCAD design files and STL objects.
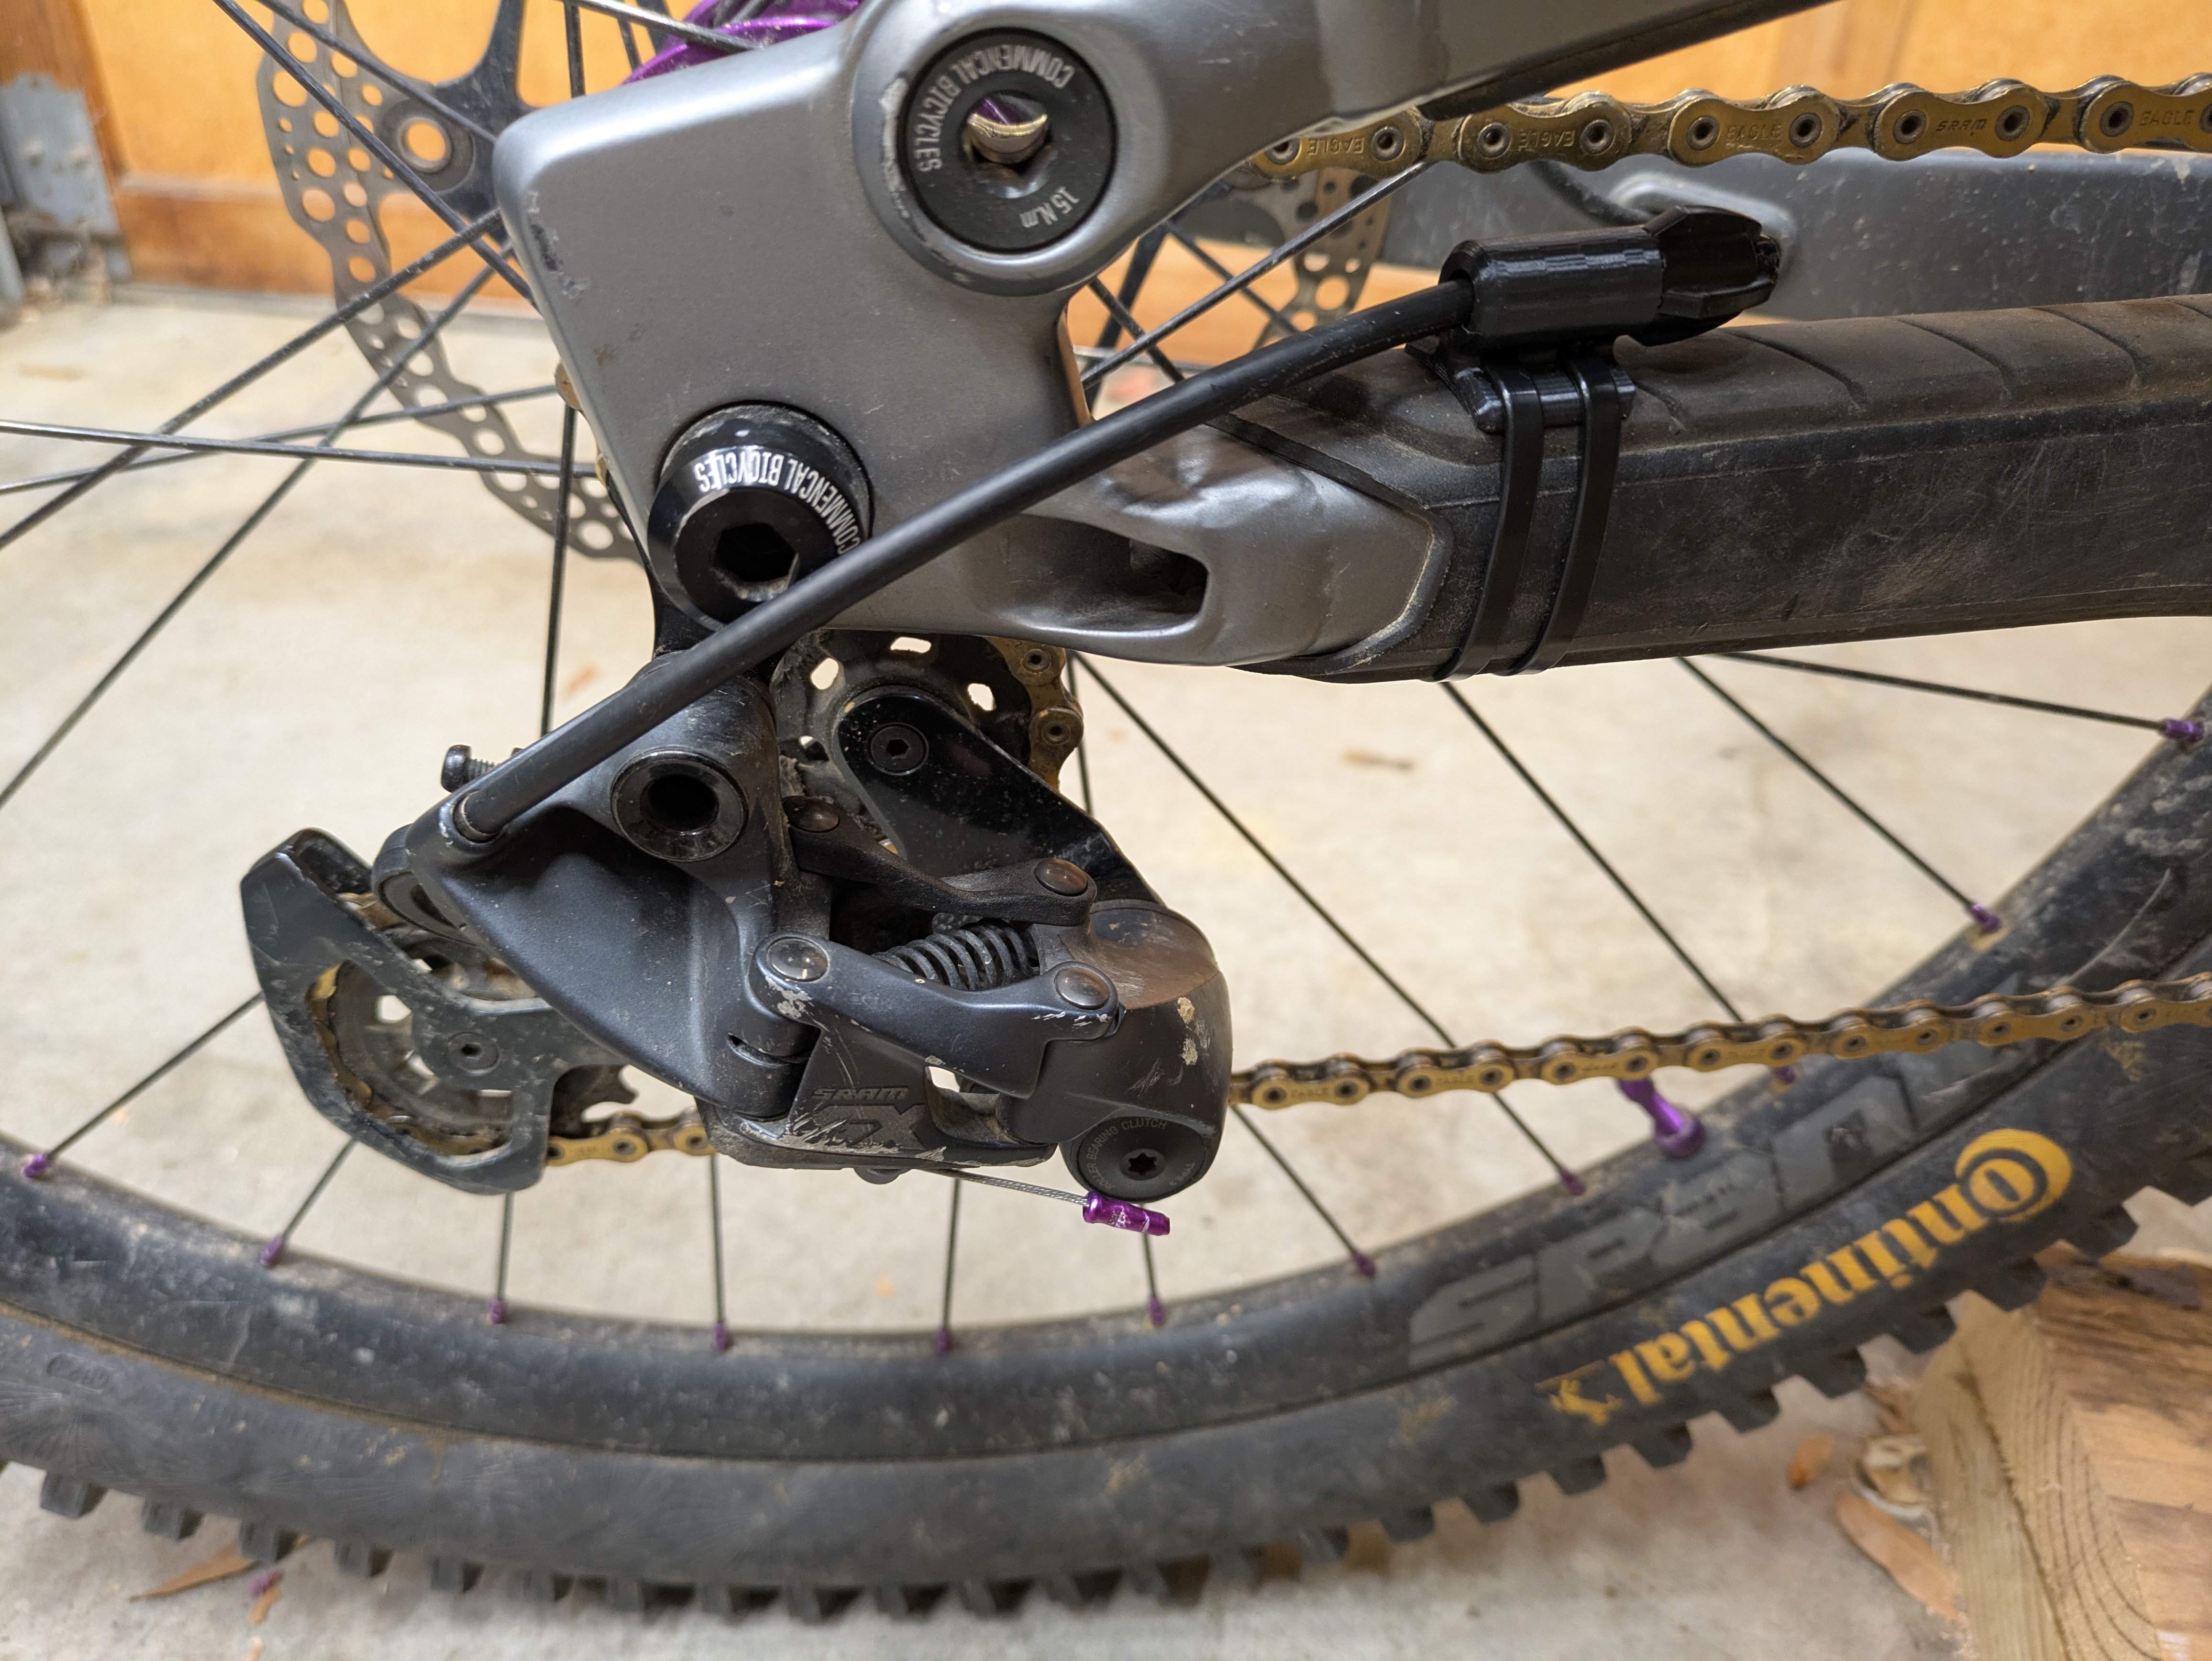
Single Speed Conversion
I’ve always liked the simplicity of a single-speed bike, especially for things like lift-access and shuttle-access parks. There’s less that can go wrong, and you never have to worry about being in the wrong gear because you’re always in the wrong gear. But finding a good chain tensioner isn’t easy. Of the two I tried, the first one dropped the chain constantly and tried to kill me at least twice. The other one simply didn’t fit. To address this lack of good options, I made this little barrel adjuster that would allow me to use my existing derailleur with a short piece of cable housing. You can do this same thing without an adjustment knob, but getting the chain perfectly aligned is so much simpler this way.
Download the 7z bundle containing FreeCAD design files and STL objects.
So Long for Now
I still have about half a dozen other 3D prints I’ve remembered as I was putting this article together but it’s already way too long for a single post so I’m going to stop it here for now. If you were like me, on the fence about the benefits of 3D printing, I can conclusively say that I’ve gotten my money’s worth and then some out of it already. If I was putting together a tier list for tools, my 3D printer sits at the coveted S-tier rank along side my collection of hand planes and my cordless drill. And that really is what I think changed my mindset the most: viewing a 3D printer as a tool, not just a toy. I hope you enjoyed reading and that you can make use of some of my designs.